Schedule a demo of LiquidPlanner with a product expert today


As a member of our Customer Success team here at LiquidPlanner, I have the pleasure of working directly with our customers through trainings, webinars and consultations. While the questions that arise from these sessions are widespread, there’s also a handful of common questions that weave their way into these sessions one way or another. I’ve compiled some of those resurfacing questions along with their answers below in hopes that you’ll find them helpful and that you might just find the answer to one of your lingering questions as well.
A while back we published a Top 10 Questions blog. Here are the latest series of LiquidPlanner questions and answers for you.
1. How do I submit new work into the Workspace?
New work can be added into the workspace a handful of ways:
- Duplicate a template – If you frequently complete similar types of tasks or projects, build them out as templates. Then, when new work comes in, simply right-click the appropriate template on the Projects tab and select “Duplicate.” Rename the duplicate copy and move it to the proper priority position in your plan.
- Email integration – Tasks can be created simply by sending an email to a specified container, like the Inbox. On the Projects tab, identify the container where you’d like the task to be created, then right-click and select “Get Email Address.” Send your email to this address and a new task will be created in the specified container. Tasks can even be created by people who are not part of your workspace if desired.
- Intake Form widget – New tasks and projects can be added to your workspace via an intake form widget on a Dashboard. First, configure the widget by selecting where in your plan you’d like the projects or tasks to be added. Then, workspace members or external dashboard guests can click on the widget, fill out the necessary information and submit. The new task or project will be added to the specified location in your plan.
- Add Menu – Use the Add Menu and select the type of plan item you would like to add. Remember you can bulk-add up to 50 items at a time from the Add dialog box.
- Import – Import your projects into LiquidPlanner from a CSV file, or from Microsoft Project using an XML file.
2. How do I know if I’m going to exceed a set number of hours for a project?
Use the Max Effort field (in the Planning section of the Edit Panel) to input the maximum number of hours you have budgeted for the project, task or plan item. Once the Max Effort is set, LiquidPlanner will alert you in two different ways:
- You’ll receive a warning alert when your tracked time is approaching the Max Effort value.
- You’ll receive an at-risk alert when the total of tracked time plus remaining hours is expected to exceed the Max Effort value.
3. My team works on multiple concurrent projects. How can I reflect this workflow in LiquidPlanner so that my tasks from different projects get scheduled together?
A: Use priority packages. Packages can be used to organize your projects, but they can also be used to create priority overrides for individual tasks to facilitate cross-project prioritization. A priority package acts as a to-do list where you can place high-priority tasks from multiple concurrent projects to reflect the order in which you’ll actually complete them. A priority package should sit above (in higher priority position) any organizational packages containing projects. By default, every new workspace has a priority package titled ASAP TASKS, but you might choose to use a few priority packages to schedule your work. A few more packages examples are:
- High Priority/Low Priority
- This Week/Next Week
- Monthly priority packages
- Sprint packages for Agile teams
Learn more about additional package structures here.
4. When I log in to LiquidPlanner, what’s the quickest way to find the tasks I need to work on next?
A: Go to the My Work tab. My Work displays active tasks and checklist items you’re assigned to, grouped by the week you’re scheduled to work on them. Items are listed in Start Date order which means they reflect the prioritization of your work from the Projects tab. This makes it easy to focus in on the items you’re responsible for and see which of your tasks need to be tackled first. You can update your tasks directly from My Work by clicking on the task title to pop open the edit panel.
5. How can my clients or executive team easily stay up to date on project status?
A: Create a Dashboard. Dashboards allow you to share workspace data in a visually appealing way so you can communicate project status to stakeholders, even if they are not members of your workspace. As time is tracked and estimates are updated, Dashboards update dynamically showing the most up-to-date metrics. This means clients and other stakeholders can check project status whenever they want and project managers aren’t constantly being asked for status updates.
Dashboards are created by adding various widget types and filtering to display key metrics from your workspace. Dashboards can display workspace information by way of comment streams, trend charts, donut charts, analytics data tables, upcoming task lists, and more. Incoming work can even be submitted into the workspace via a dashboard Intake Form widget (explained below!).
6. How do I account for the miscellaneous work I do on a regular basis, like phone calls or emails that aren’t necessarily related to a project?
We recommend setting up ongoing tasks that workspace members can use to keep track of the time they spend on overhead work like email, admin work, staff support, etc. To set these up in your workspace, create tasks to represent the ongoing work. Then, be sure to leave these tasks un-estimated and assign them to a virtual member. Workspace members can then add these tasks to their timesheet by using the “Add+” button and track time to them as needed. When using ongoing tasks, you’ll probably want to reduce your hours of availability slightly to account for the average amount of time you spend on miscellaneous work – this will keep the project schedule more accurate. Learn more about how to set these up in your workspace in our Modeling Ongoing Tasks article.
7. My Timesheet isn’t showing me the tasks I’m currently working on this week. How can I get them to display?
By default, your timesheet displays the following tasks:
- Tasks, events, or milestones you’re scheduled to start work on in the next seven days
- Tasks you’ve already tracked time to or marked “done” during the current week
- Tasks with active timers
- Tasks that you’ve manually pinned to your timesheet.
If the tasks you’re working on this week aren’t displaying on your timesheet, check that the tasks are accurately prioritized on the Projects tab.
If there’s a task you weren’t scheduled for this week but still need to log time to it, you can add the task to your timesheet via the “Add+” button. Tasks added in this manner are automatically pinned to your timesheet. To unpin them when no longer needed, click on the blue circle on the right-hand side of the task row and it will fall off your timesheet the following week.
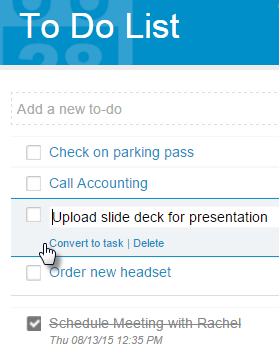
8. Where can I privately jot down notes or reminders for myself?
A: The To-Do list is the perfect spot to note down your own personal reminders. The To-Do list is located on the My Work tab and is private. Don’t worry, only you can see your To-Do list. To-Do list items don’t have any effort associated with them so if you’d like to track time for something, or estimate the remaining effort for future work, the item can be converted into a task. Just click on the to-do item and select “convert to task.” Keep in mind that as soon as it’s converted, the task can be found in the Inbox and will be visible to other workspace members at that time.
9. I have a team meeting every Monday morning. How can I model that in LiquidPlanner?
A: Set up a recurring event. To add a recurring event to the workspace, add a partial day event, assign it to everyone included in the team meeting and select the “Add Recurrence” link located below the Owners section of the edit panel. Set the event to recur weekly or bi-weekly and select a day(s) of the week. Then select a Start Date and choose whether the event should be ongoing or if it should finish on a certain date.

10. Where should I place projects that need to be built out but are not yet ready to be scheduled?
Backlog packages are essentially regular packages placed on hold. In a backlog package, anything sitting inside the project will inherit the on-hold status of the parent container. We recommend using backlog packages as a place to stage upcoming work that isn’t yet ready to be scheduled. Backlog packages are also great for storing templates, how-to guides, your LP Playbook or any other items that don’t need scheduling.
If any of these FAQs trigger other questions, we’d love to hear from you!
If you haven’t tried LiquidPlanner, but your antennae are raised, register for a 30-minute demo with one of our product experts. They’ll help you assess if our software is a good fit for your teams’ needs.