 Schedule a demo of LiquidPlanner with a product expert today

Commenting within LiquidPlanner helps cut down on meeting time and moves conversations out of email, where threads are easily lost and disconnected from the task work.
- Comments can be added via the plan item’s Edit Panel, the workspace activity stream on Home, your timesheet, or email integration.
- Comments can include any rich-text content, including images.
-
Commenting supports tags. Entering a hashtag (#) directly followed by a new or existing tag name will add that tag to the plan item.
Address Comments
- Comments can be addressed to specific workspace members using the @username format. In addition to making it clear that you are speaking directly to that person, the addressing format will drive an email notification to the person letting them know about the comment, provided they have “Add comment” option checked in their Personal Notification Settings.
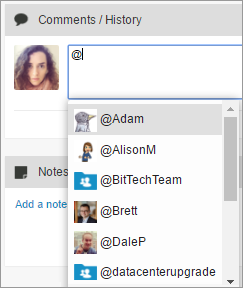
- You can address comments to an individual, multiple workspace members, Teams, Project Teams using a project @alias, or all workspace members. For example: @Charles, or @Mary @Sara, or @DevTeam, or @ClientVideoProject, or @All.
- The helpful members picker makes it easy to choose the right individuals or teams and ensures proper formatting when user names are selected.
Add Comments In The Edit Panel
This is one of the most common ways to add a comment:
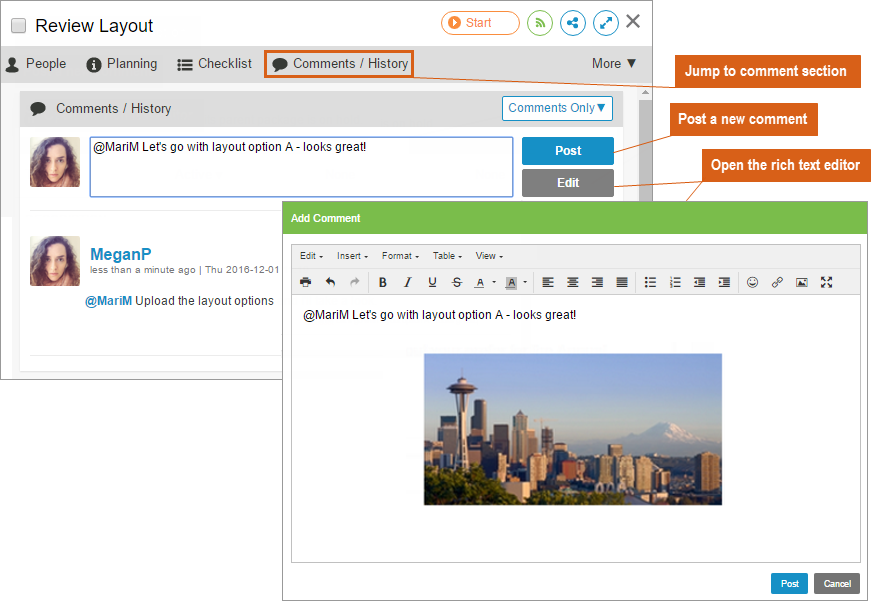
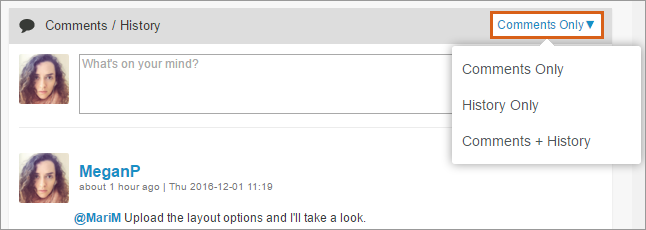
Viewing Comments in the edit panel
Use the dropdown menu in the Comments/History section to select a view. Get up to speed on all the changes and conversations being had around your work and choose to view Comments Only, History Only, or together with Comments + History.
Comments In The Activity Stream
The Home tab aggregates recent updates and commenting across all items in the workspace. Reading through the workspace activity stream is a great way to stay connected, and up to date on the most important conversations going on in the workspace.

- Comments are threaded by plan item. The most recent comment added to the workspace will be at the top, and it will be grouped with other recent comments for that same plan item.
- See comments along with all recent updates or focus in to see only comments by checking the box for Show Comments Only.
- Hover over a comment to view the comment options (Reply All, Reply, Edit, or Delete).
- Use the toggles above the stream to narrow comments down to just those that are of interest to you:
- All – all recent updates and comments across the workspace
- Following – recent updates and comments on items that you are following (including items within containers that you follow)
- My Items – recent updates and comments on items that you own
- My Comments – recent comments that are for you or from you. Here, comments are presented individually, in chronological order. Use the menu picker in the upper right corner of this stream to filter comments to Comments To Me, Comments From Me, or All Comments.
View Project Comments
It’s possible to view all of the comments for a specific project- without opening the project folder to view individual plan items. All you need to do is check the “include subitems” box on the project edit panel. Comments will display on the project folder threaded by plan item, the same way they display on the workspace comment stream.
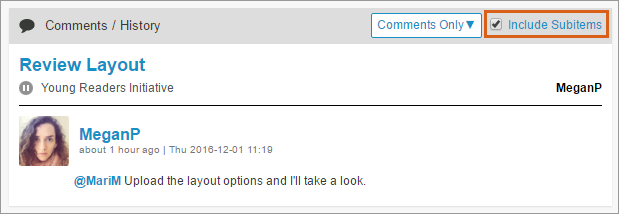
The “include subitems” check box appears on every container – project, sub-folder or package.
Person Summary
View the Person Summary by clicking on a member’s name in a comment in the following locations:
- Comments in the edit panel comments section
- Comments in the activity stream on the Home tab
- Comments in a comments widget on a Dashboard
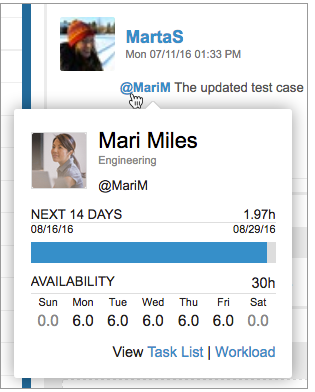
The summary displays member availability and capacity over the next 14 days. In the utilization bar in the pop up, blue represents hours scheduled and grey represents hours available in the next 14 days. Below the utilization bar, the availability section displays how many total hours of availability they have per week as entered in their profile settings.
Task List jumps to that person’s upcoming tasks on the My Work tab and Workload jumps to the Resource Workload report filtered to that person and their team.