 Schedule a demo of LiquidPlanner with a product expert today

Project Portals allow you to share project work with external clients or stakeholders, and collaborate with them in a secure way. Any project folder in LiquidPlanner can have its own project portal, and portal guests do not require a paid license.
Use project portals to:
- Keep clients and stakeholders in the loop on projects without having to spend hours creating separate status reports.
- Exchange files, comments, schedules, and notes on projects in a centralized place.
- Manage external collaboration on multiple projects from within one workspace, keeping a single centralized schedule and record for your internal team.
Here are some key things to consider when deciding if it’s appropriate for someone to be a portal guest instead of a main workspace member:
- Portal guests see only specific tasks that you choose to share with the portal. They have no visibility into your workspace.
- Portal guests see only a project-level schedule status, plus a subset of key schedule data at the task level (remaining efforts, expected finish dates, & deadline dates). To share more schedule detail with the portal, you can attach a static PDF snapshot of your plan to the blue project folder so that it will be visible in the corresponding portal.
- Portal guests can own tasks, and even create them; but they can’t estimate their tasks or log progress against them. A workspace member must estimate and log progress on behalf of a portal guest.
- Portal guests don’t have timesheets, so progress logged on behalf of a portal guest will not be accounted for in timesheet data export. It will be accounted for in the project plan and all reports.
- By default, a portal guest is an overdrive resource, but you can turn off overdrive via the portal guest’s profile on the People page. A portal guest is assumed to have 8 hours of availability M-F, and there is no way for you to change that.
- Portal guests can participate fully in these collaboration features: comments, notes, links, attachments & email notifications. Anything they add in the portal will be visible to all other portal guests and all workspace members.
- If a portal guest belongs to more than one portal, they will toggle between different portals in order to access their work. There is not a consolidated view for them to see all of their work across all of their portals.
- If privacy is a concern but these functional limitations are prohibitive, you can instead create Restricted Members in your main workspace.
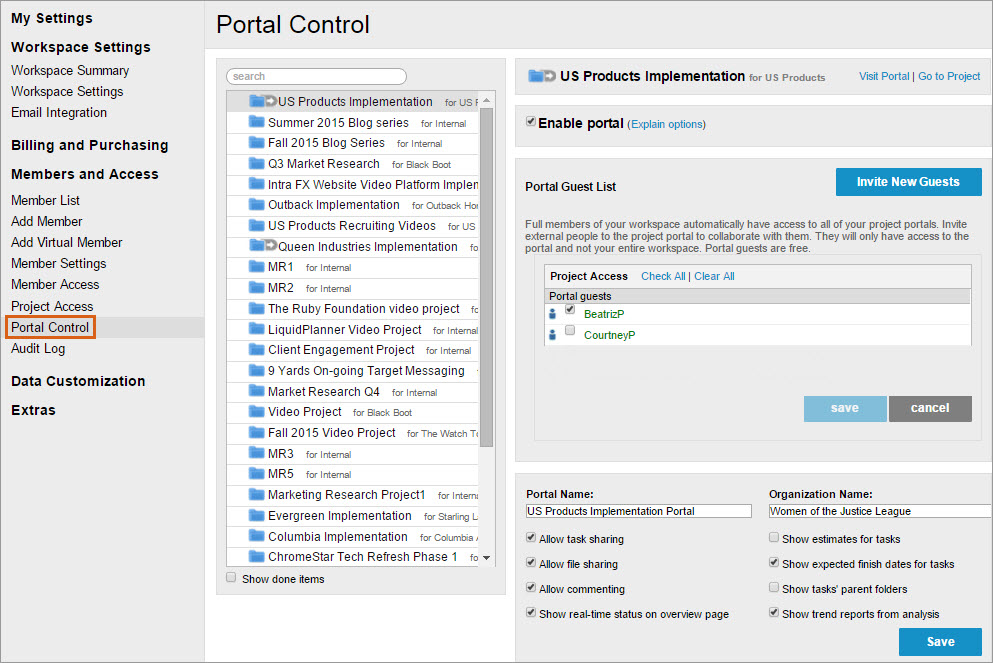
Setting up a Project Portal
- Go to your User Menu > Settings > under Members and Access, select Portal Control or open the project edit panel, click the gear icon in the top right corner and select Portal Control.
- Select the appropriate project on the left.
- On the right side of the page, check the ‘Enable portal‘ box.
- Enter the names of your portal and organization.
- Confirm the types of information you’d like to share by checking the boxes. When you uncheck the box next to any of these items, that category of information will be removed from view in the portal. You can reinstate it by checking the box again.
- Upload your company logo (this will be displayed on your project portal)
- Upload your client’s logo and it will be displayed on the project portal. It can serve as a visual cue to portal guests that they’re in the right place.
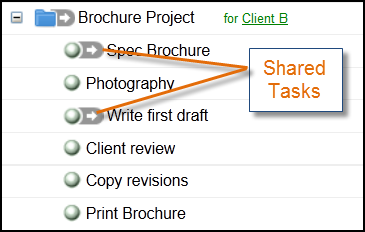
In your plan, a project that has a portal enabled for it has the shared icon next to, as does each task that has been shared with the portal:
Enabled portals are viewable by all non-restricted workspace members and any portal guests you’ve invited into the portal. Restricted members will only see a portal if they have been granted access to the associated project.
Sharing Project Data with a Portal
After you’ve enabled your portal, it’s time to share specific information with it.
Project-level information
- By default, content from the project folder’s Edit Panel will show up in the portal Details page. To share a PDF snapshot of your project with portal guests, attached the PDF file to the project’s Edit Panel.
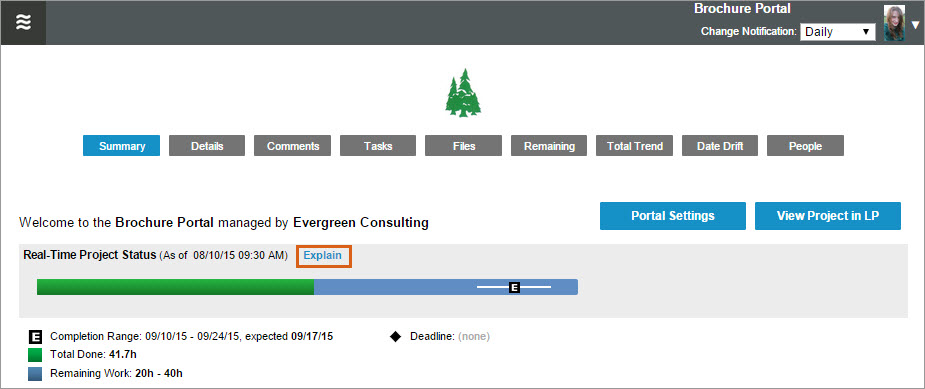
- If you have enabled sharing of the real-time project status, the project’s deadline date, remaining effort, total done, completion date range and estimated finish date will be visible on the portal Summary page.
Task-level information
- Only tasks that you specifically mark as shared will be visible on the portal Tasks page.
- To share a task with the portal, open the task Edit Panel and check the ‘Shared on Portal?’ box. Note that you can multi-select more than one task first, then share them all at once.

- In your plan, a task that has been shared with the portal will have the “shared” icon next to it.
- All comments, notes, documents and links for a shared task will be visible in the portal.
Inviting First-Time Portal Guests
First-time portal guests must be sent an email invitation:
- Go to your User Menu > Settings > under Members and Access, select Portal Control.
- Select a portal-enabled project on the left, then click the ‘Invite New Guests‘ button on the right.
- Enter the email address and click Next.
- Put a checkmark next to all of the portals you want this person to access.
- Click Send Invitations.
- The email invitation will include a link for that person to create and activate their LiquidPlanner sign-in. When they do sign in, they will automatically land in the project portal.
Managing Portal Access for Existing Guests
If a person is already a guest in one portal, you can easily grant them access to additional portals, or revoke access to portals as necessary:
- Go to User Menu > Settings > under Members and Access, select Member Access.
- Select the portal guest on the member list to the left.
- Check, or uncheck, the specific portals on the right to grant or revoke access. Take advantage of the ‘check all’ & ‘clear all’ options if appropriate.
- Click Save.
Navigating a Project Portal
Your portal guests do not need prior experience with LiquidPlanner to use the portal! To help them get up and running as quickly as possible, direct them to the ‘Explain’ link in the portal, which takes them to an article we wrote specifically for them: Navigating a Project Portal. You’ll want to read that article as well, to understand exactly what your portal guests see.
Portal guests navigate through the project portal by clicking on a series of page icons:
Disabling a Project Portal
- Go to User Menu > Settings > under Members and Access, select Portal Control.
- Select the appropriate portal-enabled project on the left, then uncheck the ‘Enable portal‘ box to the right.
- After you disable a portal, you’ll see that the portal/shared icon no longer appears next to the Project folder itself. However, in the schedule view, individual tasks that had been shared with the portal will still be marked as shared. This allows you to easily re-enable the portal at any time without having to re-share the individual tasks. You can unshare the tasks by multi-selecting them, then uncheck ‘Shared on Portal?‘.
Related Articles
Navigating a Project Portal
Restricted Members
Overdrive Scheduling
Project Portal FAQs