 Schedule a demo of LiquidPlanner with a product expert today


There are three important steps to setup and configure your workspace.
- Create your First Project and then add the active projects your team will be working on when you roll out LiquidPlanner.
- Prioritize your Projects using Packages to create a workspace structure that ensures your priorities are reflected in the schedule.
- Customize Your Project Data so you can forecast and analyze results through Dashboards and Reporting.
You’ve arrived at step two, Prioritize your Projects. This step in setting up the workspace introduces the most common package structures that can help you prioritize your projects and tasks.
Need a refresher? revisit Create your First Project.
Ready to advance? jump ahead to Setup Project Data.
Packages
![]() LiquidPlanner uses an item called Packages to help you prioritize work in two ways:
LiquidPlanner uses an item called Packages to help you prioritize work in two ways:
- Prioritize your workflow. For example: the Active Projects package is prioritized higher than Pending Projects. Or a 2023 Projects package is prioritized above a 2024 Projects package.
- Prioritize individual tasks from low priority projects (to learn more read about the ASAP package)
Packages are also subject to LiquidPlanner’s “top-to-bottom” priority-based methodology.
Status Model Package Structure
The Status Model is the most common package configuration because it provides quick visibility into active vs. pending projects. This model also naturally reinforces listing projects in priority order from top-to-bottom, which is a key aspect of priority-based scheduling.
Inbox
The Inbox is at the top of every workspace and can be used as part of your project intake process. Items in the Inbox are unscheduled, so you can build out new tasks that need review prior to being scheduled and prioritized in your plan.
Events
Keep the events your team is using to block time out of the schedule for meetings, holidays, and vacations in this package. Unlike tasks, events will always be scheduled for the date and time that you set, regardless of where they’re placed in the plan hierarchy. We recommend keeping PTO grouped together in the Events package so it’s easy to see who is out of the office.
ASAP
LiquidPlanner’s priority-based scheduling methodology will schedule your tasks in order from top to bottom by default, but sometimes tasks from projects listed lower in the workspace will need to be done before tasks listed higher up in the workspace. Use the ASAP package to manage your to-do list. Package up tasks from multiple concurrent projects to schedule them in the order they need to be completed.
Active Projects
Keep the projects your team is actively working on in a package called “Active Projects”. Be sure to list them in priority order so LiquidPlanner schedules them accordingly.
Pending Projects
This is where you’ll keep any projects that have not started yet, or perhaps the project is still being scoped. You can rename this to “Planned Projects” or “Awaiting Approval”. Pending Projects is placed below the Active Projects packages so that LiquidPlanner schedules all tasks assigned in the Active Projects package first. You can also keep the Pending Projects package On-Hold.
Templates
If you have projects with the same tasks and phases, create a template version of those projects and keep them in the Templates package. When a new project is approved, just duplicate the template, drag and drop it to the appropriate place in the plan.
Avoid Category Packages
It can be natural to use Packages to categorize your projects by team or project type, but it is not recommended. Since Packages must also be placed in top-to-bottom priority order, setting up packages by category will result in your highest priority projects being inaccurate.
In the example below, the package structure organizes projects by Team Category. Notice that the R&D projects are prioritized above the Engineering package. This is problematic if you have shared resources working on projects across both teams. LiquidPlanner will assume team members should work on their R&D projects first, before working on their Engineering projects below.
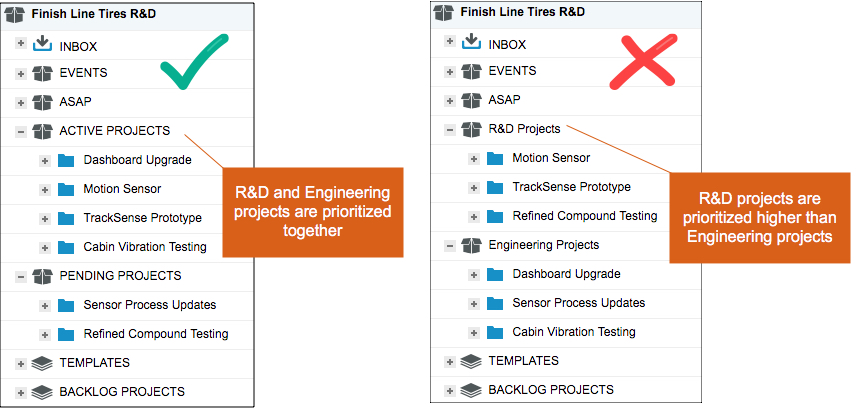
Pro Tip: Instead of categorizing your Projects using Packages, use Custom Fields instead.
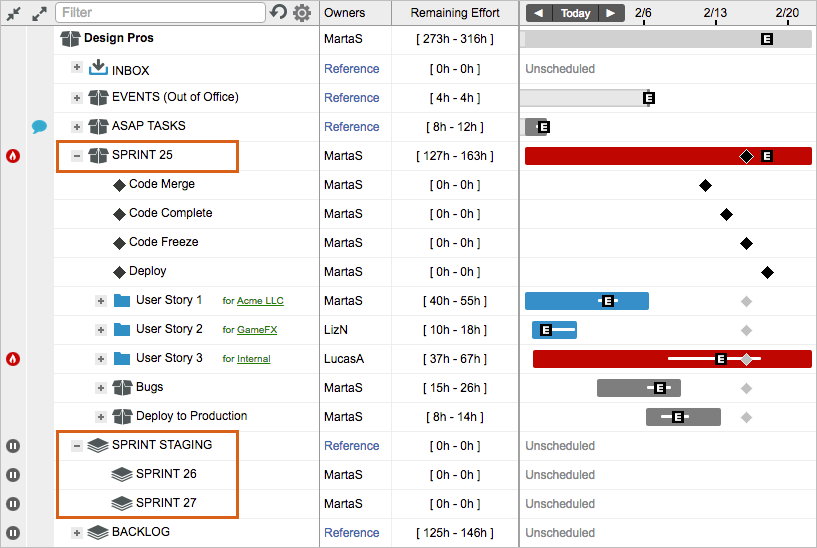
Sprint Package Structure
If you’re an Agile team, you can configure your workspace using our sprint package structure.
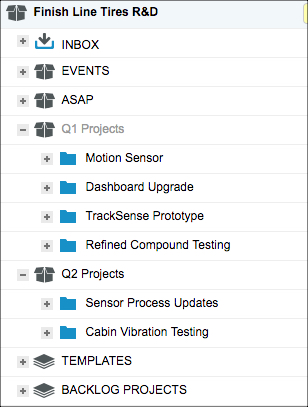
Time Based Structure
You can also set up packages to organize your project workflow in time-based packages. For example, prioritizing your projects quarter-by-quarter or year-to-year.
You’re ready for step three
Once package structure is established, your team’s priorities will be reflected in your project schedule. The last step for setting up your new workspace is configuring settings to capture project data using custom fields, activities, teams, and more. Learn how to Customize Your Project Data so you can analyze results through Dashboards and Reporting.
At the end that article you’ll find an Onboarding Webinar covering best practices for setting up your workspace, and the most important things your team can do to keep the schedule up-to-date.