 Schedule a demo of LiquidPlanner with a product expert today
Dependencies and Wait Time are on the Edit Panel Scheduling tab. From there you can see a list of Predecessors and Successors linked to a plan item, add or remove Dependencies and enter Wait Time. In Priority and Grid views, use the Right-Click or 3-Dot menu to create dependency chains or remove dependencies.
| 1 |
Predecessor and Successor Dependencies # |
![]()
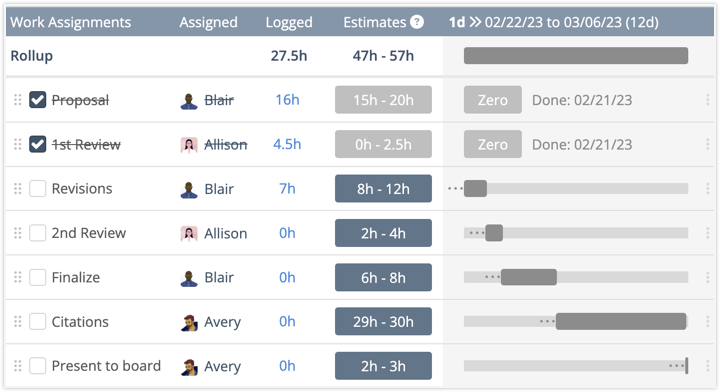
LiquidPlanner supports finish to start dependencies on all plan items: Packages, Projects, Sub-Folders, and Tasks. Items with dependencies are designated by the “Has Dependencies” icon. Dependency indicators next to schedule bars show whether plan items have predecessors, successors, or both.
Predecessors: need to finish before this item can start.
Successors: start after the this item’s schedule status is “Done.”
Dependencies can also include Wait Time to model a waiting period after the predecessor dependencies are satisfied and before starting the successor.
Be sure to mark work done to satisfy dependencies and keep everything moving along!
Dependencies are very common in project management, but you may find that the priority-driven schedule you’re creating in LiquidPlanner requires fewer tasks and dependencies to sequence work.
Read more to learn why that’s true. . .
Fewer Tasks
Fewer tasks are necessary because multiple assignments can be set up on a single task.
Individuals can map their work across a series of assignments on one task.
Collaborators can pass work back and forth over multiple assignments on the same task.
Within the Task there’s a setting to Schedule In Order which ensures assignments schedule one after the other as if a dependency were in place. There are Dependency Indicators on assignment schedule bars when the setting is used.
Change the assignment order by using the 6-dot grab handle on the left to drag them up or down the table. Use the 3-dot menu on the right to add or remove assignments.
Fewer Dependencies
Fewer dependencies are needed in a priority driven schedule because tasks assigned to the same person automatically schedule one right after the other. When one task is marked done, the next one is automatically served up for you.
| 2 |
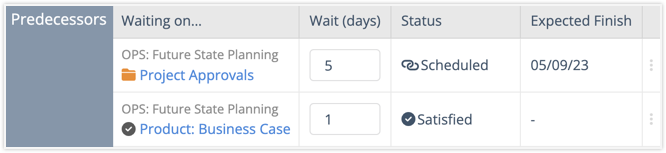
Dependencies on the Edit Panel Scheduling tab # |
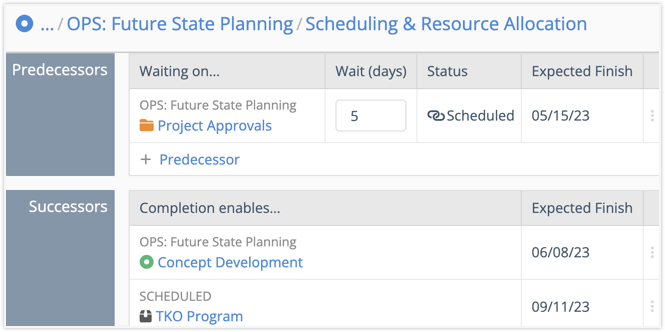
To see Predecessors and Successors listed on the Edit Panel Scheduling tab click on the “Has Dependencies” icon or the schedule bar. Wait Time, Dependency Status and Expected Finish are also shown.
Linked plan items are in the first column. The icon on the left indicates the plan item type (Package, Project, Sub-Folder or Task). It’s location is provided in gray above the plan item name.
Clicking on a task link opens the Edit Panel. Clicking on a Package, Project or Sub-Folder link navigates away from the current plan item and into the container’s list view.
Read about Predecessor Status and Expected Finish . . .
Predecessor Plan Items
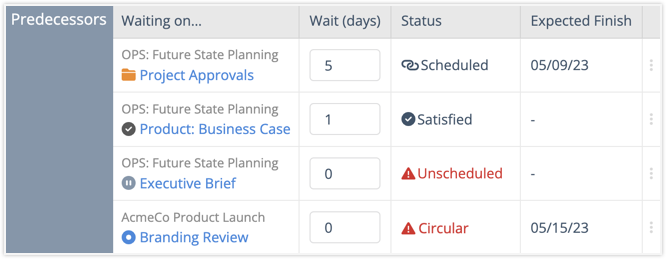
The Predecessor Status column displays the dependency status.
Scheduled: Predecessor is active
Satisfied: Predecessor was marked done
Unscheduled: Predecessor is not scheduling because it is on hold
Circular: Predecessors and Successors have been linked so that they are dependent on each other.
Expected Finish Column (Predecessors & Successors)
The Expected Finish date is supplied for Predecessors and Successors.
This is the linked plan item’s Expected Finish Date. If the plan item has a Target Finish date set to Stop Scheduling, then this is the Target Finish date.
| 3 |
Add Dependencies from the Edit Panel # |
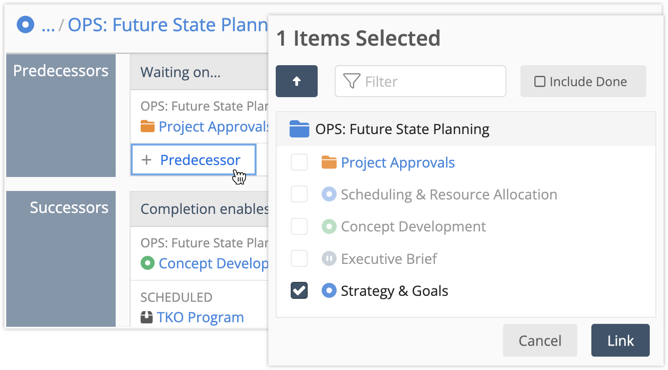
The Edit Panel Scheduling tab offers the greatest flexibility for creating dependencies. From here you can create simple dependences between a few plan items, or more intricate dependencies across packages, projects and nested sub-folders.
Select either +Predecessor or +Successor and when the modal opens, check the boxes next to items you want to link. Items are grayed out when a dependency is already in place.
Use the filter at the top to find an item by name.
Check the box to “include done items” if you need to link an item that has been marked done.
Navigate to other plan items using the arrow at the top of the modal.
Link creates the dependency and closes the modal.
TIP: Linking to a Sub-Folder, Project or Package creates a dependency that includes all the items in the container. When everything inside is marked done, the container also needs to be marked done in order to satisfy the dependency and move on to the next plan item.
| 4 |
Wait Time # |
Wait Time tells the scheduling engine how many days to wait after the predecessor dependencies are satisfied before starting the successor plan item. Click into the Wait (days) column and enter the number of days.
When the Predecessor Status is “Satisfied” it means the item was marked done and the scheduling engine is counting down Wait Time. If there are multiple Predecessors with Wait Time, scheduling for the Successor starts when all of those items are marked done and their waiting periods are over.
Wait Time in your Schedule
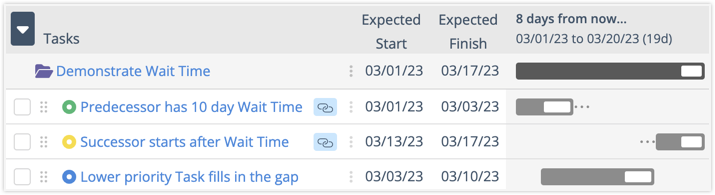
Wait Time creates a gap between the Expected Finish date of the Predecessor and the Expected Start date for its Successor. Predictive Scheduling fills in lower priority work until the Wait Time period ends.
| 5 |
Create Dependencies while in Priority and Grid Views # |
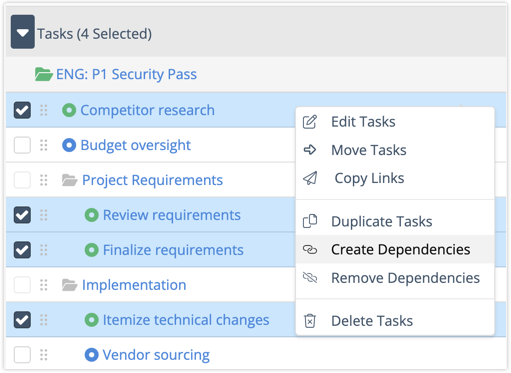
In Priority and Grid views there’s an option to “Create Dependencies” from the right-click and 3-dot menus. Check the boxes next to items that you want to include and “Create Dependencies” chains them together in top-down order.
To select a block of plan items check the box next to the first one, then hold down the shift-key while selecting the last one.
| 6 |
Use Dependencies to sequence work in phases # |
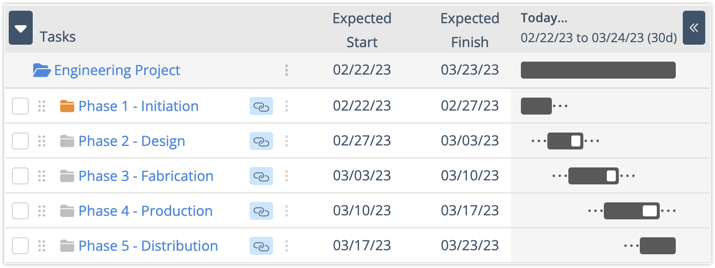
Dependencies are very useful for sequencing work in phases. To manage phases within a project create a Sub-Folder for each phase and add tasks. Create a dependency chain so each Sub-Folder is linked, one after the other.
When a phase is completed, mark its Sub-Folder done so the next phase can begin.
| 7 |
Removing Dependencies # |
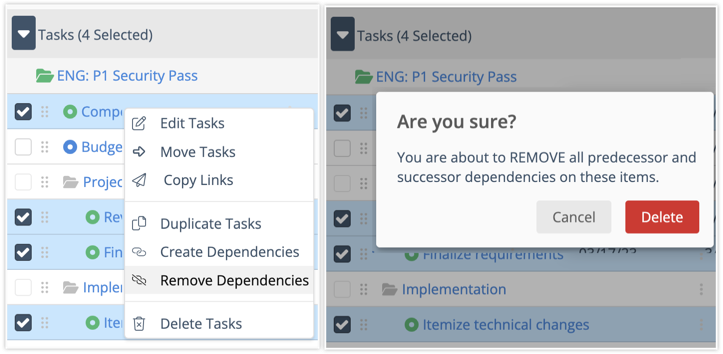
Dependencies can be removed while you are on the Edit Panel Scheduling tab or while in Priority and Grid views. In the views you need to check the boxes next to plan items and select Remove Dependencies from the right-click or 3-dot menu.
Removing dependencies while on Priority and Grid views removes all of them from the plan item. A warning displays asking you to confirm your choice.
If you are unsure about all the items that may be linked, look at the Predecessor and Successor lists on the Edit Panel Scheduling tab.
Read about removing them via the Edit Panel and managing deleted dependencies . . .
Edit Panel Scheduling tab
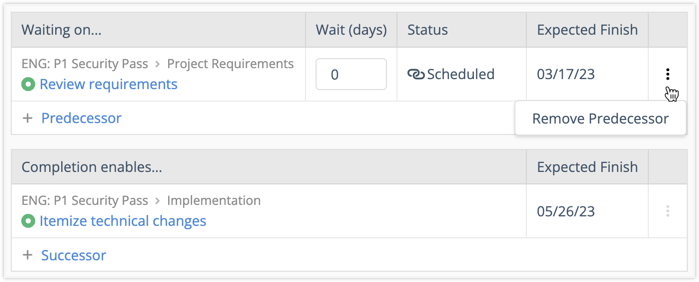
Use the 3-dot menu on the Edit Panel Scheduling tab to remove a Predecessor or Successor.
Deleted Plan Items
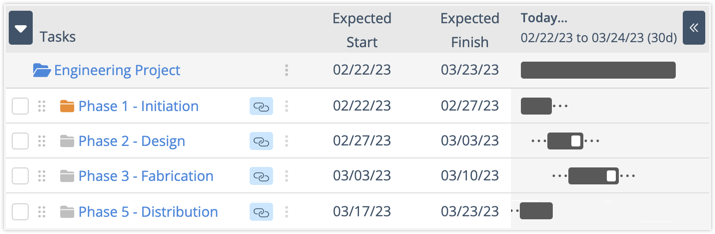
When a Predecessor or Successor is deleted from the workspace, it’s removed from the Dependency list on the edit panel. Deleting a Predecessor plan item breaks the dependency chain and Successor items schedule based on their priority position.


