 Schedule a demo of LiquidPlanner with a product expert today
The Bulk Editor allows you to edit or move up to 50 plan items at time while in Priority and Grid Views. Bulk Edit and Move plan items by checking the box to the left of a plan item to engage the Bulk Edit Action Buttons at the top of the view.
| 1 |
Select items for editing in Priority & Grid views # |
Bulk Edit and Move multiple plan items at once in Portfolio, Package, Project and Grid Views. Check the box to the left of a plan item to engage the Bulk Edit Action Buttons at the top of the page. Hover over a button to see what it does.
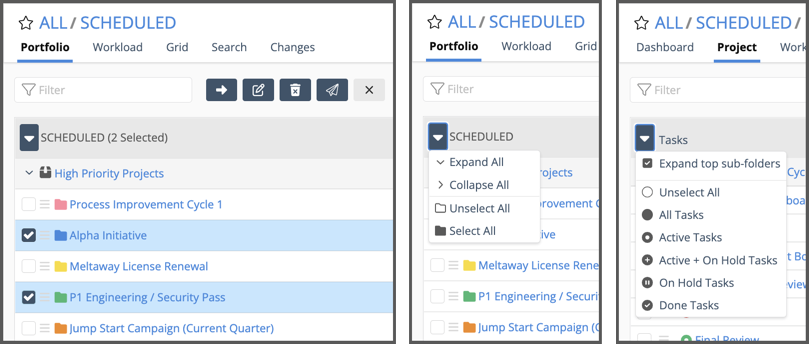
You can check boxes one at a time, or use one of the following methods to select multiple items at once.
Select a block of items by checking the box for the first item, then hold down the Shift key while selecting the last one.
Select Projects using the drop down menu to Select All or Unselect All while in Portfolio view, Package views and Grids set to Projects.
Select Tasks by status with the drop down menu in Project View and Grid views set to Tasks. In Project view, check the box to Expand top sub-folders and include nested tasks in your selection.
Each of the buttons are explained below. To learn about moving items, scroll down to the last section.
| 2 |
Bulk Editor Action Buttons # |
Checking boxes to the left of the item name engages the Bulk Editor and reveals action buttons at the top of the view.
Actions for Editing Projects or Sub-Folders
![]()
Move, Edit, Delete, Copy Link, Clear Selection.
Actions for Editing Tasks
![]()
ASAP Scheduling, Task Status, Move, Edit, Add Assignment, Swap Assignments, Delete, Copy Link, Clear Selection.
Actions for Editing Assignments in Grid View
![]()
Edit, Swap Assignments, Delete, Clear Selection
| 3 |
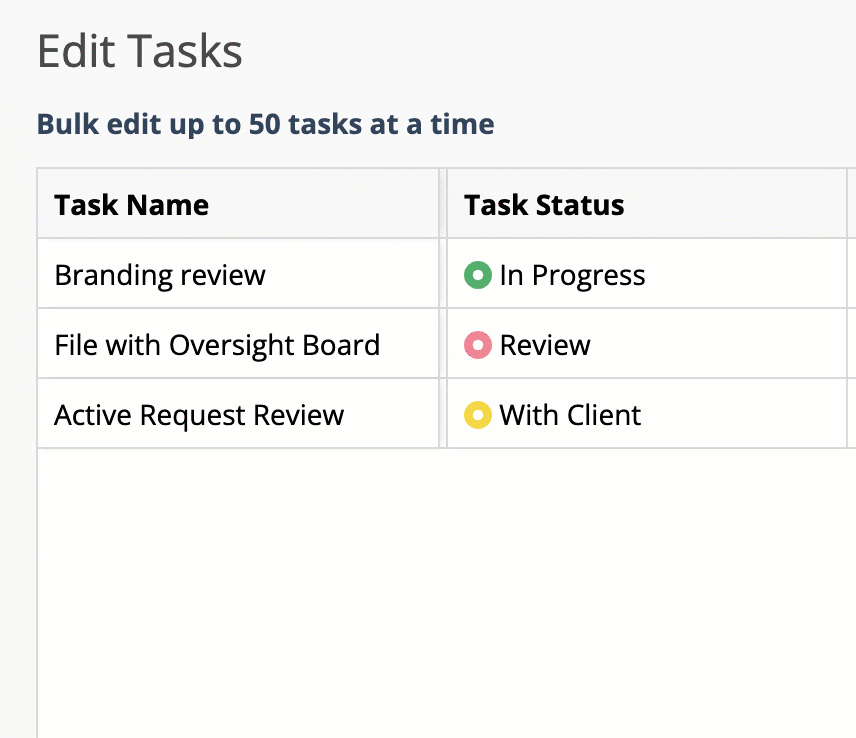
Bulk Edit up to 50 items at a time # |
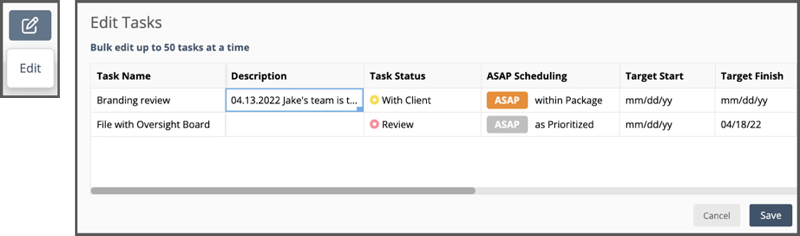
Use Edit and update 50 items at a time. Items must be the same plan item type (either projects, sub-folders or tasks). Adjust the view in the modal by changing column widths. Scroll to the right to see more columns. Click into a field to edit. Saving your changes closes the Editor.
The following fields can be edited:
Edit Projects or Sub-Folders: Name, Description, Schedule Status, Target Start, Target Finish, At Finish, Data Fields.
Edit Tasks: Task Name, Description, Task Status, ASAP Scheduling, Target Start, Target Finish, At Finish, Assignment Scheduling, Task Data Fields.
Edit Assignments: Assigned To, Assignment Done, Low Estimate, High Estimate, Cost Code, Tracking Only.
Data Fields are available in PROFESSIONAL and ULTIMATE Plans.
Editing is disabled when more than 50 items are selected. Uncheck boxes to reduce the number of items.
Read more to learn about copying and pasting updates into the Bulk Editor. . .
Use the blue drag handle to copy the same content down a column. Hover over the blue square until it expands, then click and drag down.
The editor also supports copy/paste using Ctrl-C to copy and Ctrl-V to paste.
| 4 |
Bulk Add Assignment # |
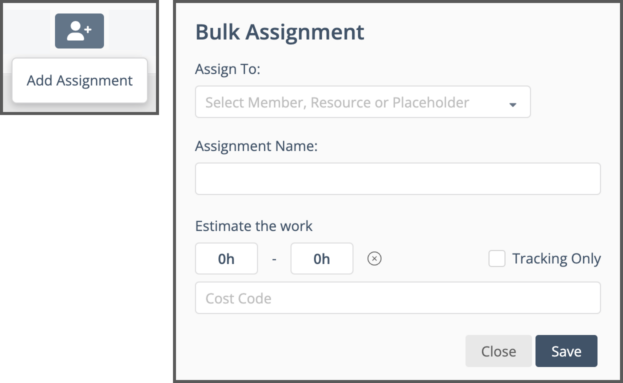
Add Assignment to open the Bulk Assignment Editor and create the same assignment on multiple tasks. Select a Member, Resource or Placeholder, name the assignment and enter a best case – worst case estimate. Check the box for Tracking Only when you need to track time, but you don’t need Predictive Scheduling to calculate dates.
Set a Cost Code if you know which one should be used when tracking time. If your workspace has a Default Cost Code enabled in the Workspace Settings under Administration, leave the Cost Code field blank and the default will be applied automatically when the assignment is created.
| 5 |
Swap Assignments on up to 50 tasks at a time # |
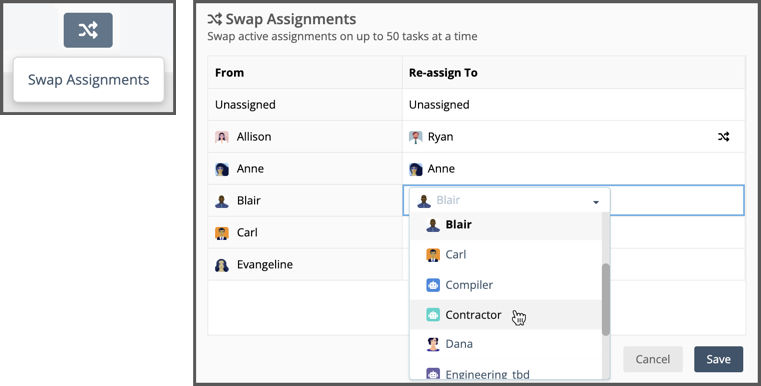
Use Swap Assignments to change task assignments on up to 50 tasks. Click into the Re-assign To field on the right to select a Member, Resource or Placeholder. You may also choose “Unassigned.”
Here’s how it works: Swapping from Person A to Person B takes ALL of Person A’s active assignments for the selected tasks and assigns them to Person B.
If time has been tracked: If Person A has tracked time to an assignment, swapping will mark their assignment done and create a new one for Person B.
After the swap: Swapped Assignments have the swapped icon in the Re-assign To column, making it easy to track changes as you go along.
Swap Assignments is disabled when more than 50 tasks are selected. Uncheck boxes to reduce the number of items.
| 6 |
Delete items # |
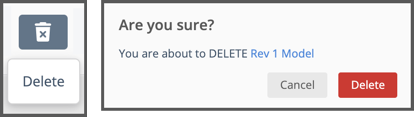
When deleting you’ll be prompted to confirm your choice by clicking the red “Delete” button. Deleting immediately moves the item from the current view into the Changes view. Deleted items are retained up to 90 days for paid accounts and 30 days on the FREE Plan. Learn more about deleting items in the Changes View lesson.
| 7 |
Copy Link # |

Use Copy Link to share items with other workspace members. Anyone who has access to the item will be able to use the link.
| 8 |
ASAP Scheduling # |
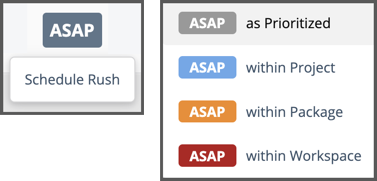
Use the Schedule Rush action button to apply ASAP Scheduling and change the schedule priority for selected tasks. Go to the lesson about ASAP Task Scheduling to learn about changing schedule priority.
| 9 |
Change Task Status # |
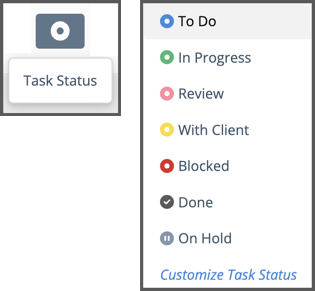
Change the Task Status for selected items. See the Task Status lesson to learn more.
| 10 |
Moving Projects, Sub-Folders and Tasks # |
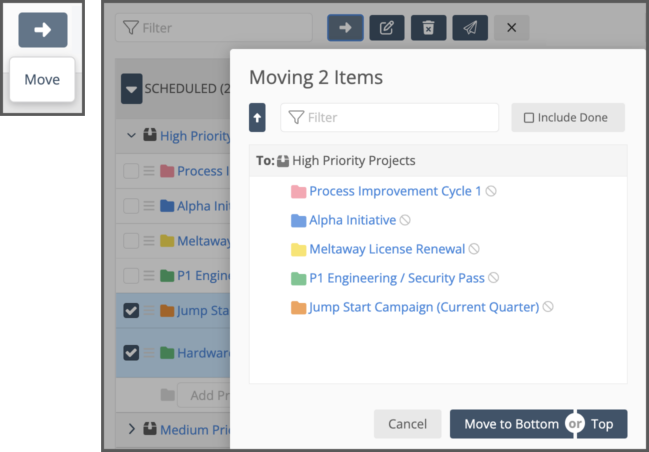
Select the items you want to move, and use the Move action button in the Bulk Editor to open the Move modal. Items can move to a new container, or they can be moved to the top or bottom of their current container.
Projects can be moved to Packages.
Sub-Folders can be nested into other Sub-Folders or moved to a different Project.
Tasks can be moved to other Sub-Folders and Projects.
Plan items can be moved to Scheduled, Pending and Archived Collections.
Use the up arrow to change location
![]()
Check the box to Include Done items if you want to move an item that has been marked done, or move items into a container that has been marked done.
Use the Quick Filter to find one of the containers in the list by name.
Choose a new location for your items by navigating up the hierarchy with the arrow at the top of the modal.
Click on a container name to select it as the new location.
Move to Bottom or Move to Top
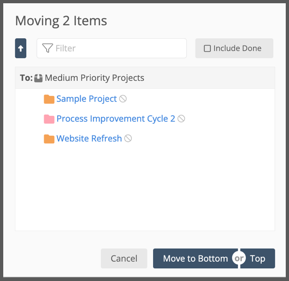
After selecting the new location, choose Move to Bottom or Top. The modal will close and return you to the previous view. Navigate to the new location if you need to edit or prioritize the plan items you just moved.


