 Schedule a demo of LiquidPlanner with a product expert today
Use Project & Task Intake Form widgets on Dashboards to set up new Projects and Tasks based on a form that you design. Customizable settings and layout ensure requestors supply all the necessary information up front so you can prioritize and assign new work as soon as it is submitted.
| 1 |
Intake Form Widgets on Dashboards # |

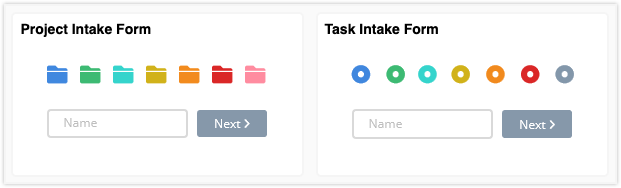
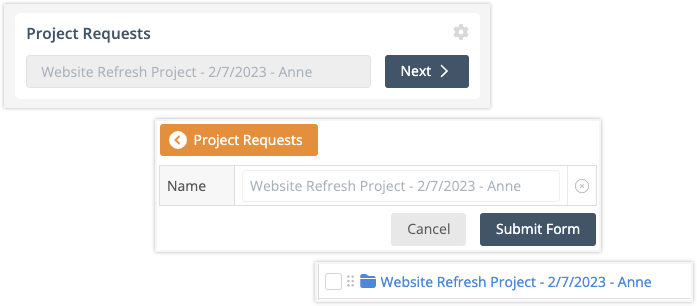
There are two dashboard widgets for taking in new work, one for Projects and the other for Tasks. In View Mode clicking Next opens the Intake Form users fill out to submit their Project or Task request. The gear icon opens the Intake Form Design page.
| 2 |
Using Project & Task Intake Forms to Submit Work # |
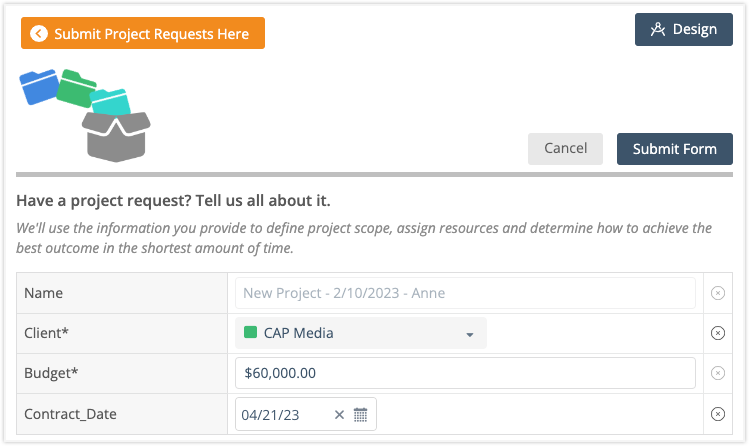
The Intake Form guides users through the process of creating a new plan item. It could be as simple as a single task or project folder, all the way up to a fully built out project with tasks, assignments and properties based on a Template. The person designing the form selects the fields that need to be filled out in order to submit it and create a new project or task.
* Required fields are marked with an asterisk, they need to be filled out in order to submit the form.
Some fields may be presented as Read Only. They’ll be grayed out and you won’t be able to change them.
The name field can be auto-generated. When that’s the case, the field will be Read-Only on the Intake Form.
X Clears field entries when fields are editable.
The Orange Button at the top to leaves the form and goes back to the Dashboard without saving or submitting.
Cancel leaves the form and goes back to the Dashboard without saving or submitting.
Submit Form creates plan items based on the information provided by the requestor, as prescribed by the form.
Design is present for Project Manager and above so they can jump into form editing.
Read about clearing issues when submitting a form . . .
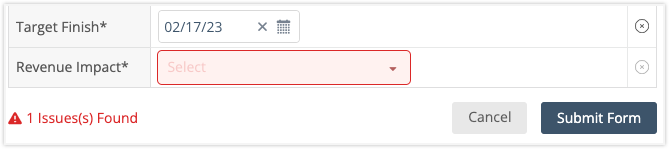
Required fields are marked with an asterisk. Any that are missed will turn red and prevent submission until the issues are cleared. Enter the required information and submit the form again.
| 3 |
Add Intake Form Widgets to Dashboards # |
Intake Form Widgets are found in the Widget Gallery. Use the Design button at the top of a Dashboard to switch from View Mode to Design Mode and +Widget to open the gallery.
Project Intake Form is for Workspace and Package Dashboards. Use it to add new Projects to a Package in any Collection.
Task Intake Form is for Workspace, Package and Project Dashboards. Use it to add new Tasks to a Project or Sub-Folder in any Collection.
Read about widget Settings and Options in Design Mode . . .
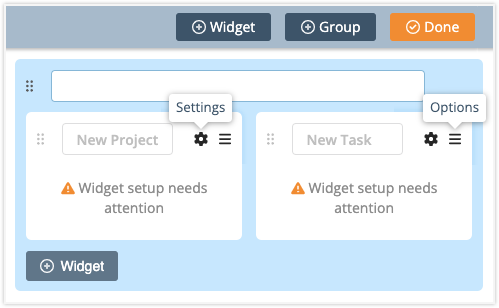
New Intake widgets are disabled until a destination is selected in form Settings. Click Settings to open the form for editing. Use the Options menu to change the widget size, duplicate or delete it.
![]() Widget setup needs attention means that a destination hasn’t been selected yet OR the selected destination was deleted from the workspace. If was deleted, a warning will appear. If you’re able to recover the deleted item, it will automatically sync up with the Intake Form widget again.
Widget setup needs attention means that a destination hasn’t been selected yet OR the selected destination was deleted from the workspace. If was deleted, a warning will appear. If you’re able to recover the deleted item, it will automatically sync up with the Intake Form widget again.

| 4 |
Designing Intake Form Settings # |
In Design Mode, Task and Project Intake Forms are very similar. The main difference is where items land when the form is submitted. Choosing a destination is very important because you can’t save the form until one is selected. Your new project or task’s destination can be in the Scheduled, Pending or Archived Collection.
Task Intake Form widgets are linked to Project or Sub-Folders.
Project Intake Form widgets are linked to Packages.
Read more about Intake Form Settings and Action Buttons. . .
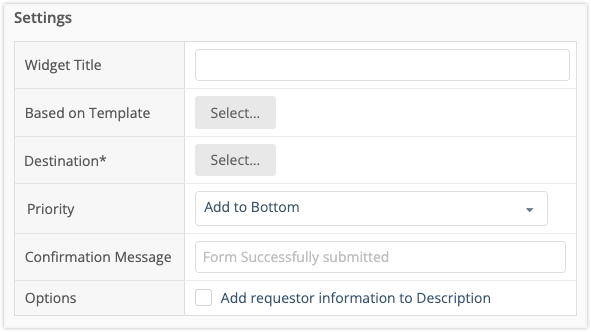
Widget Title: The default widget titles are New Project and New Task. You can keep those or enter something of your own. Some people may find it helpful to see a widget titled, “Enter Project Requests Here,” (project intake) or “Report Your Issue,” (task intake).
Based on Template: Intake Forms can be based on Projects from the Templates Collection. Using Templates is optional. In a Project Intake Form, linking a Project Template spins up a new project with the same tasks, assignments, estimates, properties and so on. In a Task Intake form you’ll link a single task from one of the projects in the Templates Collection. TIP: Create a project folder in the Templates Collection to hold template tasks.
Destination: Select the location where the new item will land once it’s submitted from the form. A Project destination is always a Package. A Task’s destination is a Project or one of its Sub-Folders.
Priority: Choose whether the new item should go to the top or the bottom of the list. For a Project, that’s the top or bottom of the Project list inside the destination package. For a Task it’s the top or bottom of the task list inside the Project or Sub-folder. Bottom is the default setting.
Confirmation: Enter a message in this field to display an acknowledgement after the form is submitted. Leave it blank if a confirmation isn’t needed.
Options: Check the box to have the requestor’s information added to the description field when they submit the form. It will include their name, email address, dashboard name and destination location.
Action buttons

Use the orange button at the top, or select Cancel to leave the form and go back to the Dashboard without saving changes. Save preserves your progress while editing the form. Save & Use saves progress and jumps to the Intake Form. Save & Close returns to the Dashboard. The orange button displays the widget title.
| 5 |
Customizing the Intake Form Layout # |
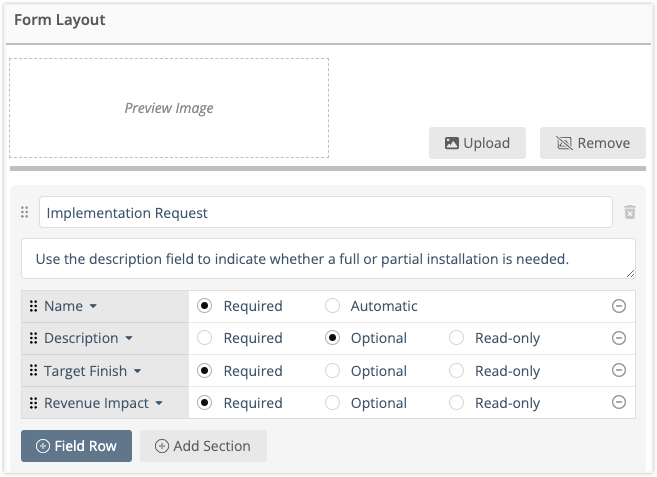
Form Image: Upload an image to the form. Maximum dimensions are roughly 584 x 98 pixels.
Sections: Intake forms can have multiple sections. Section title and prompt are both optional. +Add Section adds a new section. Use the six dots to drag sections up or down and change their order. Delete a section by clicking the trash can.
Fields: Choose from schedule control, property and custom data fields. +Field Row adds a new row. Use the six dots to drag fields up or down and change their order within a section (fields can’t be moved to another section). Remove a field by clicking the minus icon on the right.
Field settings control how users interact with the form once it’s published. Required fields are mandatory for submitting the form and Optional fields can be left blank. Read-only displays information that can’t be edited when submitting the form.
Read about the fields that can be added to customize the Intake Form Layout . . .
Intake Form fields populate the new item’s Edit Panel. All fields are optional. They can be selected once per form and +Field Row is disabled when all available fields are used.
| Project Intake Form Fields | Task Intake Form Fields |
|---|---|
| Project Name | Task Name |
| Project Description | Task Description |
| Target Start | Target Start |
| Target Finish | Target Finish |
| Target Finish Type | Target Finish Type |
| Work Limit | Work Limit |
| Notes | Notes |
| Project Custom Data Fields | Task Custom Data Fields |
| Project Status | Task Status |
| File Uploads | File Uploads |
| Project Color | ASAP |
| 6 |
Populating Edit Panel Fields from Templates # |

When the Intake Form is based on a Template, the Edit Panel for the new item is automatically pre-populated with the template’s values.
Template fields don’t have to be included as part of the form design and can be hidden from users. Any of the pre-populated fields you choose to display can be Read Only or made editable. Using the Required or Optional field settings allows users to make a selection that overrides the value set in the template.
| 7 |
Naming New Projects & Tasks created from Intake Forms # |
When designing the form there are two settings for the name field, Required and Automatic. When it’s Required, users need to enter a name in order to submit the form. Automatic creates a system generated name and displays it as read only. The auto-generated name includes the submission date and the username of the person who submitted the project or task.
Read about naming conventions for Projects and Tasks created from Intake Forms. . .
Naming Conventions for Intake Forms based on a Template
Required, the template name is displays as a prompt that can be edited.
Generated automatically, the template name is used with the submission date and submitter’s username.
Omitted from the form, the template name is used.
Naming Conventions for Intake Forms that aren’t based on a Template
Required, the item can’t be submitted until a name is entered in the form.
Generated automatically, the name is either “New Task” or “New Project” with the submission date and submitter’s username.
Omitted from the form, the new plan item name is “Untitled”.


