 Schedule a demo of LiquidPlanner with a product expert today

Plan items often need to be moved to different locations in the plan as priorities change. There are two ways that you can change the location of an item:
- Drag and drop the item to a new location.
- Change the location from the Package or Project Folder field of the item’s edit panel.
Using Drag-and-Drop
- On the Projects tab, find the item you wish to move.
- Select the item and hold down the mouse button.
- Drag the item to a new location.
- Release the mouse button.
Using the Edit Panel
- Open the edit panel for the item you wish to move.

- Click into either the Package or Project Folder field.
- Choose the new location in the list.
- Click Ok.
Moving the item with this method will add the item to the bottom of whatever container (package, project, sub-folder) you’ve chosen as its new location.
If you would like to reprioritize the item within its new container, click the jump button  to go to the item’s current location in the plan on the Projects tab. Then, drag-and-drop the item.
Moving an Item from a Packaged Location
If you are attempting to move an item from a project to a package or vice versa, LiquidPlanner assumes that you are creating a priority override, so both the Package and Project Folder field will show a location. This is because the task now has a priority position within a package and a placeholder position within a project. See Multi-Project Scheduling for more information.
If you did not intend to create a priority override, use the item’s edit panel to change the packaged location. Once you’ve changed a location field, make sure to click the Schedule Ready button to refresh the plan and see the changes.
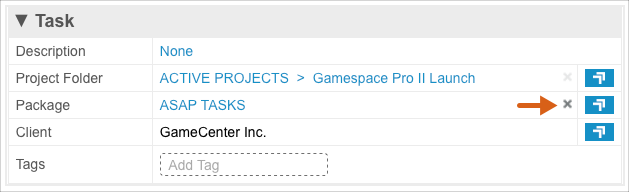
To remove a priority override, simply click the x next to the Package field. The task will stay within its associated project and will now be scheduled according to its position within that project:
To move a task from a project to a package, add the new package location to the Package field and then click the x next to the Project Folder field.
To move a task from a package to a project, add the new project location to the Project Folder field and then click the x next to the Package field.
Allowed Locations by Container Type
Containers (packages, projects, sub-folders) follow certain hierarchical rules:
Packages can contain projects, sub-folders, tasks, events, or milestones. You may nest packages within other packages. You cannot add packages to projects or sub-folders.
Projects can contain sub-folders, tasks, events, or milestones. You cannot add projects to sub-folders, nor can you nest projects within other projects.
Sub-folders can contain tasks, events, or milestones. Sub-folders can only be added to Projects. You may nest sub-folders within other sub-folders.
Any task, associated to a project, can be given a priority override in a package while retaining its current project location in the plan. Events and Milestones are fixed date plan items, so prioritizing them into a package will not have a priority override effect.
Related Articles
Introduction to Plan Items
Multi-Project Scheduling
The Inbox
The Edit Panel