 Schedule a demo of LiquidPlanner with a product expert today

Access Workspace Settings
To access the Workspace Settings, go to User Menu > Settings:

Workspace Summary
On the Workspace Summary page, you can see:
- Workspace name
- Your unique five or six digit workspace number
- The workspace owner
- Your access level
You can also see your Workspace Status, including:
- The number of alerts by type in your workspace
- Any items with an update requested
- The total number of active tasks and projects
- The number of timesheets submitted
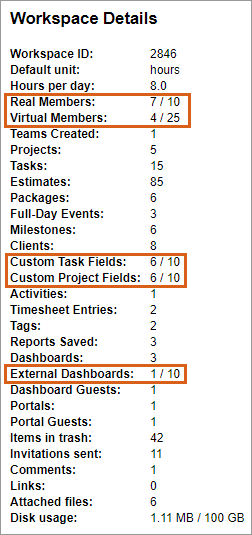
The Workspace Summary page also contains the Workspace Details, where you can see how your workspace is using LiquidPlanner features, and more easily monitor the ones that are metered, as shown below:
Workspace Settings
Workspace settings can be edited by workspace administrators only and contains:
- Workspace Name
- Company
- Description
- Currency – select from 19 different currencies. The default for new workspace is USD $. Currency is used to label dollar valuations of hours in your rate sheets and analytics reports.
- Week Start – you can set your week start to Saturday, Sunday or Monday. The default for new workspaces is Sunday. The week start is used to define timesheet periods, weeks in the Active Tasks list, and for all relevant date range filtering in LiquidPlanner reports. Be aware that changing the week start will immediately adjust all of your historical time tracking and reporting data to sync with the new definition of a work week.
- Logo – your logo will display on schedule printouts and project portals. The maximum logo size is 250 x 250 pixels. Accepted formats are: JPG, PNG, GIF or BMP.
- Default Unit – Estimates on tasks can be entered in hours, days, or minutes using the designation h, d or m, respectively. For example: 8h, 1d, or 30m. Estimates will be displayed back using the default unit (hours or days). The default for new workspace is hours.
- Time Conversion Factor – LiquidPlanner makes an assumption for each workspace of what one day (or really one work day) means in terms of hours. This conversion factor defaults to 8 hours and should be set once and left alone. If you do change this value, it will affect the size of your existing estimates and your logged time if you are using hours as units. For example, if you set the conversion factor to 4 hours = 1 day and you had previous estimates based on 8 hours = 1 day, then you will see your hourly estimates get smaller. In the 4=1 case, if you had an 8 hour task it would become a 4 hour task. This is because under the hood, LiquidPlanner stores estimates and logged time on tasks as days (or fractional days).
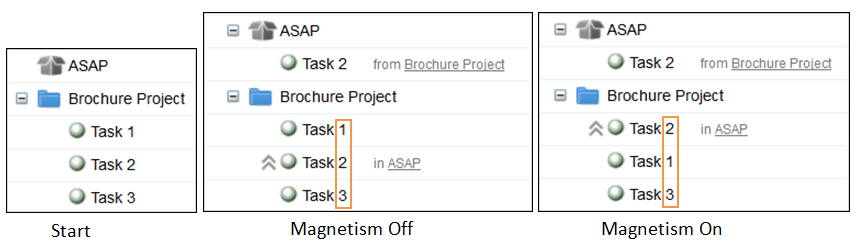
- Magnetism On/Off Checkbox – Magnetism is an optional behavior that affects the display order of packaged tasks in the project folder. In workspaces created before June 16, 2012 magnetism is turned on by default. In workspaces created since that date, magnetism is turned off by default.
You can magnetize packaged tasks by checking this box in Workspace Settings:
![]()
When magnetism is turned on, tasks in the project folders are displayed in the order that reflects their physical scheduling order:
-
- We start with Tasks 1-3, listed in that order and none of them packaged.
- Then we package Task 2 into ASAP. With Magnetism turned off, Task 2 stays put in the same position in the project folder.
- Now we package Task 2 with Magnetism turned on. Notice that Task 2 has shifted to the top position in the blue project folder. This mirrors the fact that Task 2 holds the highest physical scheduling position of all tasks in this project.
- Magnetism has no effect at all on schedule dates, so turning it on or off is simply a matter of preference.
Email Integration Settings
Email Integration settings are found by clicking on your User Menu > Settings > Workspace Settings > Email Integration. This is where you set the security level for emailing tasks into your workspace:
- Disabled – This will prevent tasks from being emailed into your workspace. An email will be sent notifying your workspace members.
- Low Security – Anyone can email tasks into your workspace. Email that does not come from the same email address as a workspace member will be recorded as coming from ‘Unassigned’.
- High Security – Only workspace members can email into your workspace. Email from anyone not in your workspace will be ignored.
Related Articles