 Schedule a demo of LiquidPlanner with a product expert today


There are three important steps to setup and configure your workspace.
- Create your First Project and then add the active projects your team will be working on when you roll out LiquidPlanner.
- Prioritize your Projects using Packages to create a workspace structure that ensures your priorities are reflected in the schedule.
- Customize Your Project Data so you can forecast and analyze results through Dashboards and Reporting.
You’ve arrived at step one, Customize Your Project data which introduces the basic elements and considerations for adding your work.
Need a refresher? make sure you know the 3 inputs for LiquidPlanner’s scheduling engine.
Ready to advance? jump ahead to Prioritize your Projects.
What is a Project?
An important consideration at the outset is to be clear about what a project is:
- A project typically represents an organizational initiative that results in a major deliverable.
- Projects have defined a beginning and end, as opposed to ongoing work.
Projects are different from Programs which are typically comprised of multiple projects. You’ll learn about representing Programs in the workspace in step three when you Setup Project Data.
Add a New Project 
Go to the Projects tab — this is where you can view and prioritize all Projects across your portfolio. A project in LiquidPlanner is represented by a blue folder icon.
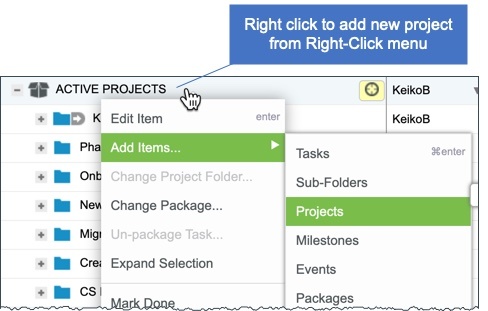
1. Add a Project to the Active Project Package
Add your first Project to the Active Projects Package. Right-click to highlight this Package.
From the Right-click menu choose Add Items > Projects
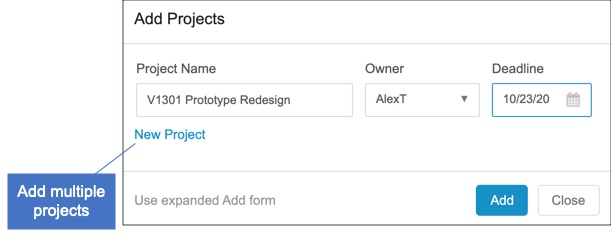
2. Provide Project Details
Next, you will provide the name of your project, assign the project to the project owner, and you can also provide the Project Deadline.
The Project Owner should be the assigned project manager, or team member responsible for the outcome of the project. If you haven’t invited the project owner into your workspace yet, you can create and assign it to a virtual member for now, as a placeholder for the real team member.
If you don’t have a deadline for the project, you can leave this field blank. If you do enter a deadline, LiquidPlanner can warn you if you’re at risk of missing your deadline date.
Add Sub-Folders for Phases or Stages 
Sub-Folders are a grey folder icon, and they are used to represent phases or stages of your project. For example: Phase 1 and Phase 2 or Initiation and Design and Development.
Sub-Folders need to have a parent Project, so they must be inside a blue Project folder.
Two Important Tips:
- Like Projects, you should place your Sub-Folders in top-to-bottom priority order. Do not use Sub-Folders to represent categories of your project. We recommend using custom fields to categorize groups of tasks within your project.
- Avoid nesting too many layers of Sub-Folders in a project. It can make your workspace hard to navigate.
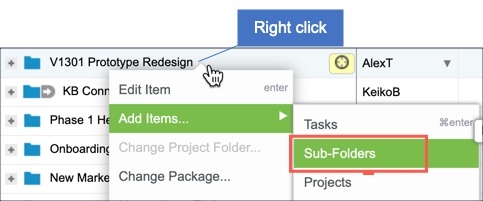
Create a Sub-Folder
Create Sub-Folders to your Project from the right-click menu:
- Right click on your blue Project folder
- Click on Add Items > select Sub-Folders.
- To add multiple Sub-Folders, click on the “New Sub-Folder” link to add up to 50 Sub-Folders at one time.
Learn more about unique project attributes and tips for working with sub-folders in the article about Projects and Sub-Folders. You can also import project data into your workspace either from a spreadsheet or MS Project.
Tasks
When the basic outline of the project is established, you’re ready to add Tasks, the most basic building block in LiquidPlanner. Tasks represent individual work items for a project. The ranged effort associated with a task is used to calculate the schedule.
You’re ready for step two
Now that you know about creating projects you’re ready to explore the next step in setting up the workspace. Learn how to Prioritize Your Projects using Packages to create a workspace structure that supports your workflow and ensures your team’s priorities are reflected in the schedule.