 Say hello to the new Tempo! LiquidPlanner is now Portfolio Manager.
Every team juggles multiple projects at a given time, and needs a way to effectively prioritize work across all projects. There are two ways to do this using LiquidPlanner, and both methods can be applied in your workspace.
Before you apply these multi-project scheduling methods, you should ensure that your projects are set up correct priority order. Here is a quick review or the principles of priority-based scheduling:
- Arrange your projects in top-to-bottom priority order within the Projects tab
- Tasks within projects should also be arranged in top-to-bottom priority order.
- Assign a ranged effort estimate and task owner to each task. LiquidPlanner will automatically calculate realistic start and finish dates based on the priority of the task, the effort involved, and the availability of the task owner.
- Utilize other features that the scheduler takes into account such as dependencies, delay until dates and events.
Once your projects are prioritized, you can use the two methods to schedule multiple projects in LiquidPlanner.
Method 1 – Set Daily Limits Across Projects
Setting a daily limit on a project can be used to limit the number of hours per day that a team member can be scheduled to work on that project. By using a Daily Limit, you can model the amount of time resources will spend across multiple projects on a daily basis.
For example, when you have a team member working on two different projects, you can limit his/her availability for Project One to 3 hours per day, and Project Two to 2 hours per day. LiquidPlanner will then allocate any remaining availability for that team member to the next highest priority work.
LiquidPlanner will also reference two things in order to calculate the Daily Limit into the project schedule:
- The project team member’s availability on their profile
- The remaining effort of any tasks within the project assigned to that team member
Learn more about how to set a Daily Limit.
Method 2 – Use Packages to Prioritize Tasks
If you haven’t done so already, you’ll want to read our Packages help article to learn how packages can be used to prioritize urgent tasks across multiple projects or to add organizational structure into your plan. This article only focuses on how packages can be used to prioritize urgent tasks across multiple projects.
Designated Priority Packages
 LiquidPlanner’s automatic scheduling behavior will schedule tasks in your top priority project first, then move to tasks in your next highest priority project, and so on. Using Daily Limits (described above) makes it easy to allocate specific amount of time across your top priority projects. However, you may encounter situations when you need to move up the start date for a task in a low priority project. Even with Daily Limits, the lower priority task may not be scheduled to start immediately. In this case, you can use a designated priority package to reflect this in your schedule.
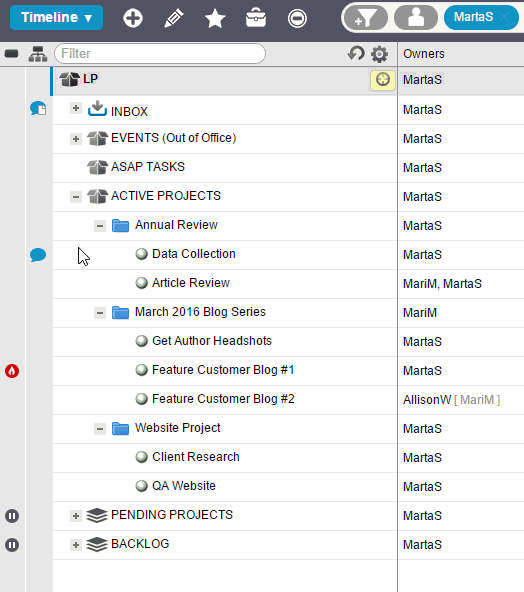
In the example to the left, individual tasks are being dragged from three different projects and dropped into a high priority package called ASAP TASKS.
Dragging a task out of a project folder and into a higher priority package creates a priority override for the task so it will schedule sooner.
After the tasks are pulled up to the ASAP TASKS priority package, they can be rearranged to reflect the actual order this member plans to complete their work.
Now this member can begin to chip away at all three projects concurrently, rather than being scheduled to complete all tasks from the first project before beginning work on the second project, and so on.
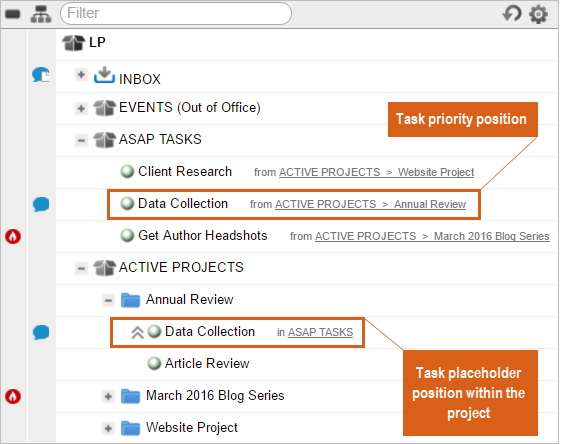
View Priority Overrides in Your Plan
A task that has been pulled up from a project to a high priority package is represented twice in your plan. The same task is shown in two locations:
- The task’s priority position (its override position) drives the schedule date. That’s the prioritized copy of the task that sits in the high priority package. Clicking on the breadcrumb next to the task will take you to the project that the task lives in.
- The task’s placeholder position (the original task) continues to represent the task within the project structure. The breadcrumb for this task shows you the package that the task was prioritized into. The placeholder task will also have chevron arrow to the left of the task name indicating the task has a priority override.
Now that you know how to prioritize tasks from multiple projects, it’s time to think about how you want to structure priority packages along with organizational packages in your own workspace. The help article below will help you do just that!
Take a look at Setting Up the Workspace to see different ways of modeling your workflow!