 Live webinar: Mastering Project Forecasting in Jira with Portfolio Manager
LiquidPlanner makes it easy to model the cost of a new project and help you make informed decisions while planning. This can be especially useful if you need to compare the potential revenue between two potential projects and determine which one you’ll take on.
Introduction
Once you’ve built out your project in LiquidPlanner, you’ll use activities and bill/pay rates to get financials for your project. The seven steps in this article will walk you through the process in detail, but here’s a brief overview of how it works:
- By adding estimates and activities to all of the tasks in your project, LiquidPlanner uses each task’s associated activity and whether it’s billable or non-billable to determine if the expected hours for that task are included in the project cost calculations.
- Once you set up your company-specific billing and pay rates (by client, project, activity or person), LiquidPlanner can calculate the dollar value of expected effort for tasks with billable activities. Billing rates are used to capture the rate at which you charge for the work and pay rates capture the costs incurred for employees to complete the work.
With these inputs, LiquidPlanner will calculate the estimated profit. Follow the steps below to get financial estimations for your projects:
Build Out Your Project
- Create your project via the Add Menu
- Add the tasks required to complete the project
- Add a best-case/worst-case ranged estimate for each task
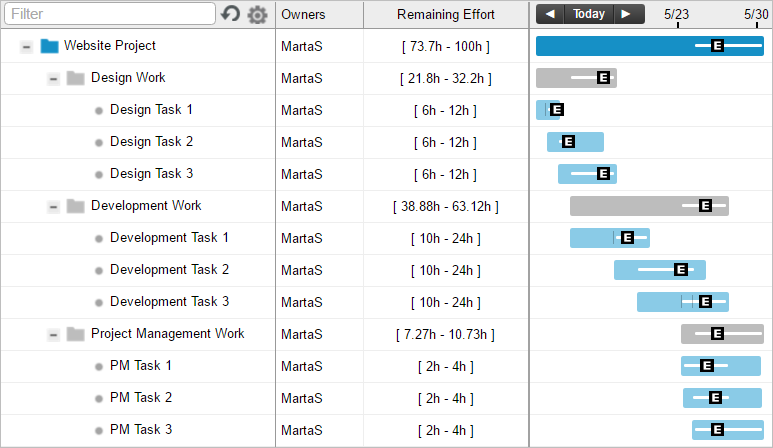
As shown above, you can be a bit vague with your ranged estimates at this point since the ranged estimate will help capture any uncertainty regarding the work in your plan.
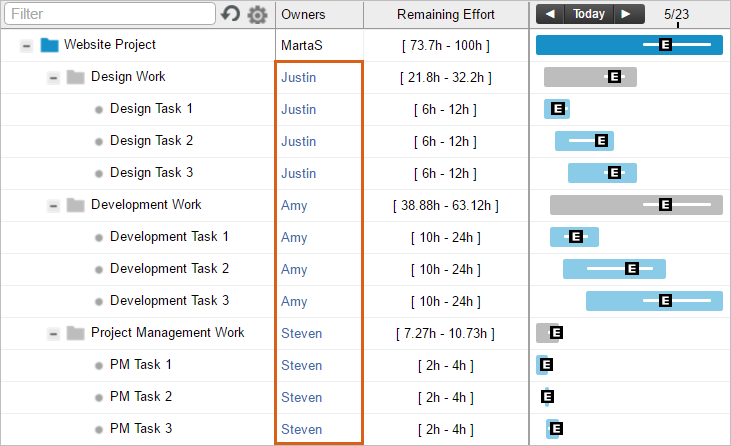
Assign Work to Team Members
- Assign tasks to the workspace members likely to complete the work
- If you are just modeling at this point or are unsure of who will complete the work, you can use virtual members (as shown below) to assign out tasks instead of real people. This prevents your workspace members from getting email notifications while you’re staging up the project.
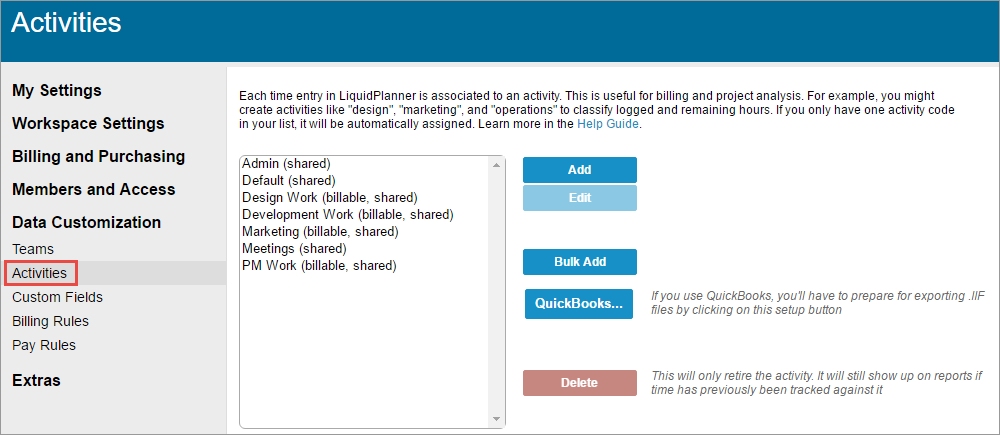
Create Activities for Tasks
- Create activities to categorize the work you do on a specific task and choose whether the activities you add are for billable or non-billable work. Workspace administrators can create activities via their User Menu > Settings > Data Customization > Activities.
- When creating activities, think about what type of work is billable or non-billable and if different types of work will be billed at different rates – create separate activities for these. Billable activities associated to a task (step 4) will be used to determine if the expected hours for a task are included in the project cost calculations and at what rate (step 5).
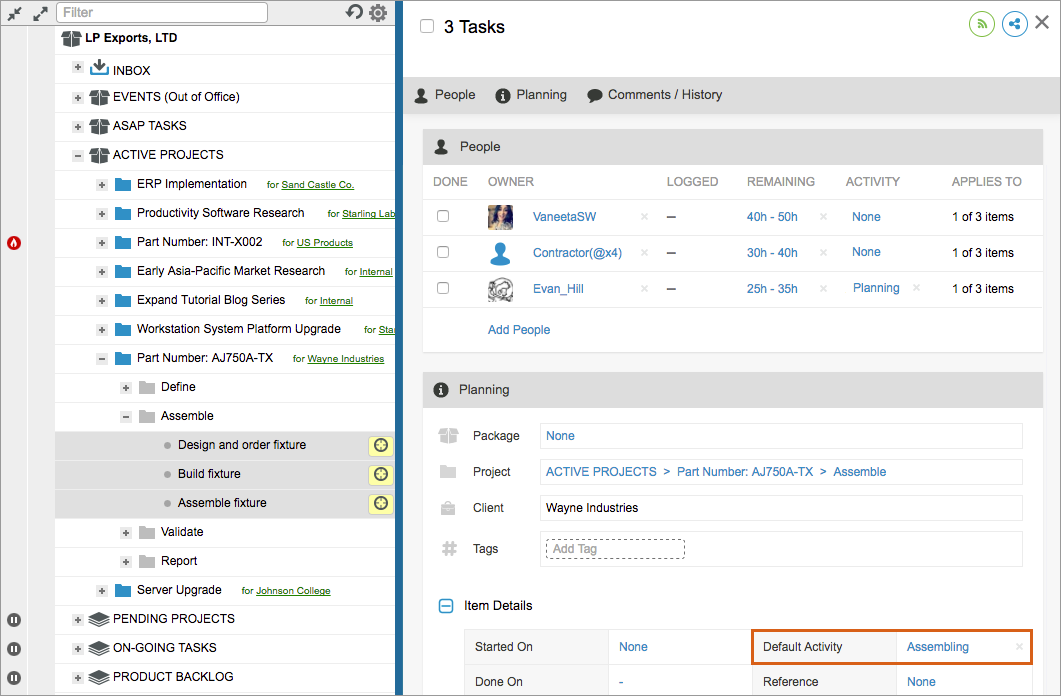
Associate Activities to Tasks
- For each task in the project, associate an activity by setting the default activity field in the edit panel. Make sure the activity chosen is billable if the expected effort on the task should be included in the cost calculations.
- If you have a task with multiple owners and owners will be logging time to different activities on the same task, set the Activity field in each owner’s assignment row. If the Activity field is not set, LiquidPlanner will reference the task Default Activity when calculating costs.
Now that you have your tasks set up with their corresponding activities and estimated billable hours, you need to tell LiquidPlanner the rate at which the work will be billed and paid out. You’ll designate these rates by adding pay and billing rules.
Add Pay Rules and Billing Rules
Pay and billing rules can be added only by workspace administrators from their User Menu > Settings > Data Customization > Billing Rules or Pay Rules. Each rule added specifies the rate that should be applied when certain conditions are met for hours remaining (or logged). These conditions can be a combination of Client, Project, Activity or Person.
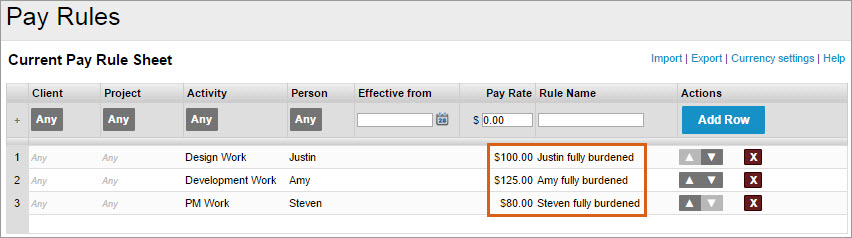
Pay Rules
- To determine the cost of the time spent on the project, you’ll need to determine the fully-burdened cost of each employee’s time at the hour level. Fully-burdened costs may include hourly salary, taxes, benefits, facility costs, and other overhead costs.
- Click on Pay Rules and create one or more rules for your workspace members. Associate the fully-burdened cost to each person and to an activity. You may also have more generic rules, for example if everyone in your workspace is paid the same rate for a specific activity you can leave the rule’s person field set to “Any.”
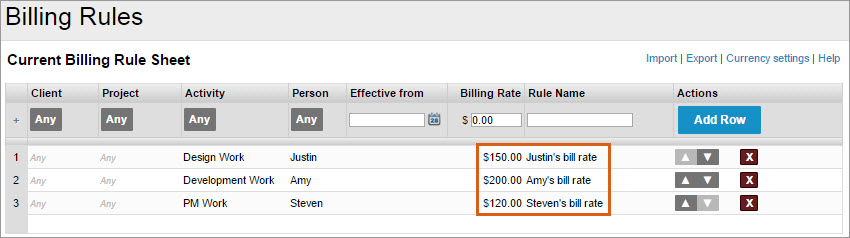
Billing Rules
- Next, click on Billing Rules to assign the billable rates for each workspace member, and associate an activity, if necessary
- This will allow you to see how much is being paid out (pay rules) and how much you are bringing in (billing rules)
Learn more about setting up these rules in Using Rate Sheets for Billing and Pay Rules.
Use Analytics to see Project Cost
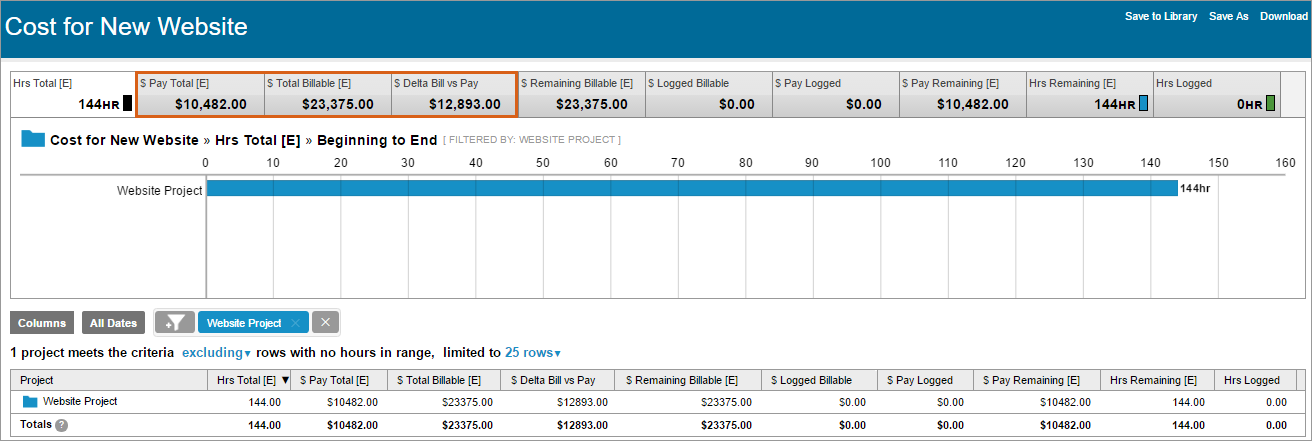
- Go to the Analytics tab
- Under New Report, click on Project Report and select Project Roll-up
- Change the Date Filter to All Dates and
- Click on the Columns button to expose the following columns in your report
- $ Pay Total [E]: Gives you the fully-burdened expected cost of the work being done on the project
- $ Total Billable [E]: Gives you the expected amount you should earn from the work done on the project
- $ Delta Bill vs Pay: The expected profit to the bottom line
- For a more detailed view, click on the blue project folder in the table to open a task roll-up report displaying metrics for each individual task in the project.
Expenses
If your project costs include non-labor hours or other costs that the client will incur, your team can track those with the Expenses feature instead of, or in addition to, calculating based off a fully-burdened hourly rate.

The total expenses entered on each task will roll up to your project. You can see these non-labor costs alongside your other financial calculations by exposing columns with expense calculations in a Project Roll-up report. There you’ll be able to see expense totals on their own as well as aggregated with billable and non-billable labor costs for the project. Learn more about reporting on non-labor costs in the Expenses article.
See Real Results
Learn more about project costing in this webinar and see how to track metrics like contract value, billable rates and expenses in LiquidPlanner.