 Say hello to the new Tempo! LiquidPlanner is now Portfolio Manager.
Dashboards allow you to build high-level views that help you visualize your data and share information with workspace members and external collaborators. You can create dashboards to help you track project completion, provide status updates to stakeholders, or to manage your own work.
Create a Dashboard
To create a new dashboard:
- Select the Dashboards tab at the top of your workspace.
- Click + Create Dashboard from the left-hand navigation menu.
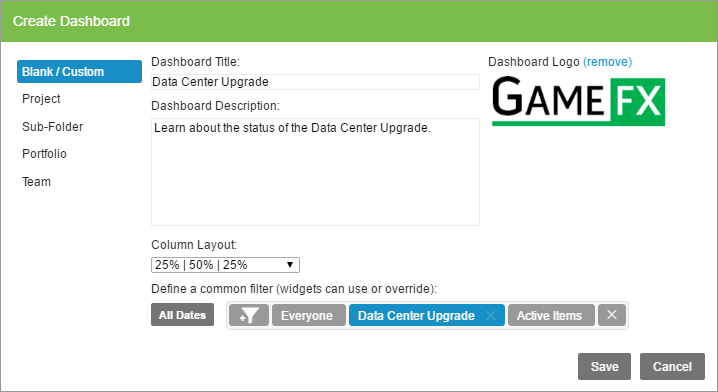
- In the Create Dashboard dialog, select Blank/Custom (no default widgets) or a pre-built option: Project, Sub-folder, Portfolio, or Team (default set of widgets).
- Give your dashboard a descriptive title.
- For a Blank/Custom dashboard, set the common filter (optional) and column layout. For a pre-built dashbaord, set the filtering parameters.
- Click Save.
Setting the Common Filter
The common filter is helpful for when building a dashboard that consists of multiple widgets filtered the same way. It saves time by allowing you to set the filtering parameters at the dashboard level. Then you have the option to easily apply or exclude the common filter for each widget in the dashboard.
The common filter can be set when first creating a Custom/Blank dashboard, or by clicking the Customize link in the top right corner of the dashboard after it has been created.
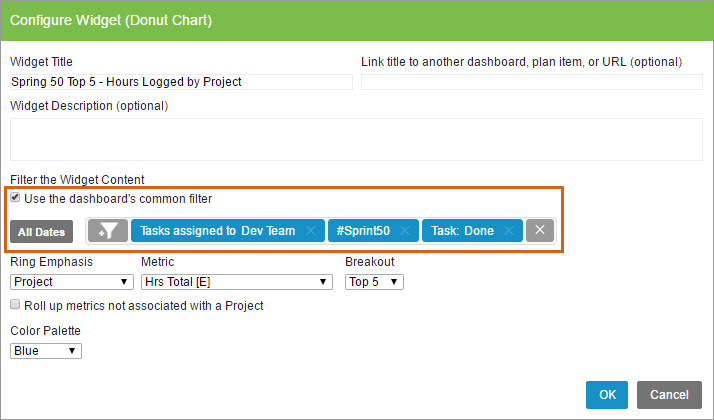
Below, the Customize Dashboard window shows where to set a common filter and the Configure Widget window shows where the checkbox is located for a widget to “Use the dashboard’s common filter.”
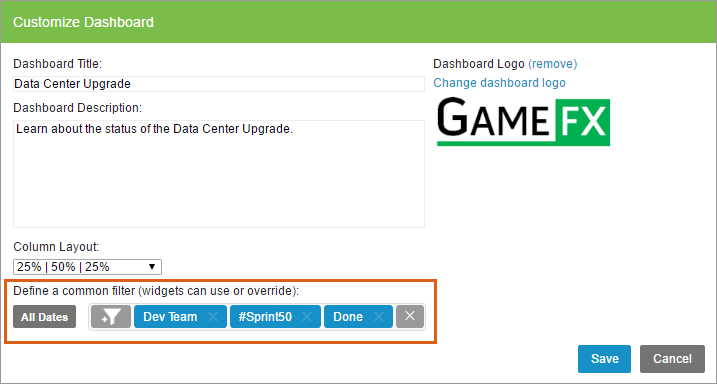
Any changes to the common filter will also be reflected on each widget that is using it.
Types of Dashboards
Below is an overview of each dashboard type. Keep in mind that some filter options will not be available within widgets on pre-built dashboards, since those filters were applied when those dashboards were created.
Blank/Custom
Use a Blank/Custom dashboard to build a dashboard from a blank canvas. Add widgets and filter them as desired to display and share workspace data of your choosing. Dashboards created from the Blank/Custom option are always kept private until explicitly shared.
Project
Use a Project dashboard when you want to surface data and share key information from a single project. A project dashboard has a 1-to-1 relationship with its associated project folder. This means that each project folder in your workspace can only have one designated project dashboard associated with it.
Sub-folder
Use a Sub-folder dashboard when you want to surface data and share key information from a single phase or part of a project. A sub-folder dashboard has a 1-to-1 relationship with its associated sub-folder. This means that each sub-folder in your workspace can only have one designated sub-folder dashboard associated with it.
Project and Sub-folder Dashboards are unique from the other pre-built dashboard types in a few ways:
- Anyone on the Project Team will automatically have viewer access to these dashboards, except for Restricted Members and Portal Guests — these members can be invited into the dashboard manually. Anyone else not on the Project Team will also need to be invited into the dashboard manually.
- A link to View Project Dashboard will be visible in the project edit panel, as well as task, event, and milestone edit panels for members of the Project Team (except Restricted Members). This allows the Project Team to easily access the project dashboard and keep up to date on the status, upcoming work, and recent collaboration from the project.
- A link to View Sub-folder Dashboard will be visible in the sub-folder edit panel for members of the Project Team (except Restricted Members).
- Project and Sub-folder dashboards cannot be duplicated within their respective dashboards.
- Project and Sub-folder dashboards associated with project templates will be duplicated when their template is duplicated. They will also be duplicated when a new project is created via an intake form widget using an existing project as a template. After duplicating a template, open the project and sub-folder dashboards to update their titles (removing “copy” from the name).
Portfolio
Use a Portfolio dashboard to share key data from multiple projects and containers in your workspace. This dashboard uses a Location filter and automatically filters all dashboard content to display data from those specific containers. This allows you to hand-pick a specific portfolio to share with a client or department. Dashboard editors can view or change the filtered selection by clicking Customize. This type of dashboard is private until explicitly shared.
Team
Use a Team dashboard to share and keep track of what your team is working on. This dashboard uses a Person filter and automatically filters all dashboard content to a specific team or individual. Dashboard editors can view and change the filtered selection by clicking Customize. This type of dashboard is private until explicitly shared.
Add a Widget
Dashboards contain one or more widgets that present an overview of the data or metrics that are important to you. You can add up to 20 widgets to a dashboard. For detailed information on every type of widget please refer to the Dashboard Widgets article.
To add a widget:
- Click + Add Widget
- Select the type of widget
- Configure the widget’s metrics or definitions – options vary depending on the type of widget
- You can limit the data shown with a date range and filters. By default, the widget applies the dashboard’s common filter.
- Enter a title and/or description, then click OK
To edit an existing widget, mouse over the widget and click the blue Edit link in the upper right of the widget. You can configure, duplicate, or delete the widget. Duplicating a widget is convenient way to use an existing widget’s configuration as a base for another.
Customize a Dashboard
Drag-and-drop individual widgets to arrange them on the dashboard.
Change the title of your dashboard and how widgets appear by clicking on the Customize link. From here, you can also edit the common filter for the dashboard and add a description or logo.
Dashboards can be customized in numerous ways to fit your reporting needs – please see our Dashboard Gallery for more ideas and take a look at how Dashboards can be used to monitor and analyze projects in these guides:
What is the current status of my project?
What is putting my project at risk?
Share a Dashboard
Blank/Custom, Portfolio and Team dashboards are all set to private by default until you choose to share them.
Project and Sub-folder dashboards are set to shared with members by default and can be viewed by anyone on the Project Team (except Restricted Members and Portal Guests).
When a dashboard is shared, all explicitly selected people and all workspace administrators will be able to view the dashboard.
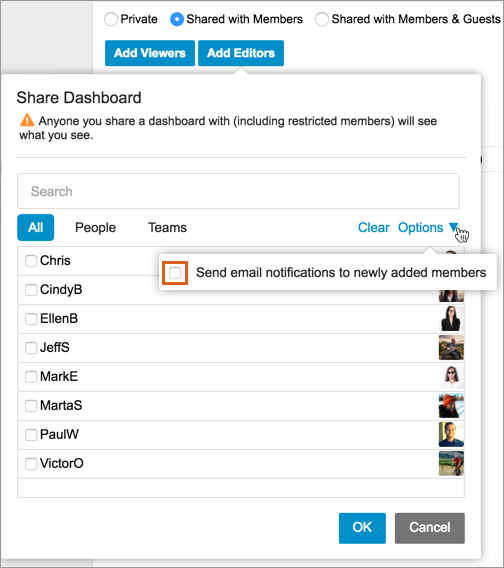
To share with workspace members
- Click the Share link
- Select Shared with Members
- Click Add Viewer to provide workspace members or teams with read-only privileges
- Click Add Editor to provide workspace members or teams with editing privileges
- Check the box at the bottom of the Share Dashboard person picker (shown below) to have an email sent to newly added members notifying them they’ve been added to a dashboard. If left unchecked, no email will be sent, however newly added members will be able to see and click on the dashboard from Dashboards tab > All Dashboards.
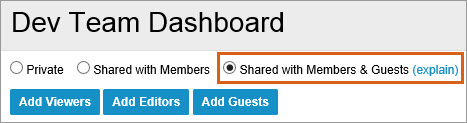
To share with external guests (non-workspace members)
- Click the Share link
- Check the Shared with Members & Guests option
- Click Add Guests
- Enter the email address for the person(s) you want to invite to the dashboard.
- Click Invite
Once a guest accepts their invitation, they will be prompted to set up a password and sign in to the dashboard. When accessing the dashboard in the future, guests will log in from https://app.liquidplanner.com/login. All newly added dashboard guests will receive an email notification upon being invited to the dashboard. Dashboard guests have read-only access. They cannot click on links to view more information or edit what they see.
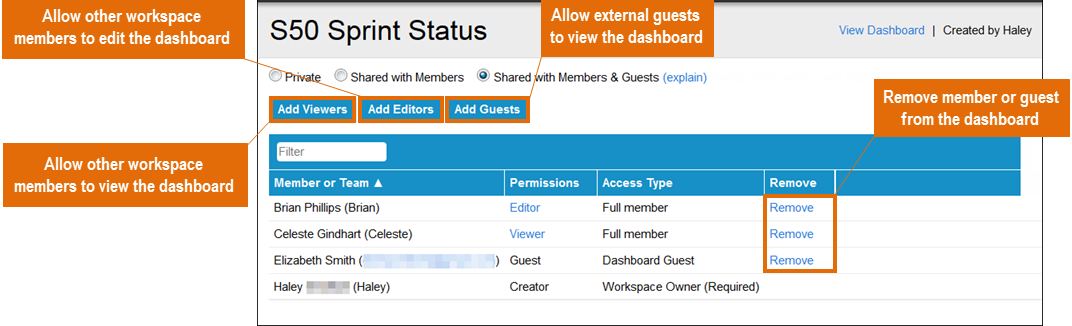
To remove an external guest from a dashboard, select the Dashboard and click the “Sharing” link. In the Remove column, click ‘Remove’. The guest will no longer be able to view that dashboard.
You can switch the shared status of a dashboard at any time. LiquidPlanner will remember the people you previously selected and will reinstate their access automatically if you choose to share the dashboard again.
External Sharing Limits: Workspace administrators are able to share dashboards externally and manage dashboard guest administration. Some pricing plans have a limited number of externally-shared dashboards. If you’d like to disable external sharing on a dashboard so that you can share another, just select the “Private” or “Shared with Members” option so the external guests for that dashboard will no longer have access to it. For additional pricing plan details, please see our pricing page.
Dashboard Administration
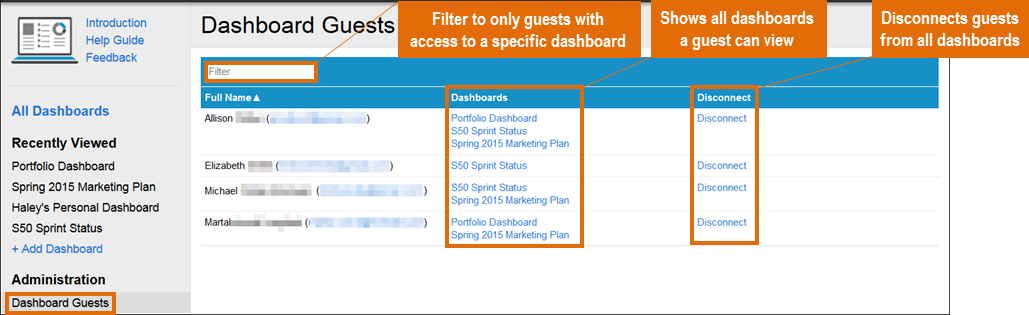
To view a full list of your external dashboard guests, go to Administration > Dashboard Guests. In the ‘Dashboards’ column you’ll see all of the dashboards to which that guest has access. Click the dashboard name to be taken to that dashboard.
To view only members who have access to a specific dashboard, type the dashboard name into the filter capsule to filter the guest list.
To remove an external guest from all dashboards, find the guest’s name on the list and click the ‘Disconnect’ link in the Disconnect column.
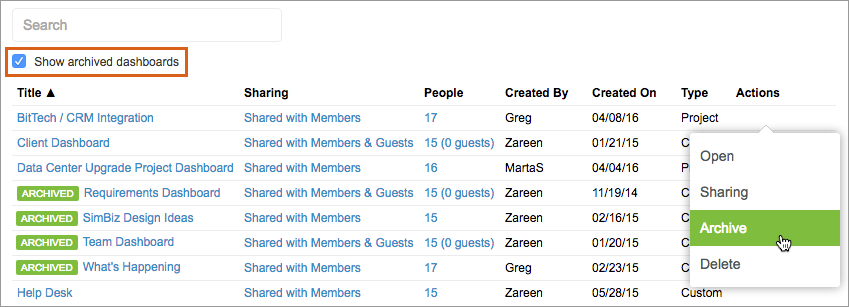
Archive Dashboards
When a project finishes or when a dashboard no longer needs to be referred to on a regular basis, it can be archived. Archiving a dashboard means it’s hidden by default when viewing All Dashboards but is still accessible in a read-only format (all widgets are rendered as view-only except for the Intake widget) to the original audience it is shared with.
A dashboard can be archived by a dashboard editor in two ways:
- Go to the Dashboards Library > Actions column > Archive
- Click to open a dashboard > select More in the top right corner > Archive
Dashboards can be unarchived at any time by following the same steps and selecting unarchive.
To view archived dashboards, simply check the box to Show archived dashboards:
Helpful Tips
- Use your browser Print option to create a snapshot of your Dashboard in its current state. Save it as a PDF or print it out to share with your team or other external stakeholders.
- You can resize the columns on the Analytics Table widget and the Projects View widget.
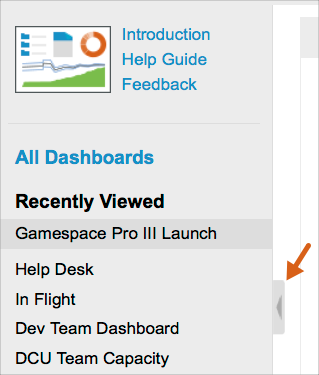
- Click on the grey arrow (shown below) on the side navigation bar for a Full Screen view of your dashboard.
- Not sure what types of dashboards to build? Looking for examples and inspiration? Visit the Dashboard Gallery.
- Visit Dashboard Widgets article to learn about the building blocks of dashboards.