Only LiquidPlanner has a scheduling system that allows you to capture, view, and manage uncertainty in your project schedule. This flexibility is the result of estimating tasks in ranges (e.g., 5 – 15 days) instead of single, fixed estimates (e.g. 10 days). Think of this as creating a best-case and a worst-case scenario for completing a task. Once you enter your ranged estimates in the task’s edit panel, LiquidPlanner does the hard math to calculate a statistically correct schedule you can trust.
Calculated Start and Finish Dates
How do I input my start and finish dates?
You will not be manually entering start or finish dates for your work. LiquidPlanner calculates these dates for you.
How does LiquidPlanner calculate my start and finish dates?
You will provide this project information: (1) Create the tasks, (2) Assign the tasks to yourself or others, (3) Estimate how long each task will take, (4) Arrange the tasks in priority order. LiquidPlanner will look at the availability settings of the assigned owners and calculates the most realistic start and finish dates for your work.
What is the advantage to creating my projects using LiquidPlanner’s scheduling methodology?
Changes to organizational priorities or availability of resources constantly affect project timelines. When these changes occur, you make the updates to your plan. LiquidPlanner will automatically recalculate the impact of these changes to all of your project schedules.
Read the Schedule Bars (a.k.a. Uncertainty Gantt bars)
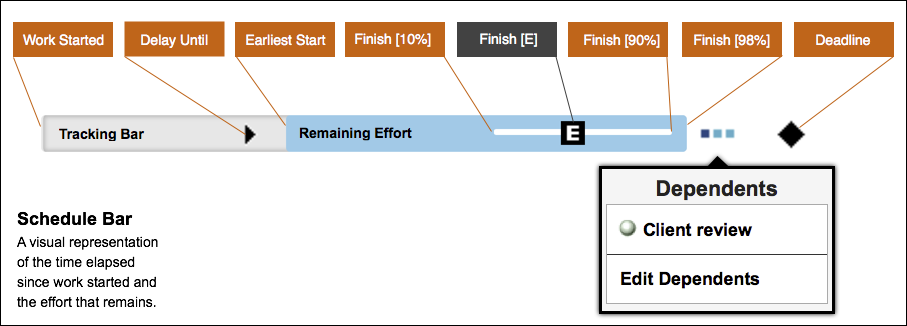
LiquidPlanner calculates probable start and finish dates for each of your tasks and displays this data on the schedule bars:

Definition of Dates
Work Started (now called Started On date)
The first date that time was logged is referred to as the Started On date. It is represented by the start of the grey tracking bar. The length of the tracking bar corresponds with the amount of time a plan item has been in progress.
Earliest Start
The earliest start is the date you are 10% likely to start this particular task. The assumption is that you can’t start a task until the preceding task completes, so the actual start date of the task is uncertain.
Start [E] – Expected Start (not shown)
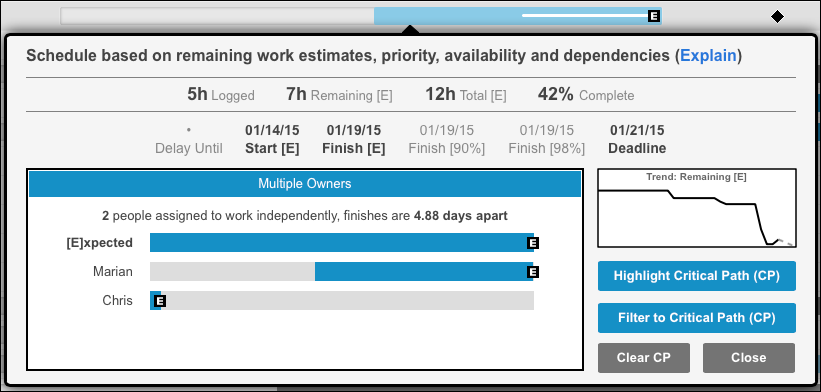
You are 50% likely to start this task or container (project, sub-folder or package) on or before this date. This date can be viewed in the The Schedule Bar Pop-Up (see image below).
Finish [10%] – Best-Case Finish
This is the earliest you could conceivably finish this task or container (project, sub-folder or package). For a task, this corresponds to the best-case (low) estimate. For a container, this corresponds to the date on which you are 10% likely to finish all of the tasks, for all people, in that container.
Finish [E] – Expected Finish
You are 50% likely to finish this task or container (project, sub-folder or package) on or before this date. This is the date you should be shooting for. For a task, this corresponds to the mid-point of your ranged estimate. For a container, this corresponds to the date on which you are 50% likely to finish all of the tasks, for all people, in that container.
Finish [90%] – Worst-Case Finish
This is the date by which you are 90% likely to finish this task or container (project, sub-folder or package). For a task, this corresponds to the worst-case (high) estimate. For a container, this corresponds to the date on which you are 90% likely to finish all of the tasks, for all people, in that container.
Taken together, the Best-Case Finish (10%) and Worst-Case Finish (90%) give you an 80% confidence interval. That’s a fancy-pants way of saying that you’re 80% likely to get the work done somewhere between those two dates.
Finish [98%] – 98% Finish
This is the date by which you are 98% likely to finish this task or container (project, sub-folder or package). Statistically speaking, this is the 98% latest possible finish date and it accounts for the inherent uncertainty in the project plan.
Customize Your Schedule
Delay Until
Setting a delay on a plan item ensures that it won’t start before a specific date. It’s important to note that when the delay date arrives, your delayed item may not be scheduled to start that day if you still have higher priority work on your plate at that time.
Dependencies
In LiquidPlanner, dependencies are most often created between tasks owned by different people. When two items are chained together, the dependent task will not be scheduled to start until the predecessor is marked “Done”.
Wait Time
To establish wait time between tasks- like when an item is being reviewed by a client, or a computer is running a report, set a delay on the dependency to represent that time. Once the first task is completed, wait time will delay the start of the dependent task by the number of days you specified.
Daily Limit
Set a Daily Limit on a task to specify the maximum amount of availability (hours per day) you would like allocated to a given task. A Daily Limit caps the amount of time spent on the task each day. After the Daily Limit on your current task has been reached, LiquidPlanner will schedule your next available (highest priority) task.
Deadline
Setting a deadline date on a plan item provides a visual marker of a specific target date. It is important to note that a deadline date does not affect your schedule in any way – it simply drives alerting to let you know in advance if it looks like you won’t be able to get the work done by that date. Once you are alerted that a plan item is at-risk, you can then make decisions on what needs to change to get you back on track with your deadline goal.
Events
When you’re not available to complete task work, block out the schedule with Events. Full-Day Events are typically used for vacations or holidays, because they block out a full day of availability. Partial-Day Events are great for scheduling meetings and activities that start and end at specific times. They can also be set to recur on specific days – weekly, or every other week. Using events ensures that no project work will be scheduled for anyone assigned to the event during that day or time.
Use expected dates and deadlines
The LiquidPlanner visual system is designed to help you focus your attention on two things:
- Work diligently towards the E, re-estimating as you go. Treat it as your target, and if you are doing it right, ½ the time you will be under, ½ the time you will be over.
- Treat the end of the bar as the safe promise/deadline date. This is the 98% confidence date.
Use deadline dates to your advantage. You can set a deadline date on any item in the plan and if the E gets too close to the deadline date the system will start alerting you with red “on fire” flags. Set a deadline date on a container and all of its children will inherit that deadline date.
Schedule Bar Pop-Up
Click on a schedule bar to see the expected started and finish dates spelled out, along with other key metrics for that plan item:

If there are multiple owners on the task, you’ll be able to see the sequence and relative duration of their assignments. Note that you can click on the Remaining Trend graphic to go to the Remaining Trend Report for that item.
View schedule bar interruptions
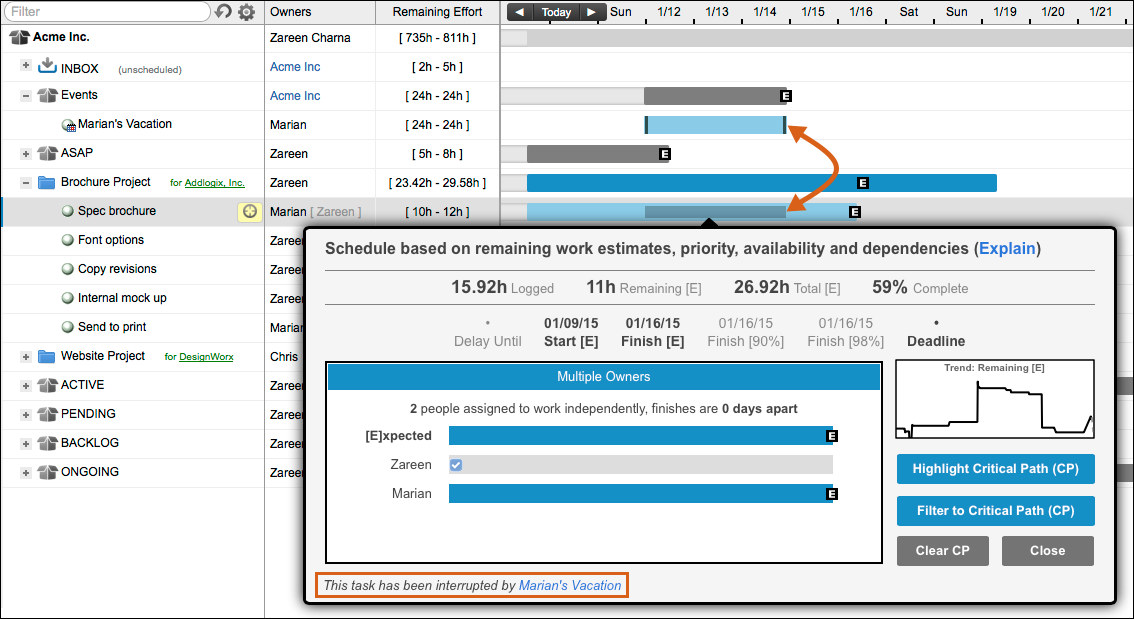
When a task is subject to a pending interruption, we show that interruption period in the schedule bar. In the sample below, the Spec brochure task is already in progress, but before it’s finished, it will be interrupted by an event: Marian’s Vacation. It will resume after the event is finished:

An interruption can be caused by any of the following:
- A scheduled Event, as seen above
- A higher priority delayed task
- A higher priority task that has an unsatisfied dependency
LP’s scheduling logic assumes that you will always be working on your highest priority “free” task. (Meaning the task has no start limitation on it – it’s not delayed out and it’s not dependent on the finish of another task.)
If you’re in the middle of working on a task (let’s call it Task X) when a higher priority task becomes free (the delay date arrives or the dependency is satisfied), the scheduling engine assumes that you will jump off Task X and go complete the higher priority task until it is done. Then you will go back and finish out Task X. The interruption graphic on Task X represents the time you will spend completing the higher priority task.
If it’s not obvious what is interrupting your task, just click on the interruption graphic, and the name of the interrupting plan item – or items – will be spelled out for you below the schedule dates. LiquidPlanner will show up to three interruptions on the schedule bar pop up.
Start and Finish Date FAQ
How do I enter start and finish dates on my tasks?
In LiquidPlanner, you do not manually enter start or finish dates on your work. Instead, LiquidPlanner uses a priority-based scheduling methodology and calculates these dates for you based on 3 factors:
- The item’s ranged effort estimate
- The item’s priority order
- The availability settings of the assigned owner(s)
Start and finish dates for containers are calculated based off the start and finish dates of items within the container.
Why is my task not scheduling until next week when I need to complete it now?
There are a few different factors that could be influencing the schedule dates of your task. Most of the time when a task isn’t scheduling as soon as you’d like it to, it’s because you’re assigned to other work that’s in a higher priority position. The higher priority work will schedule sooner and therefore push out the schedule dates of tasks farther down (in a lower priority position) in your plan. Drag and drop the task to a higher priority position in your plan in order for it to schedule sooner.
It’s also a good idea to check if a delay until or a dependency has been set on the task or on any of the task’s parent container(s) which could be influencing the dates. Additionally, make sure your availability settings are accurate and that you’re not assigned to an event that could be blocking out your availability and causing work to schedule later.
 Say hello to the new Tempo! LiquidPlanner is now Portfolio Manager.
