 On-time, every time: Supercharge your project delivery with the Portfolio Manager + Jira integration
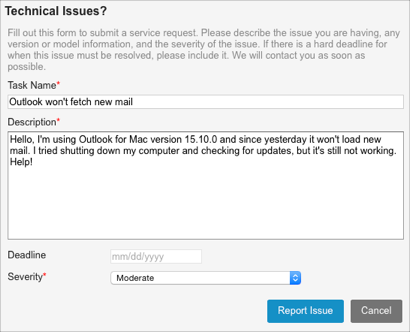 A good intake process can make fulfilling a request or launching a new project much easier. In LiquidPlanner, you can add an Intake Form widget on a dashboard to allow team members or external guests to submit new items like urgent IT issues, client feedback, or project requests.
Before building an intake form, you may wish to familiarize yourself with Dashboards.
If external guests or clients will be using the intake form, you’ll want to ensure that the information and sharing settings of the dashboard are appropriate for that audience. Anyone that has access to the dashboard will be able to submit new items to the workspace via the intake form.
There are two parts to the Intake Form widget:
- The form builder that allows you to configure the intake form.
- The form widget that allows the end-user to submit their request as a new task or project.
Add an Intake Form Widget
1. Navigate to a dashboard that you wish to add an intake form to.
2. Click + Add Widget.
3. Select Intake Form.
4. Click OK.
Configure the Intake Form Widget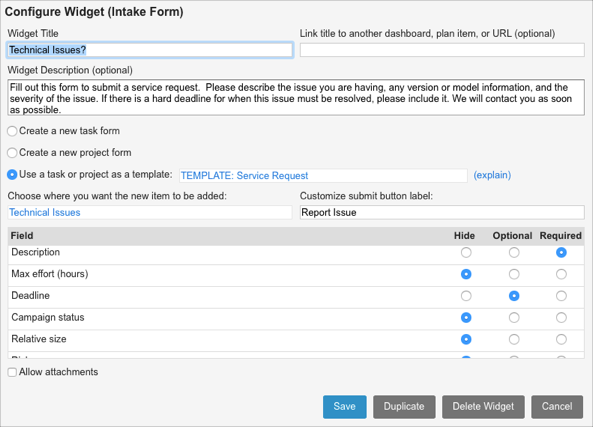
1. Add a title and description to help the requester understand the purpose of the intake form and how their request will be handled once it is received. You can also include instructions for the type of information that they should include on the form.
2. Choose an option for the type of plan item the intake form will create:
- Create a new task form – allows the requester to create a new unassigned task.
- Create a new project form – allows the requester to create a new unassigned project.
- Use a task or project as a template – duplicates an existing project or task and adds the information that is provided by the requester (see the “Use a Task or Project as a Template” section below for more details).
3. Choose where you want the new item to be added. You can select any container (package, project, sub-folder) in the workspace. The new item will inherit the status (active, on hold, done) of this container. If no other container is selected, items created via the intake widget will be added to the Inbox.
4. Customize the submit button label. Once a requester completes the form, they will click a button to submit the form and create the new item. Depending on the purpose of the intake form, you might label the button with “Submit Project Proposal”, “Report a Bug”, “Request New Hardware”, etc.
5. Select fields to allow the requester to enter additional information about the item. Field options include description, max effort, deadline, contract value (project form only), notes, and any custom task or project fields you have created in your workspace.
- Hide – the field will not be shown on the form.
- Optional – the field will be visible, but is not required upon submission.
- Required – the requester must make a selection for that field in order to submit their request.
6. Check the allow attachments option if you’d like requesters to be able to attach files to the item they are creating. These files will be added to the documents section of the new item.
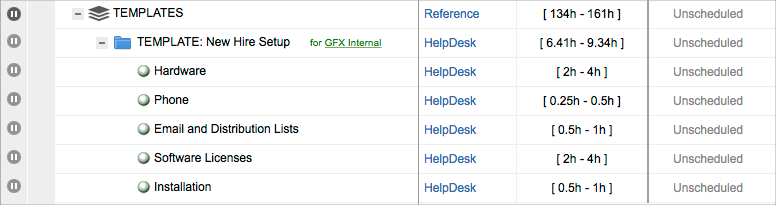
Use Task or Project Templates
The “use a task or project as a template” option on the form builder allows you to select a project or a task to use as a base for the new items that are generated through the intake widget.
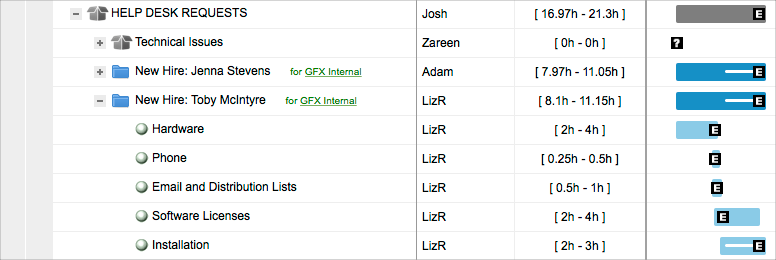
For example, let’s say that an IT department needs to complete the same set of tasks each time they set up a new employee. To manage these frequent requests, the IT manager creates a project template with tasks, estimates, checklists, custom fields, and other information pre-populated.
Once she configures an intake form widget to use this template, any department can visit the IT team’s dashboard and fill out the form to submit a request for IT to set up their new hire.
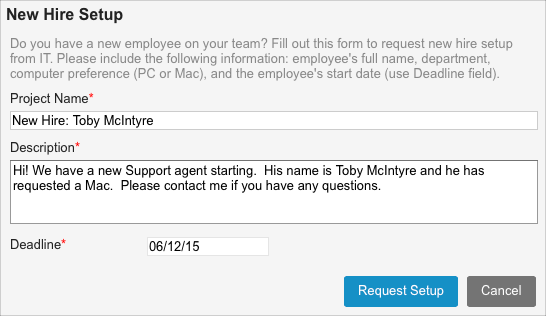
When the form is submitted, the original template project is duplicated and the information that was entered on the form by the requester is added to the new project. Since the IT manager follows the HELP DESK REQUESTS package, she sees the new request come in and is able to assign and prioritize the work.
The following fields from the template item are added to the new intake item by default: Notes, Documents, Tags, Links, Comments, Checklists, Delay Until, Deadline, Cross-Reference, Restricted Member Access.
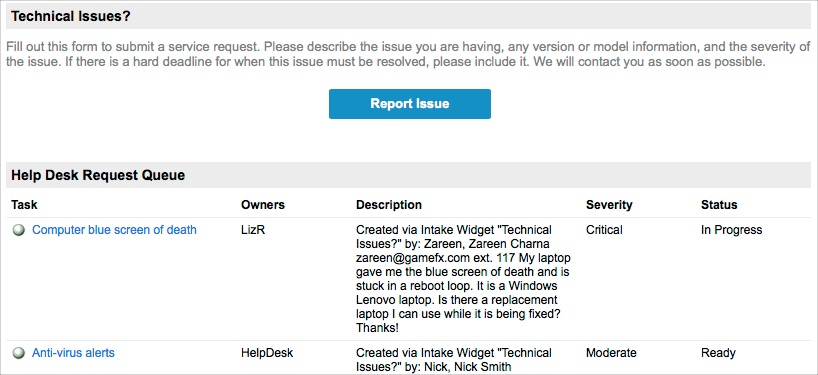
Build a Queue
Once a requester adds an item via the intake form, they will see a green banner confirming that their request was received. For intake items that are created from a template, you can add an analytics table widget as a queue to show the priority and status of new requests.
Filter by Location
Use this method if the items created by the intake widget will stay within a single container as they are being worked on:
1. On the dashboard, add an Analytics Table widget.
2. Filter by Location and select the location that the new intake form items are added to.
3. Choose columns (like owners, description, finish dates, and any custom fields) to display status information in the table.
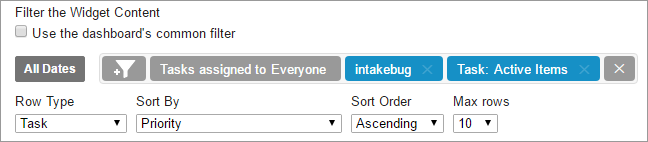
Filter by Tag
Some types of requests, like bug reports, are often moved to different containers as priorities change. If you expect that the request will be moved to a different location as part of your team’s workflow, you can add a unique tag, like #intakebug, to your template item on the Projects tab. Now, every new request that is generated through the intake form will also have this tag, so you and your dashboard viewers will be able to track items as they move around the workspace.
1. On the Projects tab, open the edit panel for the template item you are using with the intake form.
2. Add a unique tag to the template item.
3. On the dashboard, add an Analytics Table widget.
4. Filter by Tag and select the tag that you added to the template item.
5. Choose columns (like owners, description, location, finish dates, and any custom fields) to display status information in the table. Note: If you do not want the template item to appear in the table, you can build a custom status filter (done = false, on hold = false) to use in combination with the tag filter.
Tips for Managing Requests
When choosing a location for new items to land, consider who should be monitoring the incoming requests. The owner and followers of the container will receive an email notification when an item has been added*. The owner can then assign a resource, add an estimate, and prioritize the request accordingly. Alternatively, you may wish to hold a short daily meeting to assign and estimate requests that land in the Inbox.
Once the request is fulfilled, make sure you have a process in place to notify the requester, if necessary, and close out the item by marking it done.
* Email notifications will be received if owners or followers have the “Project folder / package” option enabled in their notification settings.