As a project manager, how often have you experienced these scenarios:
- You just walked out of a requirement gathering session and have an Excel list of new project requirements that need to be organized into a schedule
- Your team has developed a user story backlog in JIRA but you need to represent the sprints and key dependencies in a project timeline
- You realize several key meeting minutes are actually project tasks that need to be incorporated into the project schedule
All of these scenarios happen daily to project managers. Project managers also use a variety of tools to develop scope, gather requirements, track action items, and organize for delivery. When these individual items need to be organized into a project schedule, the project manager has to synthesize the requirements, organize the actions and to-do list, and reformat them into a project schedule.
All of this increases the project manager’s administrative burden which is counter-productive to leading the team and driving for delivery.
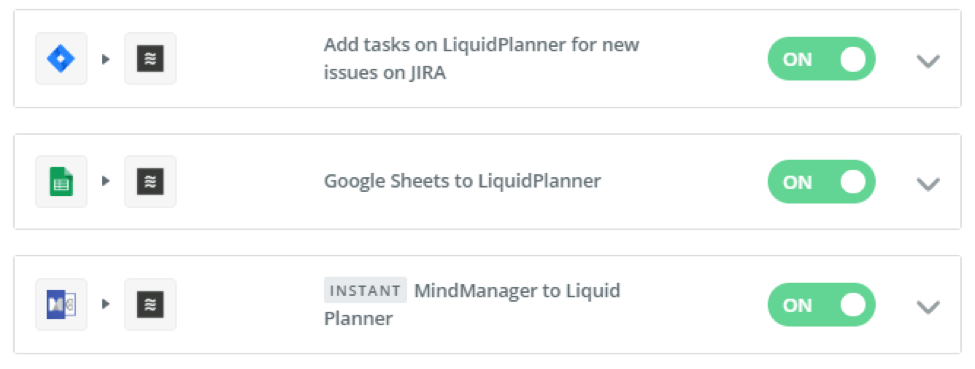
Fortunately, LiquidPlanner can help reduce this burden with its nifty Zapier integration.
What is Zapier?
Zapier is web-based application integration and automation solution that allows online applications to interact with each other. There are hundreds of automations and integrations available on the Zapier.com platform. A quick review of the prebuilt connections (also called Zaps) are available for LiquidPlanner, JIRA, Trello, Salesforce, Google Docs, and Gmail.
What is a Zap?
A Zap is an integration between two applications. A zap is configured within a few minutes by configuring a trigger and an action between two applications. Creating a Zap uses a simple process where you define a trigger in one application and then an action in the receiving application.
In the scenarios above, I configured Google Sheets to send a new task to LiquidPlanner for new requirements and user stories. It is very easy to configure the Zap integration as the Zap editor walks you through triggers and actions across both applications. Zaps can be customized to work on specific data filters and default specific values in the Zap action. Below are a few Zaps I created to address the aforementioned project management scenarios.
 In the tutorial below, I’ll show you how to send requirements in Google Sheets to LiquidPlanner. By following the simple configuration process, you’ll be building integration between your favorite web-based applications quickly.
Google Sheets to LiquidPlanner Zapier Integration
Step 1. Choose a Trigger App
The first step is to choose the source or “trigger” application. Zapier has hundreds of applications to choose from and the platform continues to grow. Because we’re integrating Google Sheets, search for Google Sheets in the Choose a Trigger App search box.

Once you configure an application, it is always available to you in the dashboard.
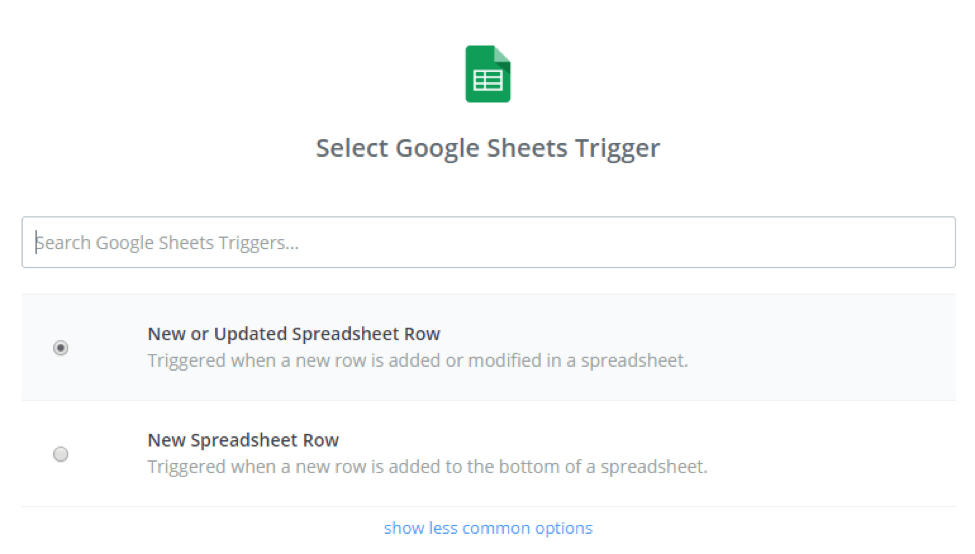
Step 2. Specify the Trigger
The next step is to select the specific trigger within Google Sheets that initiates the event. In this example, I want to send any new rows or updated rows in Google Sheets to LiquidPlanner.
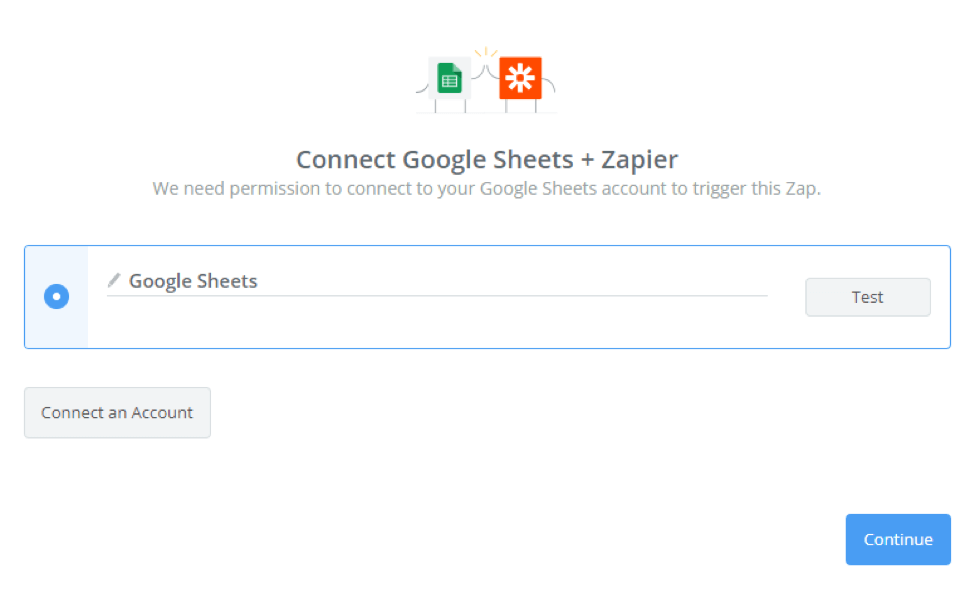
Step 3. Connect Google Sheets to Zapier
You will need to sign into your Google account within the Zapier environment to make the connection. Once you sign in, the account will be reuses for any new Zap you create.
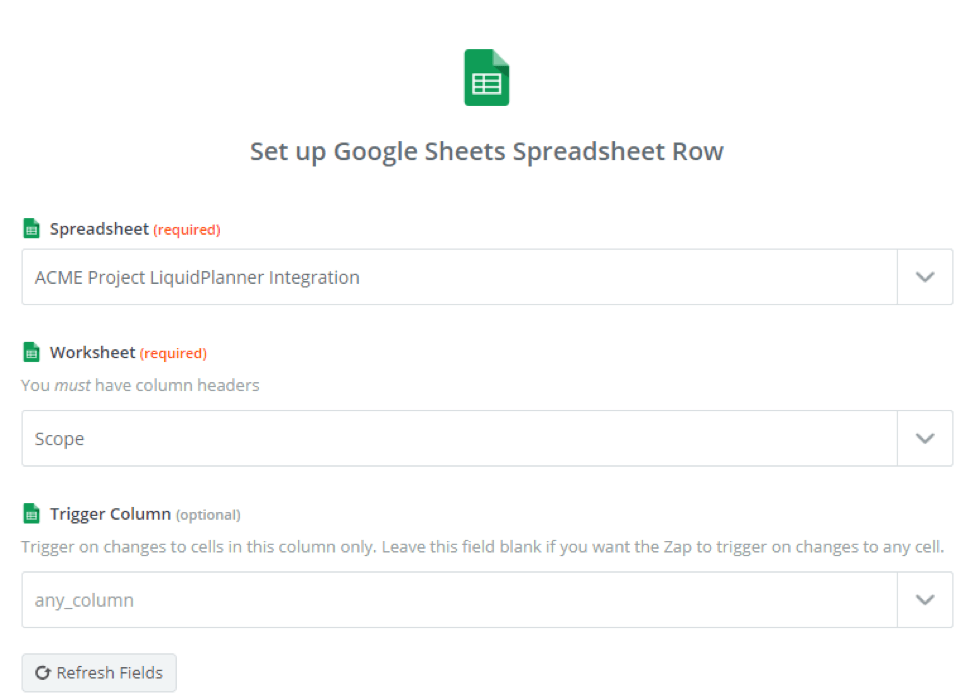
Step 4. Setup Google Sheets Options
Once the account is connected, you need to specify the Google Sheets options. In this Zap, I include the Google spreadsheet name, the specific sheet, and any column options. In this Zap, the Google spreadsheet only has one sheet called “Scope”.
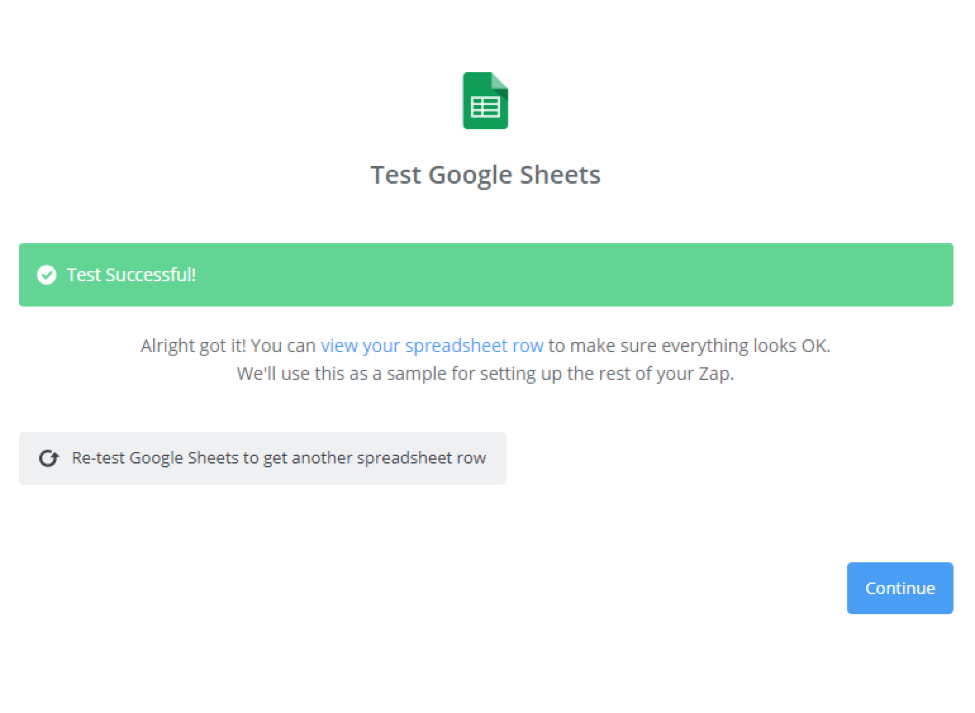
Step 5. Test Google Sheets Connection
Zapier will test the Google Sheets connection as it attempts to retrieve a row based on the criteria specified in Step 4.
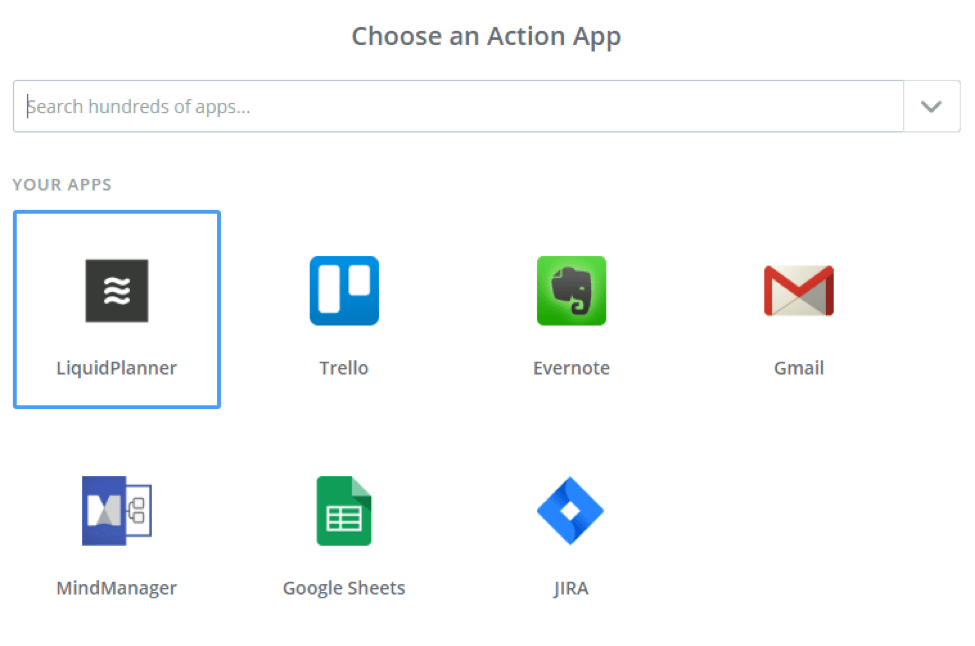
Step 6. Select an application for the Action
The next step is to specify the target application for the Zapier action. Now that Google Sheets is configured as the source, the next step is to select LiquidPlanner as the target application for the action.
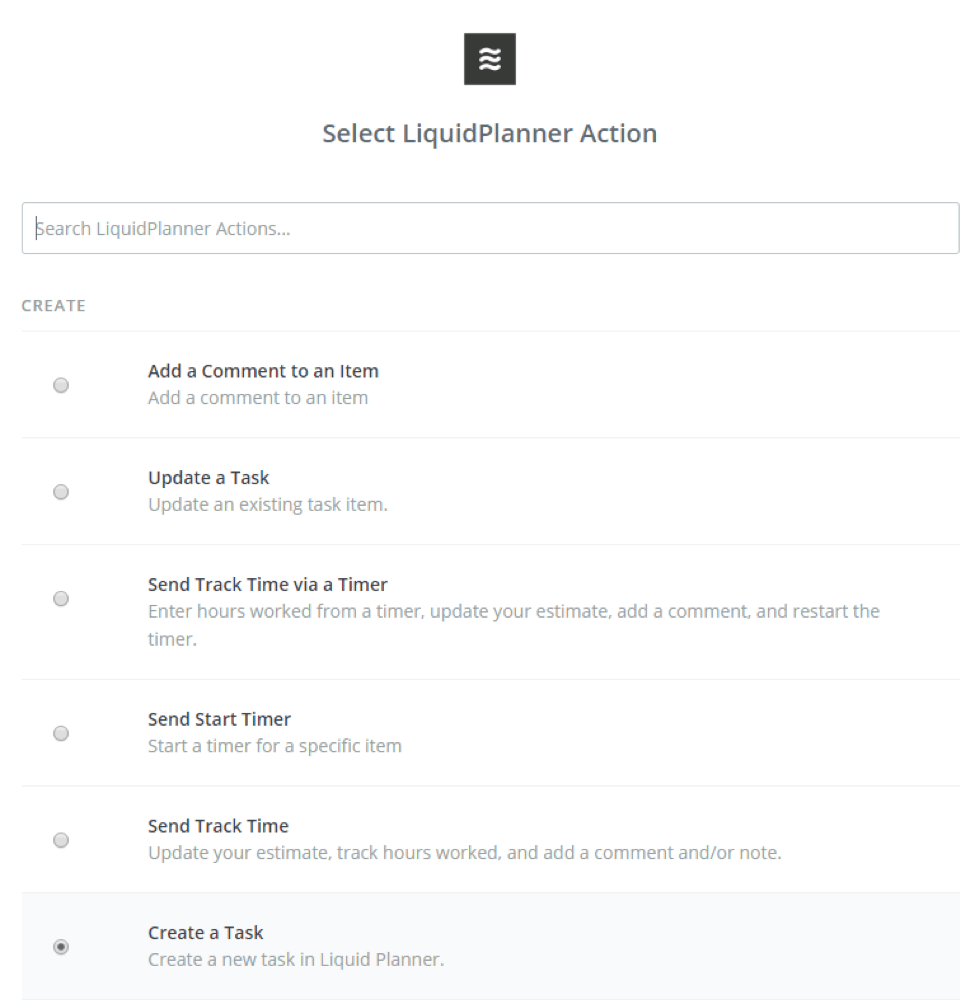
Step 7. Specify the Action
With each target applications, there are many different actions that can be taken within the selected application. LiquidPlanner provides many different actions including creating tasks, updating tasks or adding comments. Zapier maintains a list of common target actions and less common actions depending on your integration needs.
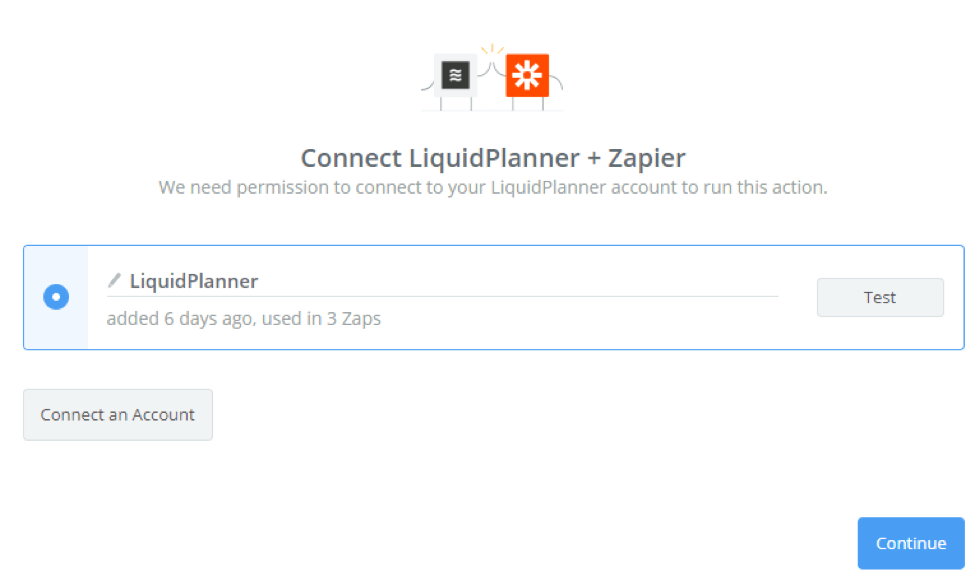
Step 8. Connect Zapier to the LiquidPlanner Account
Once the target application is defined, you need to connect the application to your LiquidPlanner account similar to Step 3 when you connected Google Sheets.
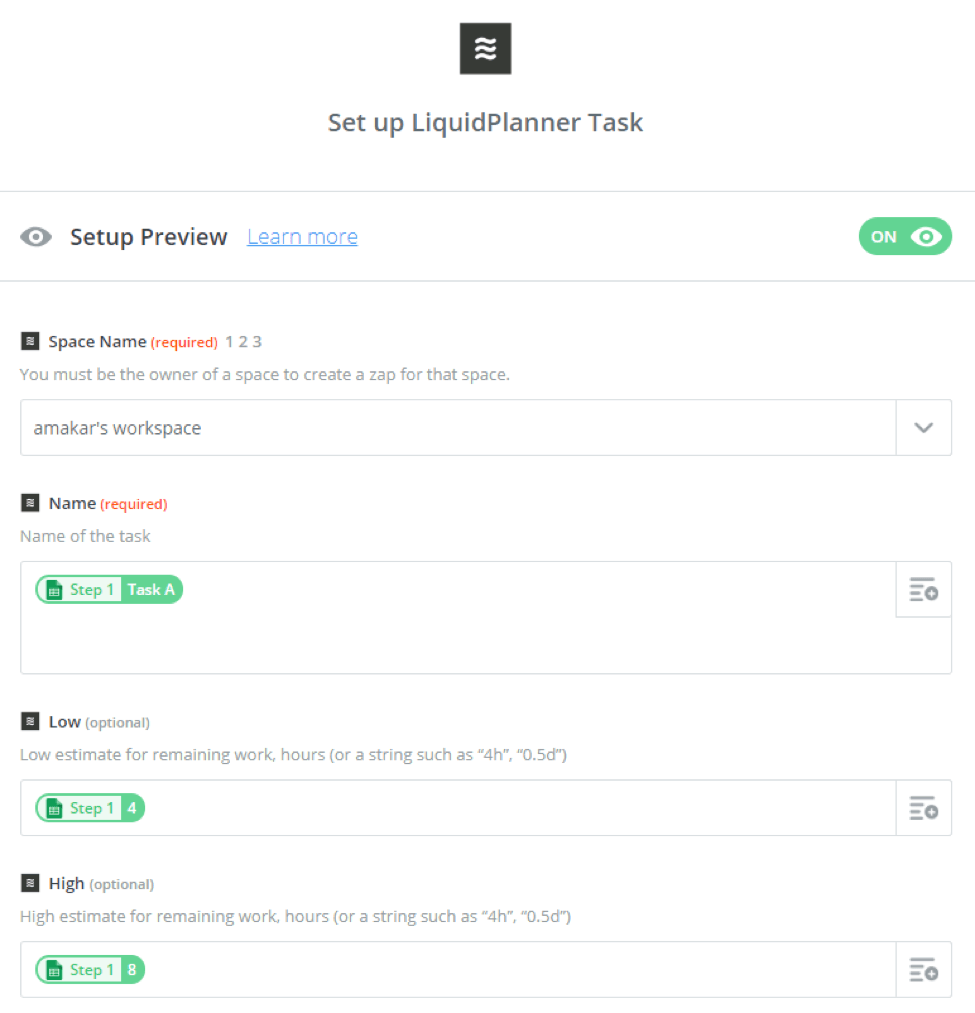
Step 9. Setup the LiquidPlanner Task
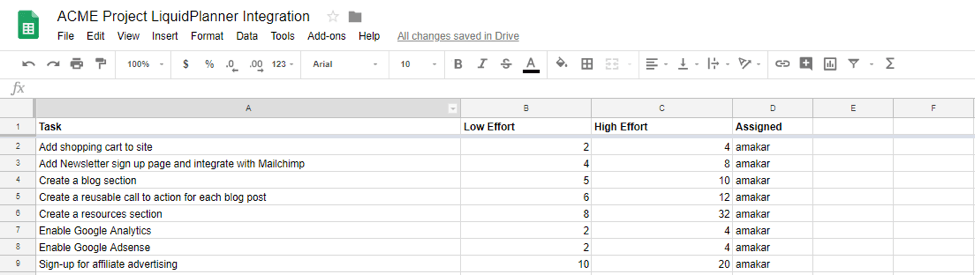
Once the account is authenticated, LiquidPlanner needs to be mapped to the data coming from Google Sheets. If Task A was the sample task in Google Sheets, it will appear in the LiquidPlanner mapping. In this example, I sent Task A with a low estimate of 4 hours and a high estimate of 8 hours. These are just a few of the basic fields that can be configured. Depending on the business needs, different mappings can be created based on the trigger.
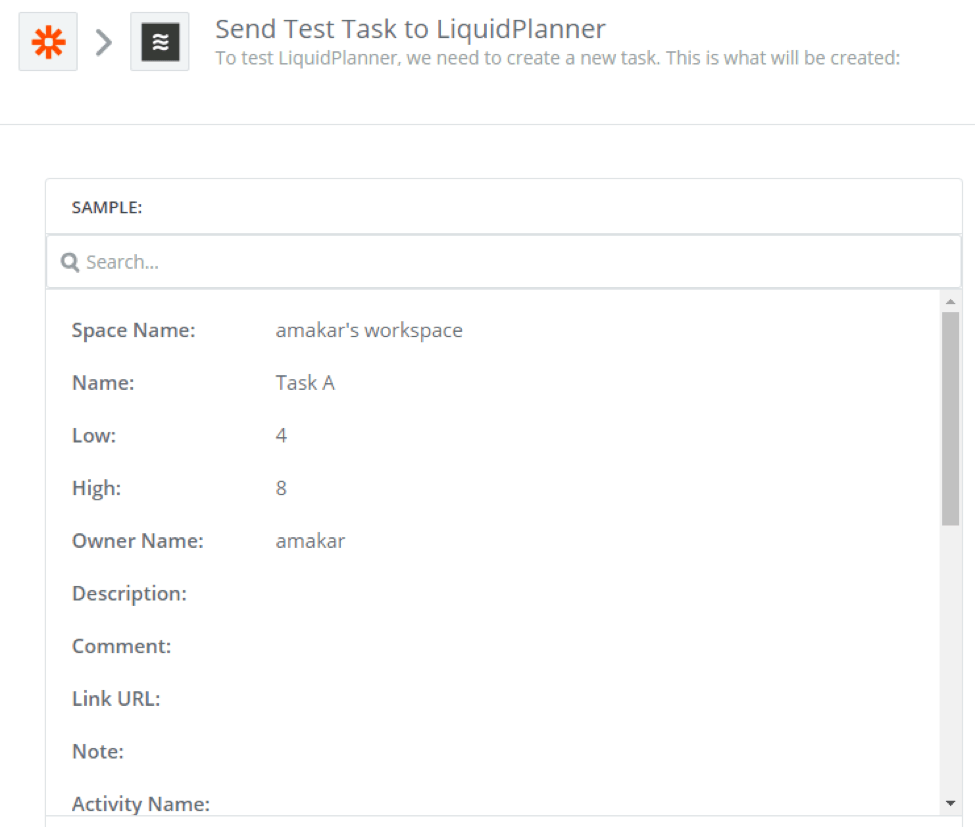
Step 10. Send a Test Task to LiquidPlanner
Once the integration is configured, send a test task to LiquidPlanner. Once the integration is a success, you’re just a few clicks away from enabling the Zap.
Step 11. Turn on the Zap
Once the Zap is confirmed to work, enable the Zap and it will run every 15 minutes integrating Google Sheets with LiquidPlanner.

Step 12. Add tasks to Google Sheets
Go ahead and open the connected spreadsheet in Google Sheets and add some tasks.
In this example, I documented several user stories and tasks needed to launch a small website.
Step 13. Wait 15 minutes or run the Zap from the dashboard
If you want immediate gratification, go ahead and run the Zap from your Zapier dashboard.
Otherwise, you can continue to update the sheet and go to lunch. When you get back, the tasks will be submitted to LiquidPlanner.
Step 14. Continue Planning in LiquidPlanner
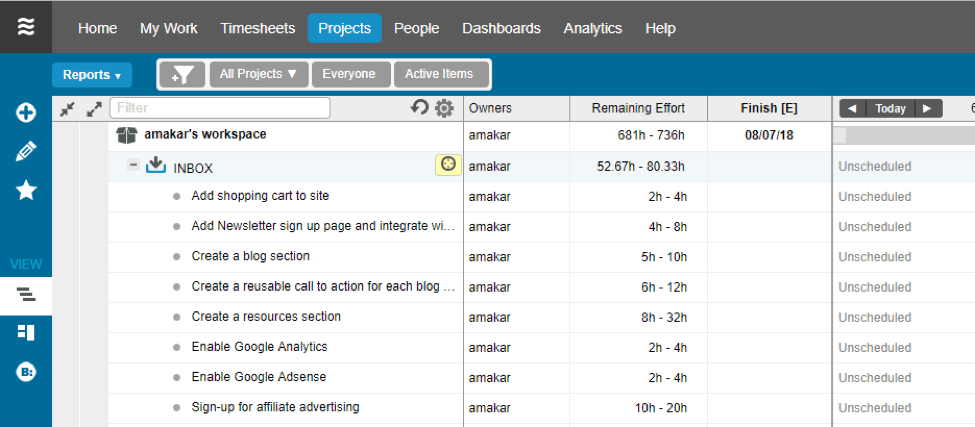
Once the tasks are in LiquidPlanner, you can plan the tasks as you normally would in LiquidPlanner. The tasks show up in the Inbox much like the tasks you email into LiquidPlanner.
Go ahead and re-assign the appropriate resources, make any estimation tweaks and recalculate the Gantt chart.
It may seem like 14 steps is a lot to configure the integration but it is very quick and easy to setup the two applications.
Benefits
As more companies adopt web-enabled project management tools, the role of “middleware” connecting robust applications will only continue to grow. The Zapier integration helps the project manager save time, reduce the administrative burden, and share project data across project management and collaboration tools. It’s actually “fun” to use. Well, as much “fun” as a project manager can have on a project.
More LiquidPlanner Zaps
There are many different Zap configuration available for LiquidPlanner. If your team is using JIRA to build a product backlog but needs a meaningful Gantt Chart, the LiquidPlanner Zapier integration will build a useful project timeline.
If you are managing operations using the Kanban board in Trello, a Zapier integration will update the task status within LiquidPlanner. Agile and Kanban approaches are excellent ways to build software yet stakeholders still want to know when their specific feature will be delivered. Integrating with LiquidPlanner will help answer the timeline question as well as enable to team to remain Agile.
For a complete list of ways to automate LiquidPlanner in Zapier, check out https://zapier.com/apps/liquid-planner/integrations. In a future tutorial, I’ll show you how to convert a work breakdown structure into LiquidPlanner with an on-demand Zap.