
“Show me the money!” – Rod Tidwell in “Jerry McGuire.”
It’s widely known that managing projects, especially technical ones, are extremely challenging, and the statistics make for some bleak reading. Under-planned, under-scoped and under-managed projects have led to some eye-watering budget overspends. In some cases, going over budget puts the existence of an entire business in jeopardy.
And for any of you who have had to tell a boss, stakeholder or client that you’re overspending the budget they gave you—well, it’s not a great position to be in.
So how do you create a budget for your project that you can have confidence in?
And how do you establish whether it’s going to be financially viable in the first place?
Answering these questions can be tricky due to the uncertainty that is inherent in all projects. But if you take the right approach and use the right tool, you’ll have a budget that you can believe in and deliver to.
Here’s how LiquidPlanner helps you create a realistic budget:
LiquidPlanner lets you plan a project and cost it out in the same platform. So, as you go through the process of building out your requirements in the initial stages, you’ll see how your budget aligns with your project plan.
Here’s how to get started:
1. Build out your project with as much detail as you can.
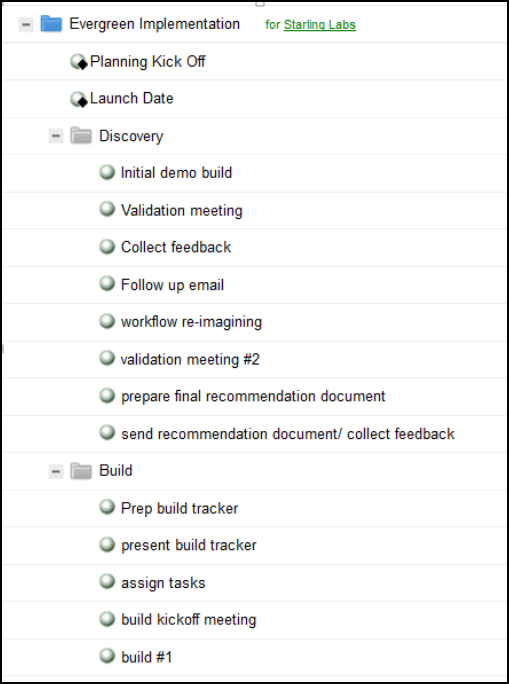
If your projects tend to comprise a similar work breakdown structure, LiquidPlanner allows you to create project templates that you can simply duplicate then edit for new projects. So creating new task structures is quick and easy.

When you build out your project, don’t forget those activities that drive quality and collaboration such as testing, team meetings, travel and face time with the customer. They all contribute to project success but they all have a cost so make sure they’re in your plan.
For fixed price projects you can also add a Contract Value so you can compare your budget to the original price as the project progresses. Even your first cut of your project budget can then quickly tell you whether you’re on target or not.
2. Assign work
Once your tasks are set up, be sure all plan items are assigned to resources on your team. This way the LiquidPlanner scheduling engine can see what work is allocated and then calculate costs accordingly. If you have tasks unassigned, then you won’t get a realistic budget calculation. For times when you don’t know who will be doing certain work, you can create and assign virtual resources as a placeholder.
3. Estimate your work
Make sure you input ranged estimates for all your project items. Base your estimates on best case/worst case scenarios around how much effort you think it will take to complete every task.
4. Set up your labor cost
LiquidPlanner allows workspace owners and co-owners to set up rate sheets using Billing Rules and Pay Rules. This lets you attach a currency value to each hour of work estimated in terms of money in and money out.
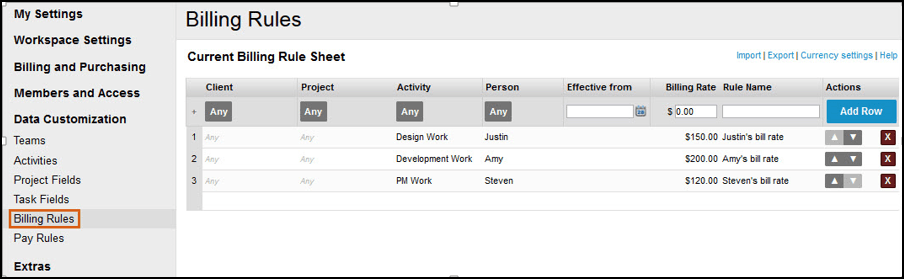
Set up a range of Activities that you can apply to each task and team member. With this kind of flexible billing and pay structure, you can easily report on the revenue earned and the costs expended.
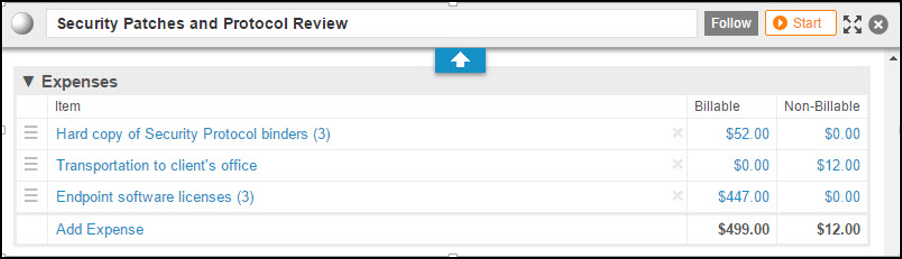
5. Set up non-labor costs
Chances are, team members will be your biggest project cost, especially with development or services-based businesses. But don’t forget the other costs: routers, wall mount jacks, and transportation for example. If nothing else, be sure to put finances aside for the project wrap party!
Non-labor costs can be added as notes at the task or project level in LiquidPlanner. For Enterprise tier customers, you have our Expenses feature, which lets you add more detailed financials:
6. Analyze your budget
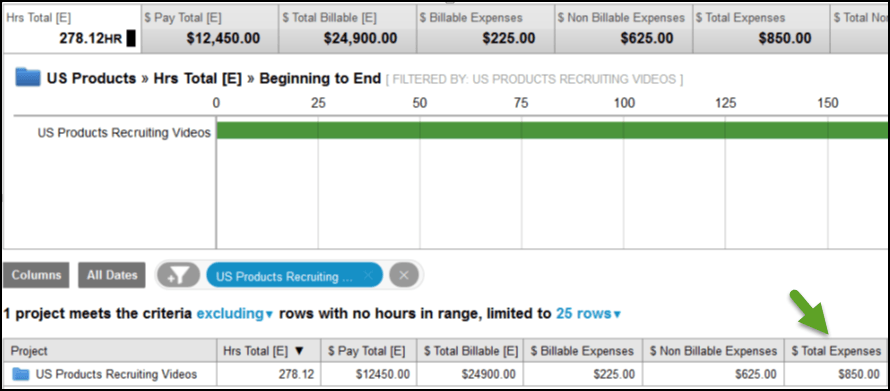
Once you’ve completed the above steps and populated your project with the key information, use the Analytics feature to generate and track your budget.
Project roll-up reports show your total budgeted hours, the dollar equivalent and many other aspects of your project forecast. In this example, the project’s total bottom line comes to $850.00
Once your budget is finalized you can use the Baseline View to compare the current status of your plan to that of a specific date in the past—i.e., the plan on Day 28 compared to the plan on Day 1.
The key to successful projects
Creating a project budget can be a daunting task but it’s key to establishing a valid business case for most projects. Plus, by establishing a solid budget up front, you can prepare yourself well in advance at the first signs of scope creep. As a manager, you’re likely to be held accountable for your project budgets. And if they really get blown, it could threaten your whole business. That’s why diligent groundwork is essential when first defining that budget. In project management, the devil is often in the details.
Knowing how to estimate work is a key component to creating a budget in LiquidPlanner. To learn how to master this art and science, download our eBook, 6 Best Practices for Accurate Project Estimates.