A living, breathing LiquidPlanner workspace is a gold mine of data about your team.
Looking towards the future we can see how the work we have is falling into the schedule and the impact it is having on the availability of our resources. Looking towards the past we see when the work was done and how much effort it required. Reporting in Analytics specifically allows you to focus on a specified date range to see how hours are scheduled, or how they have been logged.
By setting your Date Range Filter accordingly, you end up with basic reports that show how hours are scheduled or logged across projects, resources, or teams. To get beyond the basics and create powerful, robust reports, you need to harness the filtering options available in LiquidPlanner.
Here are a few examples that look at a few of the different filtering options and how they can be leveraged to build more powerful reports.
Group Resources by Skill Set or Role Using the Person Filter
I talk to plenty of teams whose members wear many different hats throughout the workweek. These various hats can break the boundaries of the Teams you have set up in LiquidPlanner and even transcend the hierarchy of an org-chart. It can be difficult to get a good measure of your capacity for different types of work if these skill sets vary across team members.
The Person Filter allows you to select specific members of your team and focus in on only their work, allowing you to see their availability when looking at resource reports. You can save groupings of multiple people so if you start setting up groups by skill you suddenly harness that ability to go into these reports with a lens that allows you to see between the layers of team members and their interwoven skill sets.
For instance, let’s say you realize a surge of design work is coming down your sales pipeline, and you’re going to need the help of anyone on your team with CAD experience.
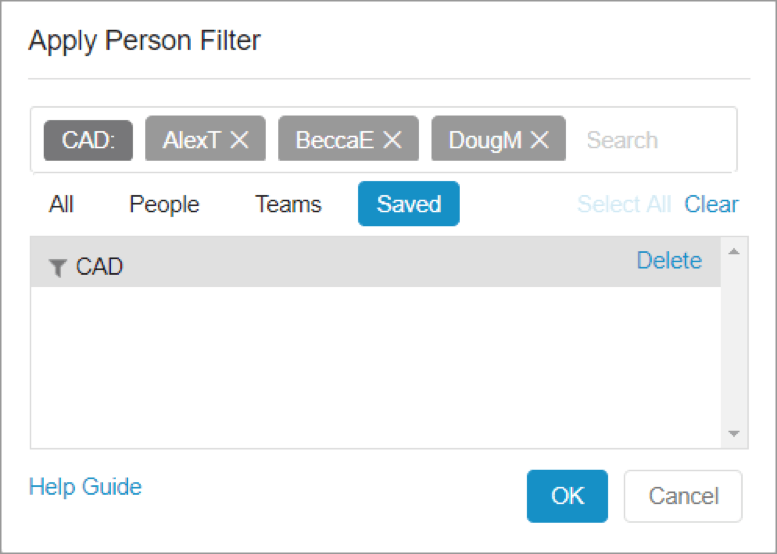
If you have all of those people set up under a Saved Person Filter, called something like “CAD”, it’s just a matter of applying this to a Resource Roll-Up report or the Resource Workload Report focused on the next few weeks. Now you can make informed decisions about who you may need to pull in to these projects to keep everything running smoothly.
By saving Person Filters based on skill sets, you’re able to see more than just how much work your whole team can take on in LiquidPlanner; you can see how much of specific types of work you are able to take on.
Filter by Tags in Reports to Build Stronger Templates
Templates are a huge time-saver when you’re frequently completing similar types of tasks or projects. Adding Tags to your Templates will unlock a new layer of long-term reporting, allow you to see how things play-out on specific steps in your workflow, and ensure that your estimates are realistic.
As you’re getting started with a new type of project, you may not have a great idea of what exactly this will look like. LiquidPlanner allows you to capture this uncertainty by estimating in ranges. Some estimates can vary wildly.
For example, I often see a final Task in Projects to review all of the work that has been done. As we get started with new types of work all we may know is that this task could take anywhere from ten minutes to ten hours. As we’re initially planning, it is alright to plug this in as an estimate if that is truly our guess at the best- and worst-case scenario.
This will lead to more uncertainty in our calculated dates, but we can use tags to check back and see how much time we actually spent on this Review Task each time we complete one of these Projects.
It’s just a matter of setting a unique Tag on that task in the Template, something like “review”. Once you have a few of these projects completed, you can create a Task Roll-up report that is filtered to that #review Tag. Be mindful of the date-range and status filters on this report.
The result is a list of these review tasks all in one spot that allows you to compare the actual time logged in each instance. If you see that you actually spend anywhere from 8-14 hours on these tasks you of course want to update the estimate for this task in your Template.
Pairing down our estimates reduces the uncertainty in our schedule and makes our calculated dates more reliable.
Now you’re starting to build project plans that are backed up by actual data from the work your team has done. Just imagine being able to do this with each of the individual Tasks in your Projects over time!
Use Status and Custom Status Filters to Report on the Exact Items You’re Looking for
LiquidPlanner was built in recognition that a lot of workspaces will see priorities change on a near constant basis. It’s just the way it goes. Sometimes we meticulously build out a project plan, and just as we’re set to get things rolling, we get the carpet pulled out from under us. Someone’s mind gets changed, a promise isn’t delivered on, or, perhaps, something bigger and better comes along and distracts us from our current plans.
For one reason or another, we sometimes end up with tasks, or even full projects, that just get forgotten about.
LiquidPlanner’s Status Filters allow you to take a look at your work at a new level, beyond just what you have done and what you are going to do.
Pre-built options allow you to get a look at tasks or projects with a deadline at risk, items that have been placed on hold, or items that are worryingly still not marked done but have zero effort remaining.
If I want to search for my tasks that have fallen off everyone’s radar, I can build a Custom Status Filter that dials into to a view of exactly what I need:
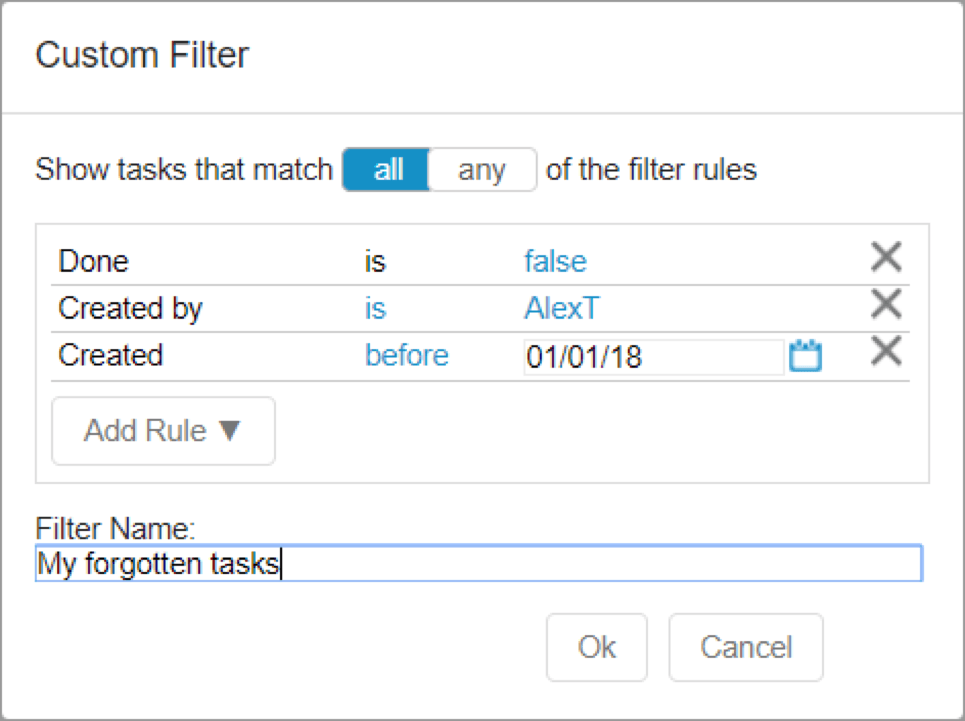
If I apply this filter to a Task Roll-up Report, I get a list of any tasks that I created before this year that are still active. I can use this report to make decisions about whether to close this work out, backlog it, or see what I can do with my team to get it done now.
This just scratches the surface of what can be done with a Custom Status Filter. If these filters are new to you, I encourage you to explore this feature area a bit more.
These Tips Apply to More than Just Analytics
These tips to create more powerful and organized reports are all based around a better use of our Filters. It’s important to remember that all of these tips are available and relevant throughout the rest of the application as well and can be just as powerful when leveraged in Dashboards or on the Projects Tab.
Brushing up on your knowledge of all of our filtering options LiquidPlanner has is the quickest path to sharpening your reporting skills.
Have questions? Don’t hesitate to reach out to our support team for help.
New to LiquidPlanner? Try these features and more with a free trial.