Say hello to the new Tempo! LiquidPlanner is now Portfolio Manager.

For project managers, a key mission is to ensure that all project team members are assigned the right tasks—and the right amount of work—given their availability. That means if someone is only available 8 hours a day, then the project schedule should only reflect (at most) 8 hours of work on that person each day.
But with most project scheduling software, it is frighteningly easy to create schedules with overloaded resources. Take this Microsoft Project Gantt Chart, for instance:

This project schedule would have you believe that Harry can accomplish 24 hours of work within an 8-hour period. Here we see that Harry is scheduled to paint the house, move the lawn and clean the garage all on the same day. Each of these tasks takes 8 hours to complete and Harry is only available to work an 8 hour day. Yikes, Harry is over-allocated!
Good project managers know a resource can’t squeeze triple the work into a given day just because that is what we see on the screen, so it’s the project schedule that needs to adjust. It needs to be “resource leveled.” But even in this simple example, resource leveling is harder than it looks.
Resource Leveling in Microsoft Project
The process of resource leveling can be a complex with a tool like Microsoft Project. In project management circles, using Microsoft Project’s automatic resource leveling feature is often discouraged, as the leveling tends to push the project finish out into the distant future.
This is often due to the constraints and dependencies in the project schedule, and the logic (if you want to call it that) Microsoft Project uses to delay and adjust team member assignments.
It’s not that Microsoft Project is a bad tool – it’s just that its automatic leveling feature is driven by a complex set of rules, and it’s an algorithm that determines which tasks to delay, split or adjust.
In the screenshot below, you can see all the different decisions you have to make just to give your project team a realistic schedule.

In Microsoft Project 2010, once these decisions are made, the actual process of resource leveling is completed by selecting the Resource tab and clicking on the “Level All” button. (Are you scared yet?)

Ok, phew — this time we got lucky. In the next screenshot, we’ve successfully scheduled Harry to paint the house on the first day, mow the lawn the second day and clean the garage on the 3rd day. However, what would happen if “Mow the lawn” was suddenly a higher priority?
If the prioritization changes, the entire process needs to be repeated to reallocate and level the project resources appropriately.
Having all these bells and whistles may help if you are some kind of project management savant, but the reality for most teams is that the best schedules are created as result of a human prioritizing the work and accepting people’s true availability.
If priorities change (as they usually do), do you really want to go through the process of resource leveling again? Heck no — that’s why so many project plans lay dormant after they’re created.
Three Cheers for Realistic Schedules!
If you’re an MS Project-user-turned-LiquidPlanner-user, you may have blocked out the memories of resource leveling from back in the day. That’s because LiquidPlanner automatically balances the work assigned to team members. Our goal is to give you dependable project schedules that are automatically resource-leveled and have realistic end dates.
Here’s how to do it:
- add your tasks
- provide best/worst case effort estimates
- assign a team member
- repeat
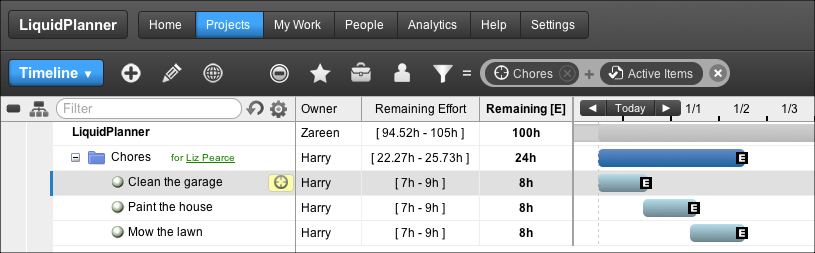
The work is automatically scheduled based on the task priority order. You can see the same sample project schedule from the last example below, this time in LiquidPlanner.
LiquidPlanner considers the team member’s availability and the work assigned to them before giving you an expected start and end date for each task. Plus, you can build priority lists from across different projects, to reflect team members working on multiple projects simultaneously. If one of the tasks is delayed or is dependent upon another task, the “flow around” feature will adjust the schedule so the team member is always working on the next highest priority task.
When I built this schedule in LiquidPlanner, I didn’t have to worry about resource leveling. As tasks were added and estimated, the expected completion dates were generated automatically based on priority/availability. And the schedule can be updated in mere seconds if/when priorities change. If the “Clean the garage” task suddenly has a higher priority, all I need to do is drag the task to the first line in the task list.
Once I click refresh, the schedule will adjust.
A LiquidPlanner schedule is always resource-leveled based on the resource’s availability and task assignments. Project managers still have to identify task dependencies like in any other system, but that’s just good schedule development.
Resource leveling is critical, but it doesn’t have to be hard. Try it the LiquidPlanner way and see.
Managing resources accurately is tricky business—but totally doable! Especially if you have the right set of skills, and tools. To learn more, download our eBook, “5 Best Practices to Manage Project Resources Effectively.”