 Say hello to the new Tempo! LiquidPlanner is now Portfolio Manager.
A task is the most basic building block in LiquidPlanner and represents an individual work item for a project. A task can be added to a project, sub-folder, package, or the Inbox. Tasks must be placed within a container.
The ranged effort estimate associated with a task and tracking time as work is completed are both critical components that drive the project schedule.
LiquidPlanner tasks can be added from several locations, in and out of the workspace.
Add Tasks From Projects Tab
First, select the destination container (project, sub-folder, package or inbox), and then add tasks using the Add Menu or Right Click Menu.
In the Add Tasks window, you can enter the task name, owner and estimate. The “New Task” link can be used to insert a new row if you need to add multiple tasks at one time. Up to 50 tasks can be created at one time from this window.
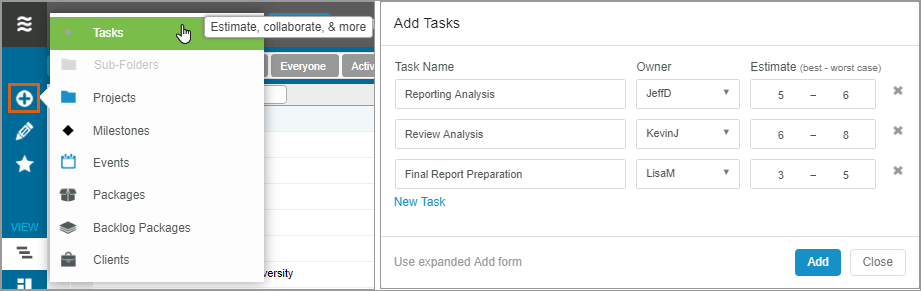
To bulk add tasks and associate additional attributes, click the “Use expanded Add form” link.
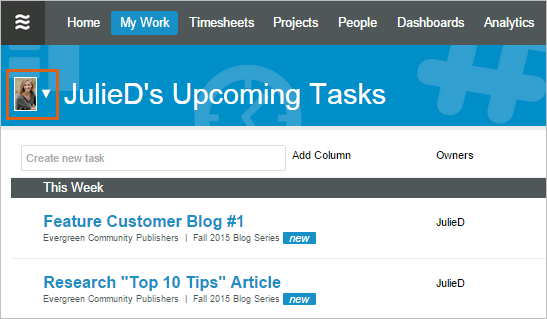
Add Tasks From My Work Tab
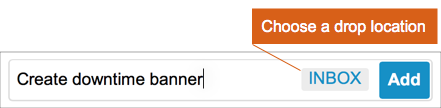
At the top of the My Work tab, click into the “Create new task” box and give the task a name. To drop the task into a project, sub-folder, or package click on the location picker. After making your selection, click the Add button. Once the task is created, enter details about the new item in the Edit Panel and estimate the task.
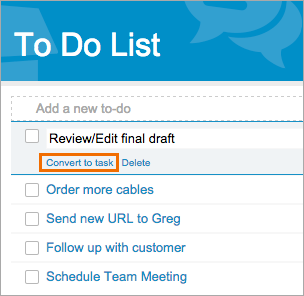
Convert To-Do List Items To A Task
Any To-Do List item you’ve created on the My Work tab can easily be converted into a task should it need to be included in a project, or have time tracked. Select “Convert to task” and the item will immediately be added to the Inbox.
Items in the Inbox are not scheduled. To schedule the task, move it to the appropriate project or package outside the Inbox. Open the task Edit Panel to clear the Inbox package association and designate a new location.
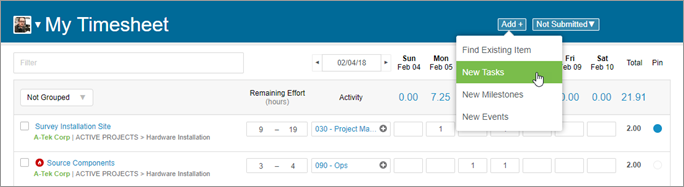
Add Tasks From Timesheet Tab
On the Timesheet, use the Add + button to create a new task. It will be assigned to the timesheet owner and placed in the Inbox.
Pin the task or log time immediately to ensure that it remains on your timesheet.
Associate the task with a project or package outside the Inbox without leaving the timesheet by clicking on the task name to open its edit panel.
Add Tasks Via Intake Widget
With the Intake Form widget on a Dashboard, team members or external guests can submit new tasks into the workspace. These can be directed to the Inbox, a project, sub-folder or package.
Use the form builder to set up task criteria such as name, description, max effort, deadline, custom field and notes. The form builder option “use a task or project as a template” allows you to select an existing task as a basis for new items generated through the intake widget.
Add Tasks Via Email
Individual tasks can be added to the inbox or another container in the workspace via email. The new task’s edit panel is populated with information from the email subject line.
Formatting is the same as under “Examples & Tips” in the Add Task window. Task name is mandatory and the other fields (i.e., owner, estimate, tag or task custom field) are optional. When the task owner is not specified, it will be assigned to the workspace member submitting the email. When that person is not a member of the workspace, the task owner will be “unassigned.”
Once it enters the workspace, the body of the email appears in the notes and attachments are added to documents on the task’s edit panel.
Note that emailing tasks into LiquidPlanner must be enabled by a workspace administrator (go to User Menu > Settings > Workspace Settings > Email Integration).
Import Tasks Via CSV File
Open the Edit Menu on the Projects tab and select Import From a File to import tasks from your .csv file.
The following fields can be imported: task name, owner, description, total work done, low and high estimate, reference field, date done, deadline, delay until, max effort, tags.
During step three of the import process you will be able to review column mapping to make sure your spreadsheet column headers map to the appropriate LiquidPlanner field.
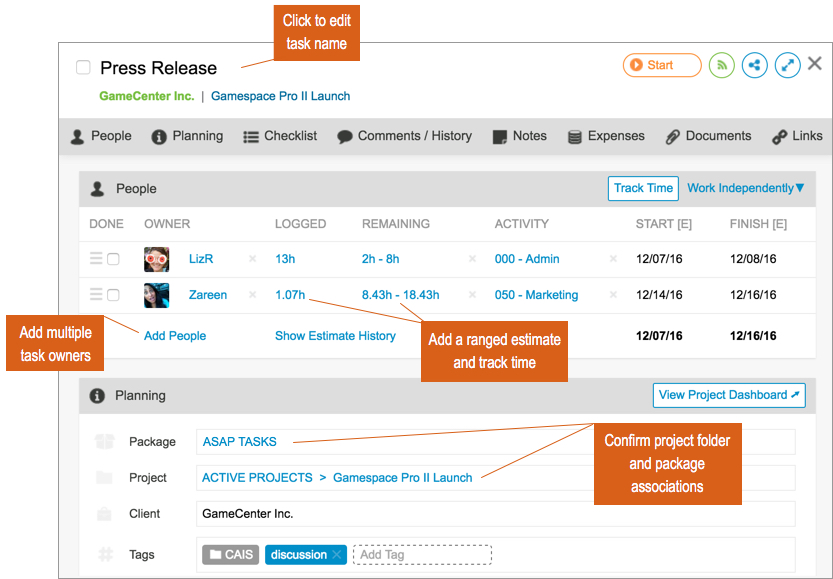
The Task Edit Panel
Details, planning, and collaboration are managed on the task’s Edit Panel. Rename a task by clicking on it’s title at the top of the edit panel. Add multiple owners to the task, estimate remaining effort, and track time here as well.
Filter To Tasks
LiquidPlanner gives you more than one way to zero in on either your own tasks or those belonging to other workspace members.
Viewing your own tasks

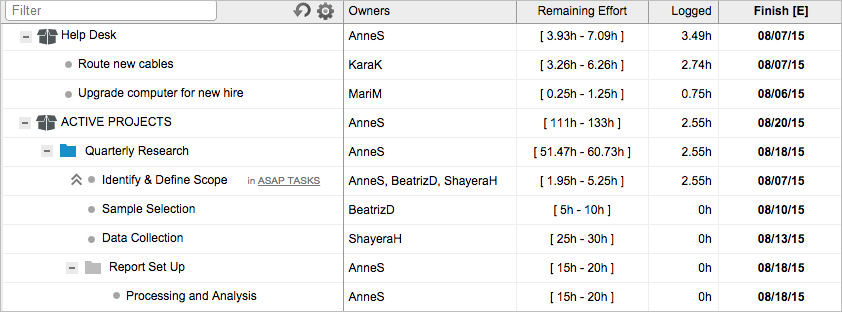
- On the Projects tab, use the focus filter and select My Tasks to see all tasks you own (see above). Use filters to further narrow this view by client, project folder, package, tag, custom field, or status.
- On the My Work tab, your Upcoming Tasks page presents your tasks across all projects, in start date order.
- On the Home tab, in the Coming Up widget, click on View My Calendar to see your tasks in a four week rolling calendar view. The calendar integration feature allows you to view your next 200 tasks on an external calendar as well.
Viewing another person’s tasks
- On the Projects tab, use Filter by Owner to see only tasks owned by one or more specific owners. Layer in other filters to narrow down further by client, project folder, package, tag, custom field, or status.
- On the My Work tab, choose a single person from the Members picker to see that person’s tasks instead of your own.
Manage Tasks
- After creating a task, confirm that it is associated with the appropriate container: project, sub-folder, or package.
- Confirm the task is assigned to the appropriate owner(s) – those responsible for completing the work.
- Confirm that tasks are estimated with an accurate ranged effort estimate. This represents your best case / worst case estimation of how many hours or days it will take to complete the task. Re-estimate tasks when the scope changes.
- Use checklists to break down task elements.
- Set a daily limit to control task scheduling when you expect to work on it just a few hours at a time, over a number of days or weeks.
Task Tips
- Duplicate tasks (or entire projects) so that you don’t have to create new similar plan items from scratch.
- If multiple people will be doing the same work or activity on a task, you can assign them all to the same task by clicking the “Add People” link and selecting their name(s) from the member-picker.
- The Edit Menu gives you several options for working with tasks, such as exporting, printing, emailing and linking.
- To search for a task by ID number, just enter the ID number into the Search field.