
| 1 |
Build out your portfolio and capture project details # |
Once you have your onboarding success plan, it’s time to architect your workspace and add your work. This lesson is intended for team champions who are helping to set-up and customize your workspace. It covers the four major components to consider when adding data and building your workflow.
Portfolio Structure
Identify new work processes
Project and Task prioritization
Customize Settings & Data in Administration
| 2 |
Portfolio Structure # |
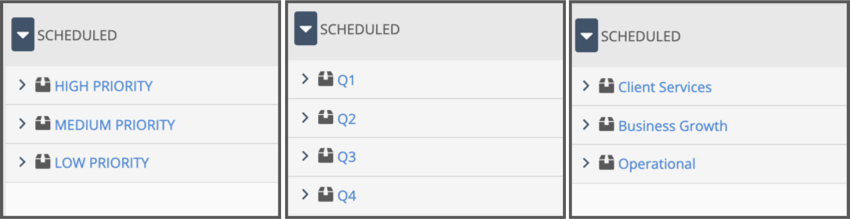
You’ll be using Packages to prioritize and group your projects. The order that packages are listed within the Portfolio View establishes schedule priority for your workspace.
We recommend using the default High / Medium / Low package structure to help you prioritize your work as you are starting out.
One of the great things about LiquidPlanner is that you can always adjust your set-up later on if you find a different structure may work better based on your workflow. Customize and add packages to reflect your organization’s priorities.
The ability to control and monitor scheduling for a group of projects makes Packages are an ideal way to manage large programs, multi-phase projects, and sprints. If you add schedule controls like Target Start or Target Finish to a Package, all of the items within the package inherit those dates. Schedule and Work Metrics data rolls up to the package as well so you can monitor and report on progress at the highest level.
Use the Packages button at the top of the Portfolio View to add Packages and change package order. Right-click on a Package to edit Package settings.
| 3 |
Identify new work processes # |
There are a variety of ways you can add work to your workspace:
- Add Projects from scratch in the appropriate package within the Scheduled Collection. You can also add projects within the Pending Collection as a staging area. Build out projects and move them to the Scheduled Collection once they’re approved and ready to be prioritized.
- Utilize Templates to quickly create a new project if you have similar types of projects with the same tasks and estimates. Create your project templates in the Templates Collection, then use them in the Scheduled Collection.
- Use import by adding your project’s tasks in Excel. Use the import template to quickly format your spreadsheet for import.
- Tasks can be added in bulk as you create your projects. Remember to add these tasks with assignments and estimates. You can always prioritize via drag and drop if things aren’t in the right order.
Think about the process for adding new projects going forward. Who should be adding projects? Where should they be added? What kind of data should be captured? Will you use templates? Having a well defined workflow around adding projects is important in implementation and beyond.
| 4 |
Project & Task prioritization # |
Prioritization is essential in predictive scheduling. List order sets the schedule priority from top to bottom and moving work up or down in priority updates the schedule for everyone involved. As you add work be sure to determine the priority order of your projects and the tasks within your projects.
When you’re prioritizing projects for the first time you may find it helpful to order them by deadline date. Target Finish is the deadline date in LiquidPlanner. As projects are placed in Target Finish date order, Predictive Scheduling calculates Expected Finish dates and displays schedule risk if you won’t meet the date. Being able to see that will help you decide what to do next about managing priorities, assignments and scope.
Place tasks in the order that you plan to work on them. Anything that needs to be completed in early phases of the project should sit above later phase work. You can adjust Task priorities and schedule work earlier to complete it on time by setting a priority override with ASAP Task Scheduling. ASAP scheduling elevates a task’s priority to the highest position in the Project, Package, or Workspace without moving to a different location. Be sure to clearly define when and who should use the ASAP Task Scheduling functionality.
| 5 |
Customize Settings & Data in Administration # |
Customizing your workspace with familiar terminology and established workflows makes transitioning easier for team members. Customize workspace settings and data by going to Administration in the left-side navigation.
Be sure to customize Task Status. Task status is tied to scheduling behavior – Active, On Hold, or Done. Task Statuses tied to scheduling will help your team communicate the status of their work and make it easy for you to see what’s going on. For example, if there’s a review process in your workflow, you may want a Task Status called In Review that places tasks on-hold while the review is being completed.
It’s useful to capture project and task details through Data Fields to categorize your work, quickly find items within your plan, and report on a variety of different metrics. Data Fields are premium feature in the PROFESSIONAL and ULTIMATE plans. You can set up Data Fields at the team member, package, project, and task level. Here are some examples:
| Project Type | Program Manager | Department | Client | Request Date |
| Task Type | Stakeholders | Geographic Location | Skill Set | Approved |
Other premium customizations include Cost Codes to classify logged and remaining hours for analysis and reporting, Rate Sheets to capture billing information, and external notifications through Slack.
Learn more from these lessons in the Settings & Customization course: Customize Task Status, Custom Data Settings, Customizable Cost Codes, Customizing Rate Sheets, Slack Integration.


