Scheduling Limits control how much time your team dedicates to their projects and tasks on a daily, weekly or monthly basis. Limits can be set for work assigned to Members and Resources. Set a Scheduling Limit for a Package, Project or Sub-folder by going to the Edit Panel Planning tab. To set a Task limit go to the Edit Panel Assignments tab.
| 1 |
Use limits to schedule work concurrently # |
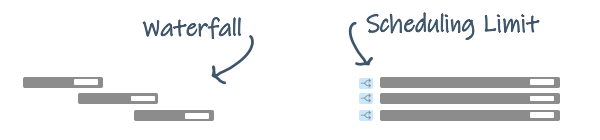
In the absence of limits or delays caused by higher priority work, items schedule one at a time in a waterfall pattern. The next item starts when the previous one is marked done. Scheduling Limits break the pattern, allowing work to schedule concurrently. Adding a limit lengthens the schedule duration so you can work on it a little at a time, until it’s done.
Limits are helpful for managing ongoing tasks and other responsibilities alongside project work. They also make it possible for someone to work on multiple projects simultaneously. The higher priority project schedules first and then when you reach the limit, tasks in the next project start scheduling.
![]() An icon displays when a Scheduling Limit is applied.
An icon displays when a Scheduling Limit is applied.
| 2 |
Control hours spent per day, week or month # |
Go to the plan item Edit Panel to set Scheduling Limits.
Package, Project, Sub-Folder limits are set on the Planning tab.
Task limits are set on the Assignments tab, scroll down past the Assignments table.
If a Package, Project or Sub-Folder has a limit, other plan items inside that container inherit the limit.
Predictive Scheduling ignores Scheduling Limits for work that is on hold, items where the remaining estimate is 0-0 and Tracking Only assignments.
Read about setting limits and working in the table . . .

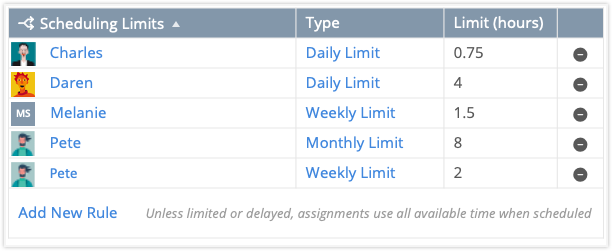
Click on the Add New Rule link at the bottom of the table then select a Person or Resource from the dropdown menu. The default rule is a 4 hour Daily Limit. Click the Daily Limit link to change the limit type to Weekly or Monthly. Edit the Limit (hours) field to change the hours. Use decimals to enter partial hours: .25, .5, .75.
Min limit = .25 (fifteen minutes)
Max limit = 744 hours (roughly the number of hours in a month)
Default limit = 4 hour daily limit
Rules are listed in Alphabetical order by first name. Use the toggle in the Scheduling Limits header to reverse the order.
Use the minus icon in the far right column to delete rules you no longer need.
| 3 |
Combine Limit Types # |

Members and Resources can combine limits on the same plan item to achieve schedule objectives. In the example above, Renata’s limit combination would result in their work scheduling 2 hours a week for a maximum of 6 hours in a month.
It doesn’t matter which order the limits are listed on the table. Predictive Scheduling will figure it out!
| 4 |
Best practices for Scheduling Limits # |
Estimate Assignments based on how much effort it will take to complete the work and use limits to control how much time is spent per day, week or month.
Track time so the scheduling engine knows when the limit is satisfied. Work remaining at that point schedules the next day, week or month (based on the limit applied).
You may find it helpful to Prioritize tasks that have Scheduling Limits ahead of the tasks that don’t.
| 5 |
Scheduling Limit Examples # |
Automatic resource leveling balances your workload, ensuring work schedules within your Availability Working Times.
Daily limit example: if your Availability is 6 hours a day and there are three projects each with a 3 hour daily limit (representing 9 hours), work in the third project won’t schedule until remaining work in one of the other projects drops below its 3 hour daily limit.
When setting weekly and monthly limits, the plan item schedules as soon as possible this week or month and then as soon as possible next week or month. Here are some things to you may run into when setting these limits:
Weekly limit example: If an item with a weekly limit schedules for the first time on a Thursday, then next week it will schedule on the first day of your work week (Monday) and then every Monday following that until it’s marked done.
Monthly limit example: If you were to add a monthly limit during the last week of the month, it’ll schedule during the last week (the current month) and then again the following week (next month). It will schedule as close to the first of the month as possible during subsequent months.
Add a Target Start date to have more control over the first schedule date.


