Using Cost Codes
Location: Hours Editor on the Task Edit Panel and the Timesheet
| 1 |
Classify logged and remaining hours # |
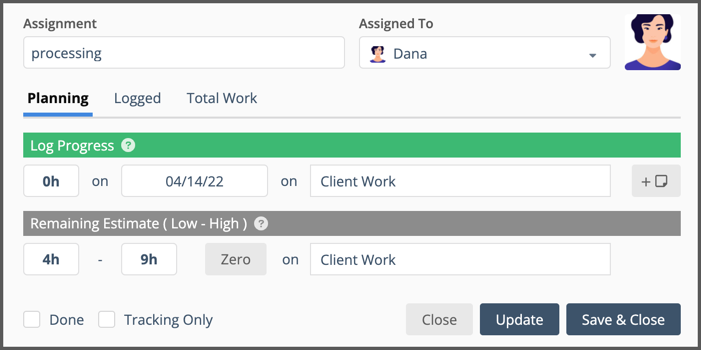
Cost Codes are associated with Logged Progress and the Remaining Estimate on Task Assignments. They are set in the Hours Editor under Planning (shown above). You can access the Hours Editor from the Task Edit Panel or the Timesheet.
The Default Cost Code is always displayed. If your workspace doesn’t require a default in the Workspace Settings under Administration, you may set one for the Assignment. Make a selection in the Cost Code field for either Log Progress or Remaining Estimate and both fields will fill in when you update.
Override the default by selecting a different code when logging progress.
Change the default by selecting a different Cost Code for Remaining Estimate.
This lesson is about applying Cost Codes when logging progress. Organization Administrators and Workspace Managers can learn about managing them in the Customizable Cost Codes lesson.
| 2 |
Time Tracking & Cost Code History # |
![]()
Switch over to Logged to see time tracking history by day, by Cost Code.
| 3 |
Task Edit Panel Assignments Table # |

To log progress or update estimates on a Task you need to open the Edit Panel and go to the Assignment tab.
Open the Hours Editor by clicking into either the Logged or Estimates field on the Assignments Table.
| 4 |
Adding and Editing Cost Codes on the Timesheet # |
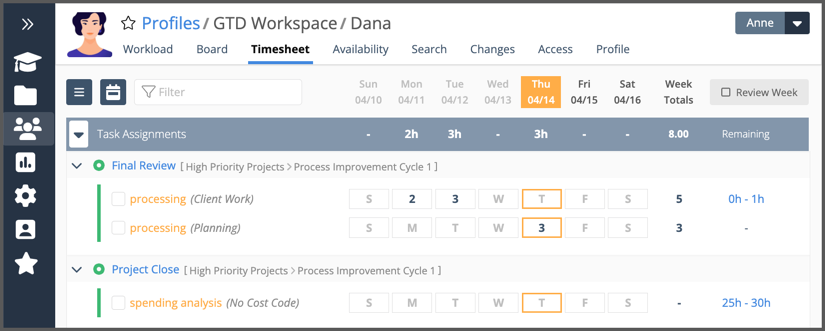
Timesheets display tasks by Assignment and Cost Code. Your Timesheet is located under My Work in the left-side navigation. To see someone else’s timesheet, go to People in the left navigation and choose a Person or Resource.
Log Progress by entering hours directly into the Timesheet. Change or add a Cost Code by opening the Hours Editor. There are two ways to do this:
- Click on the assignment name (orange link on the left)
- Click on the remaining estimate (blue link on the right)
No Cost Code means that a Cost Code hasn’t been set on the Assignment. If you haven’t tracked time yet, open the Hours Editor and set a Cost Code for either Remaining Estimate or Logged Progress.
If you already tracked time and forgot to use a Cost Code, you need to update your time tracking history. Delete the existing time entry and then open the Hours Editor to select a Cost Code and enter the hours again.
When multiple Cost Codes are used on an Assignment, the remaining estimate is always associated with the Assignment’s default Cost Code.


