Projects
Location: Create Projects in Portfolio and Package views. Navigate to Project View by clicking on the project.
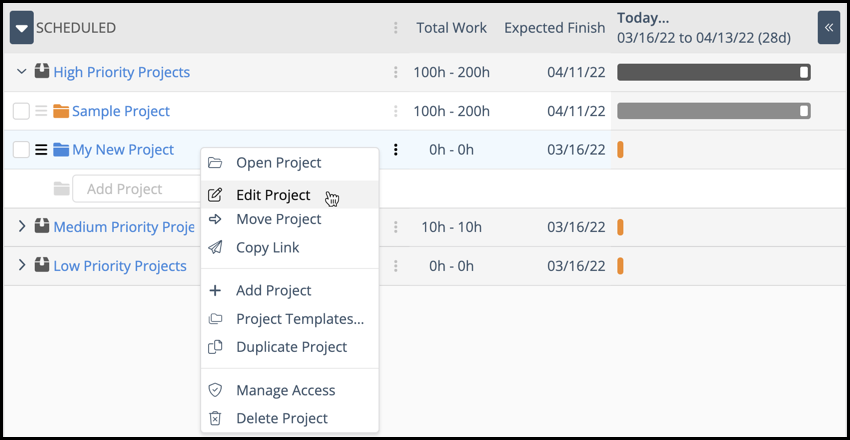
Edit Panel: Right-click on a Project folder or use the 3-dot menu and select Edit Project.
| 1 |
Set up Projects and add work # |
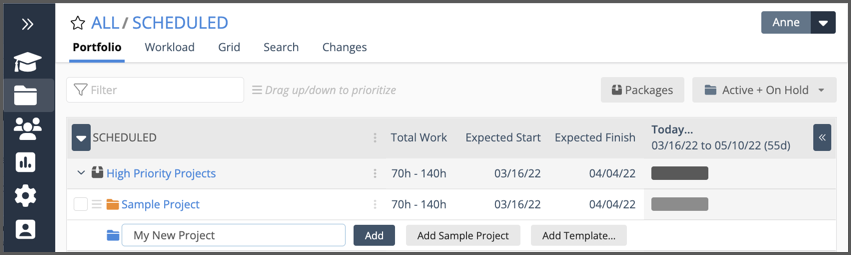
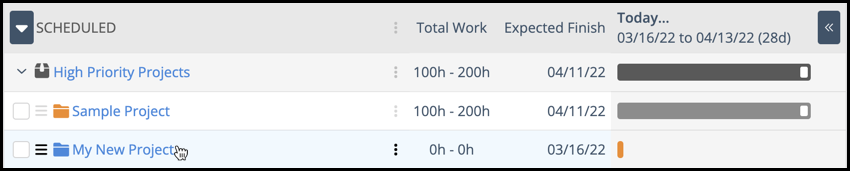
To create a Project, click on Projects in the left-side navigation. This takes you to Portfolio View in the Scheduled Collection. Projects are added to Packages in this view. Use the toggle to expand a Package.
Clicking into the Add Project field activates the Add button. Project Manager access or above is needed in order to create projects. There are several ways to set up Projects and add work:
Click into the Add Project field to create a project folder and then add Tasks.
Add and edit a Sample Project.
Use a Template. Learn how in the Project Templates lesson.
Duplicate a Project from the right-click or 3-dot menu. Learn about it in the Duplicate Plan Items lesson.
Right-click or open the 3-dot menu to insert a Project folder at a specific location and then add Tasks.
Prioritize projects within a package, setting the most important projects at the top of the list. Drag Projects up or down the list to change schedule priority. Learn more about Packages in Packages FAQ.
| 2 |
Project schedule dates and deadlines # |

The project schedule is calculated from a roll up of task data. LiquidPlanner captures all the information about assignments, estimates, dependencies, shared resources, people and priorities to calculate project schedules dates.
Expected Start is when you’re most likely to begin.
Expected Finish is the date you’re working toward, this is the likely finish date.
Latest Finish is how long it could take if worst case task estimates come into play.
Projects adapt to change in real-time. The schedule updates automatically as priorities or estimates change and when work is reassigned.
Target Dates and Deadlines
While Expected Start and Finish dates are calculated and fluidly adapt to change, Targets are fixed. They’re added manually to guide Predictive Scheduling so you know what can be accomplished within a given time frame. Schedule bars show how Remaining Work is tracking against Target Dates.
Target Start ensures that work won’t start earlier than the selected date.
Target Finish is the deadline date in LiquidPlanner.
The scheduling engine raises alerts when Target Finish dates are at risk or other issues need attention. Learn more in the lesson about Target Dates.
| 3 |
Project Edit Panel # |
Once the Project folder is created you can enter project information and set Target Dates. Right-click on the project name or use the 3-dot menu and select Edit Project to view the Project Edit Panel.
Project Edit Panel
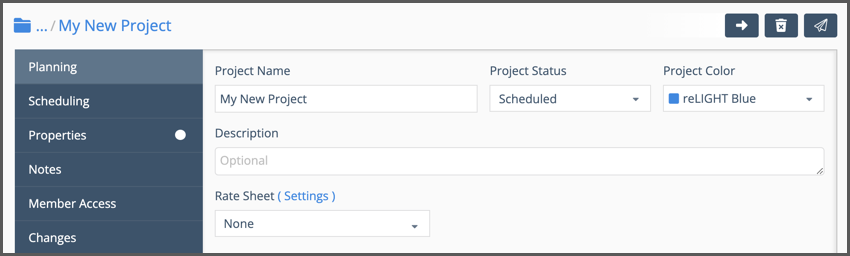
The Edit Panel has a series of tabs. Planning is where you can change the project name and choose a different color for the project folder. Description is a plaintext field. Information entered here can be displayed as a column in the Portfolio and Grid views, and shown on Dashboards.
There are three project statuses to choose from: Scheduled, On-Hold or Done. Scheduled is the default setting when the Project folder is created. When the project is completed, change the status to Done and move it to the Archived Collection.
Organizations on the PROFESSIONAL and ULTIMATE Plans can associate projects with Rates by selecting a rate sheet from this location.
Scheduling and other tabs
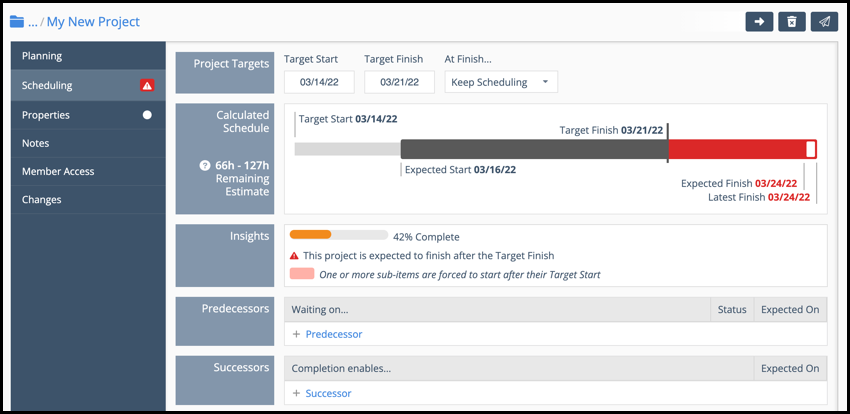
The Scheduling tab (shown above) is where you add Target Dates and set Dependencies. Calculated Schedule and Insights will help you track the project’s progress and health. Remember that Predictive Scheduling kicks in after you add tasks to the project folder, so these sections won’t display anything meaningful until tasks are estimated and assigned.
Here’s a brief explanation of the other tabs:
Properties: Custom Data, Work Metrics, Schedule Dates and Reference information are displayed here. Custom Data fields are available in the PROFESSIONAL and ULTIMATE Plans.
Notes: enter project instructions or other information using rich text, images, and links.
Member Access: workspaces on the ULTIMATE plan can set project access by member or group.
Changes: records updates related to the project, including subfolder and task changes. Change history and deleted items are retained up to 90 days for paid accounts and 30 days on the FREE Plan.
Use the buttons at the top of the Project Edit Panel to move the project, delete it or copy a link to share with another workspace member.
Close the panel when you’re done. All your changes are auto-saved so it’s safe to use the Close button.
| 4 |
Add Tasks and Sub-Folders in Project View # |
Tasks and Sub-Folders are added in Project View. Navigate there by clicking on the project name. You can also use the right-click or 3-dot menu and select Open Project to access this view.
Add Tasks & Sub-Folders to your Project
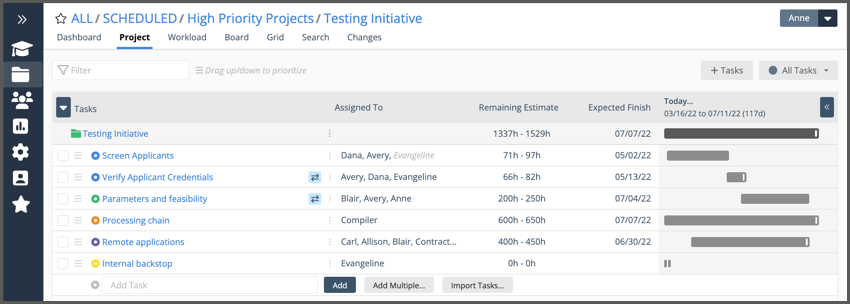
In Project View, the task list and schedule bars show what everyone is working on, how long each task will take and when the project is expected to finish.
Add tasks by clicking into the Add Task field. You can create a single task, add multiple tasks or import them from Excel. Prioritize tasks by dragging them up or down the task list in Project View. If a task needs to schedule earlier than predicted, apply ASAP Task Scheduling and elevate it’s schedule priority to the highest position in the Project, Package, or for the Workspace.
Assign team members and estimate their work so Predictive Scheduling can calculate dates.
Use Right-click and 3-dot menus to insert Tasks and Sub-folders
Hover over a task, then right-click or use the 3-dot to reveal the menu which has options to Add Task, Duplicate Task and Add Sub-Folder. The new item is created in the next row.
Learn more in the Tasks & Assignments lesson which is coming up next.
| 5 |
Project Views # |

Every project has a series of views for looking at work from different angles. Use them to examine priorities and scheduling, balance workload, analyze data and learn about recent changes. Learn more about views in the Views for Insights course which has a lesson for each view.
Project: Add and prioritize tasks in this view. Customize columns. Use checkboxes to edit tasks in bulk.
Dashboard: Schedule and work metrics update in real time in this view. Customize widgets and layout in Settings.
Workload: See each person’s contribution in hours and share of work. Find out when they can start something new.
Board: View Tasks by status. Drag tasks across columns to change task status.
Grid: Set and sort columns to see what’s most important to you, then download to analyze and share.
Search: Search the project to find tasks by name, user, description, notes content, and data field values.
Changes: See the project’s recent changes and deleted items. Change history and deleted items are retained up to 90 days for paid accounts and 30 days on the FREE Plan.


