Need to spin up a new project? Download a custom template to Import Tasks from Excel and bring in up to 100 tasks at a time. The button to Import Tasks is found in Project View. Tasks can be imported into projects in any Collection.
| 1 |
Open Project View and Import Tasks from Excel # |
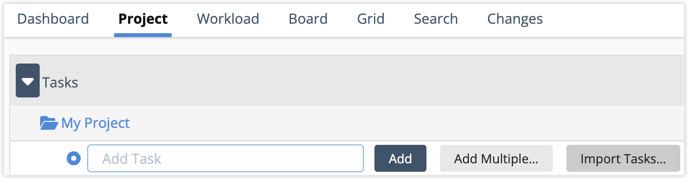
Navigate to an existing project or create a new folder and enter your cursor into the Add Task field in Project View to activate the Import Tasks button. You may import tasks from Excel into Project Folders or Sub-Folders. Project Editor access or higher is needed to create projects and import tasks.
| 2 |
Download your custom Excel template # |
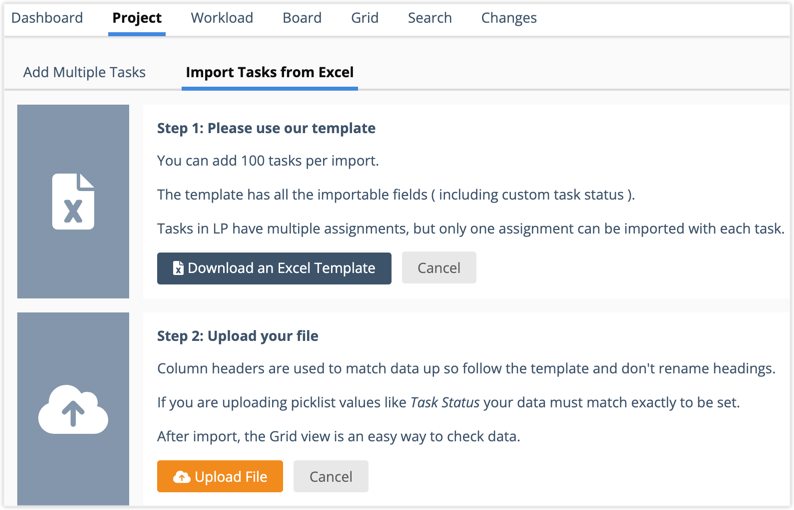
Clicking the button opens the page to Import Tasks from Excel where your custom import template is stored. It’s important to use this template because it’s formatted to integrate with LiquidPlanner and includes your workspace member list, task statuses and custom data fields. Follow instructions on this page to ensure a successful import.
| 3 |
Fill out the template and upload the file # |
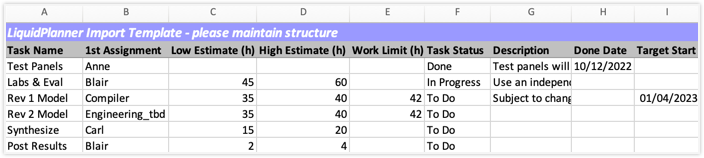
The template has three tabs, enter task information on the Task Import tab, the other two tabs are for reference. Names lists active workspace members, Statuses has the current Task Status list.
Task Name: click into the cell and choose from the menu, when this cell is empty the imported task name is “Task Name.”
1st Assignment: click into the cell and select a workspace member, resource, or placeholder from the menu. When this cell is empty the task is imported as “unassigned.”
Low Estimate (h) and High Estimate (h): be sure to enter ranged estimates so LiquidPlanner can calculate the schedule. Without estimates the task imports with a 0 – 0 Remaining Estimate.
Work Limit: is an optional metric for capping the number of hours to work on an item. Learn more about this work metric in the Work Limit lesson.
Task Status: click into the cell and choose a task schedule status from the menu. When this cell is blank, the workspace default task status is applied at import.
Description: populates the task description field on the edit panel Assignments tab. Task descriptions are optional.
Done Date: an optional field used when importing tasks with a Done schedule status. Set a date in the file, or leave it blank and the import date will be applied. If the schedule status is Active or On-hold an error displays in Preview, but it doesn’t disable import and this date field is ignored.
Target Start and Target Finish dates are optional.
ASAP Priority Override: for elevating the schedule priority to the highest position in the Project, Package, or Workspace. Leave this field blank to use the default, ASAP as Prioritized.
Assignment Scheduling: set the schedule order for tasks with multiple assignments. Schedule in Order is applied at import if the field is blank.
When you’re ready, save the file and upload it to your Workspace.
| 4 |
Preview and add tasks! # |
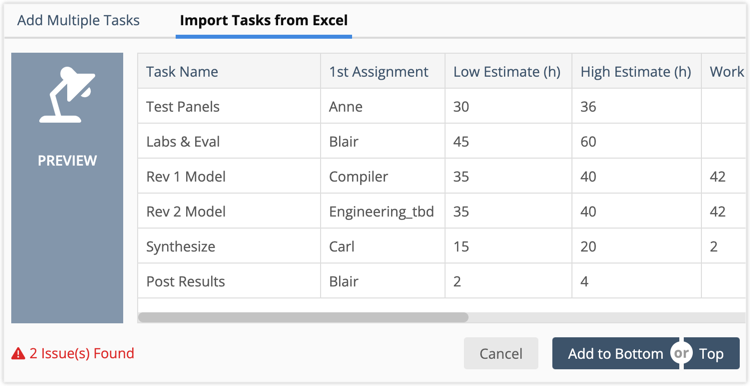
Tasks appear in a Preview table after they’re uploaded. If there are issues with the data, a warning appears in the lower left corner and fields in the table turn red.
Not everything needs to be corrected prior to import, if the add buttons are active, then the issues will be ignored.
If the add buttons are disabled, correct the Excel file and upload again.
When other tasks are already in the project folder, choosing Add to Bottom places the imported tasks under the existing tasks. Top places them at the top of the project folder, in a higher priority schedule position. Predictive Scheduling and Work Limit Deltas calculate as soon as tasks are added.
| 5 |
Helpful tips # |
- Only the template columns are imported. If you add columns to the spreadsheet they’ll be skipped during import.
- Importing a task adds the first assignment. Use the Bulk Editor to add or swap assignments after import.
- These Custom Data Fields are included in the import template: Checkbox, Currency, Date, Link, Numeric, Picklist, Text, User. Import is not supported for any of the multi-select fields, including multi-line text and notes. Item and Item (multi) are also excluded. Organizations on the PROFESSIONAL and ULTIMATE Plans can create Data Fields.
- When importing in to a Project Template, these fields are ignored: Done Date, Target Start, Target Finish, ASAP Priority Override, Assignment Scheduling.
- For best results, download a new Excel Template for each import to ensure that you’re using the latest version with the most recent columns and settings.


