 Say hello to the new Tempo! LiquidPlanner is now Portfolio Manager.
 Your Timesheet
Location: My Work and People in the left-side navigation.
| 1 |
Timesheet Settings & Filters # |
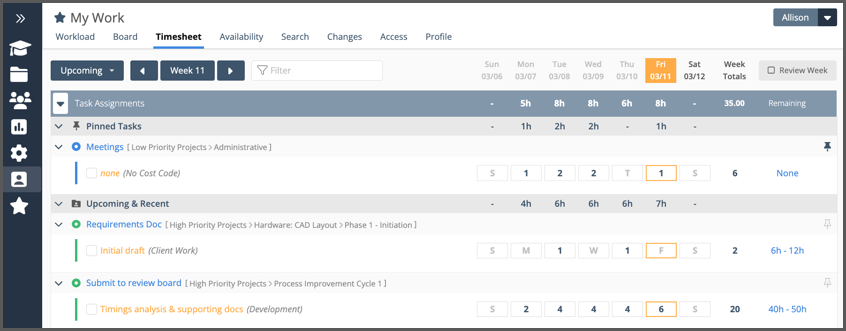
Logging progress keeps projects moving forward. Your Timesheet is an efficient way to view your assigned work and log progress quickly across multiple tasks to keep the schedule up to date. You’ll see your Timesheet under My Work in the left-side navigation. To see someone else’s, go to People in the left-side navigation and then choose the Person or Resource.
Apply settings and filters to change the Timesheet view:
Set the display order: Upcoming, By Package, By Project, By Task Status.
Select another timesheet week by using the arrows to navigate forward or back.
Open the calendar to select a different date by clicking on the week.
Filter by name to find an Assignment, Task, Sub-Folder, Project, or Package. You can also Quick Filter on Task Status, Cost Code, and Username.
Click Review Week in the upper right corner to show only the rows where you logged progress already.
| 2 |
Timesheet Entries & Notes # |
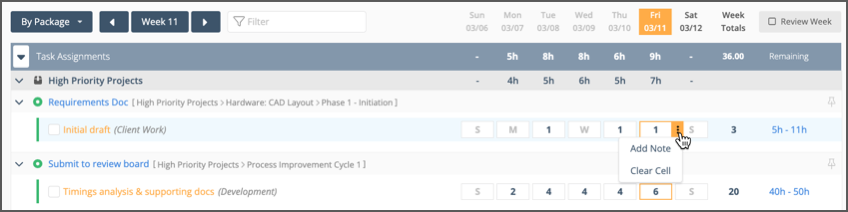
Tracking time records progress and brings you closer to the end of your day. Enter your time in minutes, hours, or days and automatic scheduling will calculate schedule dates.
Hours logged by day display in the header. Acceptable formats for entering time: 30m, 1.5h, 3d or 8. When you enter a number without indicating m, h, or d the system will use hours when calculating.
Use the 3-Dot menu to add a timesheet note and to clear your time entry.
Edit Timesheet Entries: clearing or reducing a time entry automatically adds those hours back to the remaining estimate.
Edit Timesheet Notes: If you need to edit your timesheet note, hover over the cell where the note was saved and click the orange triangle.
Check the box on the left to mark your assignment done.
| 3 |
Update Task information, Cost Codes & Estimates from the Timesheet # |
![]()
You can open the Task Edit Panel and Hours Editor from the timesheet to update Task information Cost Codes, and Estimates from the Timesheet.
Open the Task Edit Panel: click on the Task name to open the panel and edit task information.
Open the Hours Editor: click on the Assignment name to open the Hours Editor
Open the Hours Editor when you need to update a Cost Code, view Logged and Total Work history or set the task to Tracking Only. Learn about using the Hours Editor in the Tracking & Estimating lesson.
| 4 |
Pinned Tasks and other ways assignments end up on your timesheet # |

There’s some logic involved when it comes to populating your timesheet with other tasks. Tasks display when:
An assignment is expected to start.
Remaining work is scheduled.
Progress is logged during the week.
Your assignment is marked done during the week.
Pinned Tasks stay on the Timesheet until they are unpinned. Use the pin on the far right to keep an existing task on your Timesheet. Click once to pin and a second time to unpin. You may also pin tasks using the Edit Panel Pin. Pinning a task adds it to your Timesheet and Workload.
Task Edit Panel Pin
![]()
When you’re in another part of the workspace you can pin a task by clicking the pin at the top of the Edit Panel. You can pin any task. It doesn’t matter if you have an assignment on it or not. When a task is pinned the icon on the Edit Panel is orange.
Other people viewing your Timesheet will not see your pinned tasks until you track time to them.


