Priority Views
Location: Projects in the left-side navigation. Every level of hierarchy has a Priority View: Portfolio, Package & Project
| 1 |
Portfolio, Package and Project Views # |
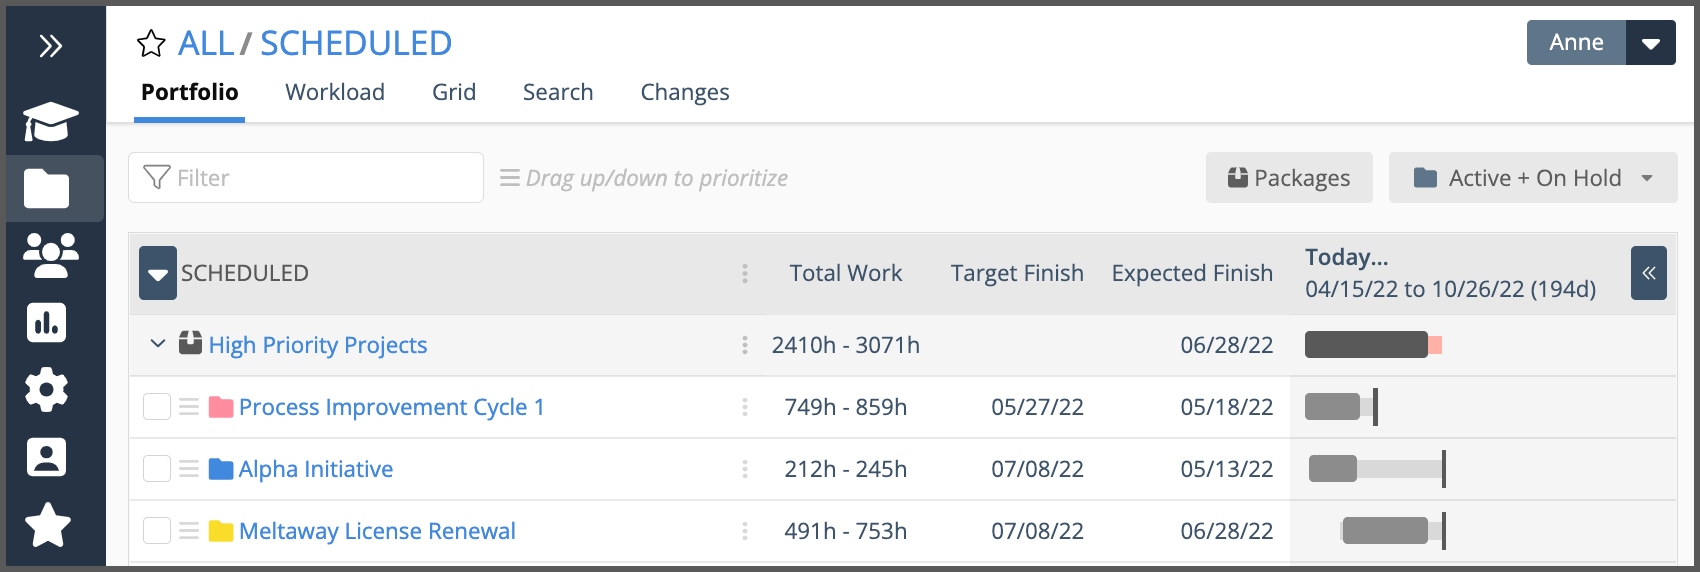
Clicking Projects in the left-side navigation brings you to the Portfolio View for the Scheduled Collection. This is the primary view for setting priorities in your workspace and where you’ll see the forecasted schedule for all the projects in your portfolio.
From Portfolio View, you can jump to Package View or Project View by clicking on the plan item name.
Portfolio View, Package View and Project View are Priority Views displaying a prioritized list of plan items with customizable columns and schedule bars. Each view corresponds to a level of hierarchy.
Portfolio View: displays Packages and Projects. Expanding a Package reveals the Project list.
Package View: a subset of the Portfolio, focusing on Projects within a single Package.
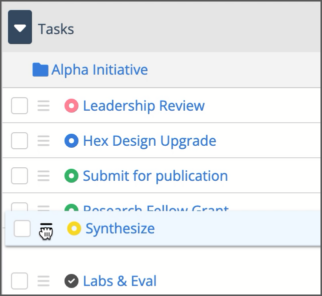
Project View: a list of Tasks and Sub-Folders in a single Project.
Priority order is important in the Scheduled Collection because dates are calculated based on the order items are listed, from top to bottom. Package order in the Portfolio View establishes the schedule priority for your portfolio. List Projects in priority order within each Package.
Priority Views are the starting point for accessing other views at the same level: Workload, Grid, Board, Search, Changes. You’ll find lessons for those views in this track. Project and Package Dashboards are covered in the next track.
Learn about adding Packages and creating Project plans in the Projects & Templates track.
| 2 |
Navigate across Priority Views with the location breadcrumb # |

The location breadcrumb at the top of the page shows your current location. When you’re in a project level view use the breadcrumb for navigating back to Package View or the Portfolio.
ALL takes you to All Projects, the landing page for Project Collections: Scheduled, Pending, Archived and Templates.
SCHEDULED takes you to Portfolio View.
Clicking on the package name takes you to Package View.
| 3 |
Drag & drop to prioritize Packages, Projects or Tasks # |
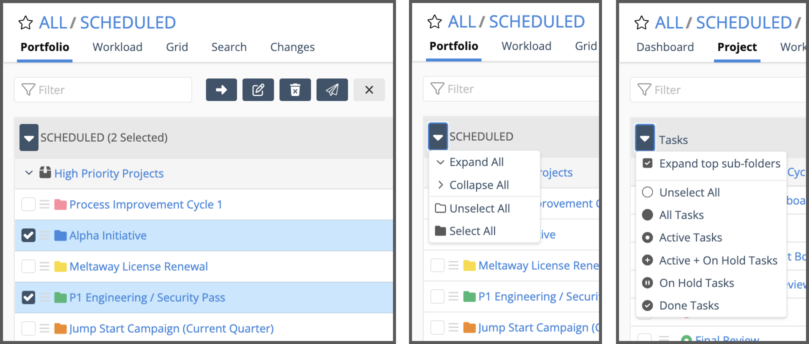
Packages, Projects and Tasks can be prioritized with a simple drag and drop action. Changing priorities updates the schedule in real time. To prioritize more than one item at a time, use the check boxes to make a selection, drag the first item and all of the other selected items will follow.
If a task needs to schedule earlier than predicted, apply ASAP Task Scheduling and elevate it’s schedule priority to the highest position in the Project, Package, or for the Workspace.
Prioritizing Packages
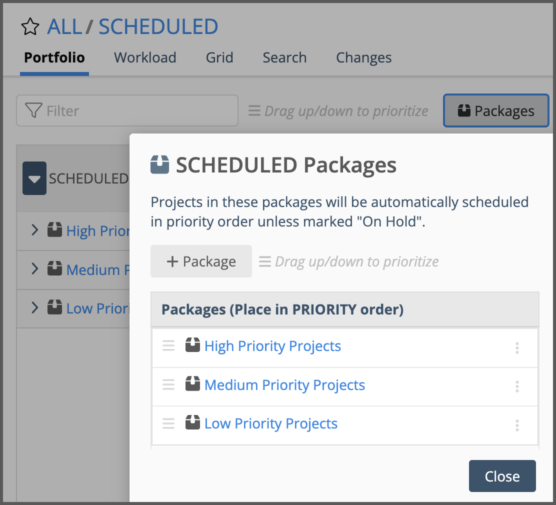
Prioritize Packages by clicking the Packages button at the top of Portfolio View to open the Packages modal, then drag a package up or down the list. Moving a Package up or down in priority changes schedule priority for all the Projects in the Package.
| 4 |
Customize Columns # |
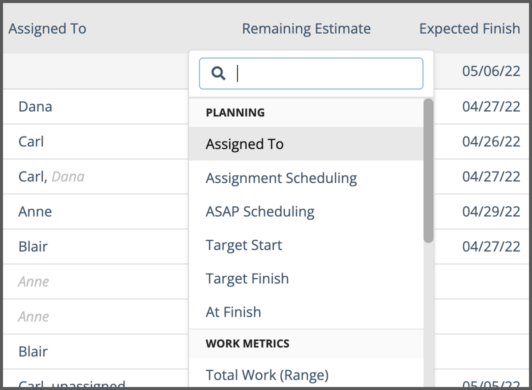
Click on column headers to change the display. Type into the search bar to find a field by name, or scroll through the list and make your selection.
Planning: Target Start, Target Finish, At Finish display on all Priority views. Assigned To, Assignment Scheduling and ASAP Scheduling display in Project view.
Work Metrics: Display the range or the expected value for Total Work, Logged and Remaining hours. Display % Complete.
Predictive Scheduling: Expected Finish, Latest Finish, Finish Range (Expected Finish to Latest Finish), Expected Start, Done Date.
Custom Fields: Package and Project data fields display in Portfolio and Package views. Project and Task fields display in Project View.
Counts: Task counts display on Portfolio and Package views. Assignment counts display in Project view.
Other Properties: Description, Status, Created On and Created By.
Column rows are clickable. In most cases, clicking into a column row opens the item’s Edit Panel. The exception is when you are in Portfolio or Package views. In those views, clicking into a Work Metrics or Counts column row takes you to Project View.
Related lessons: Target Dates, Work Metrics, Using Custom Data
| 5 |
Right-click & 3-Dot Menus # |

Each of the Priority Views has an editing menu that can be accessed by right clicking on the plan item name or clicking on the three dots in the plan item row.
Right-click & 3-dot menus

Open takes you to the Package or Project View.
Edit opens the plan item edit panel.
Move to change the item’s location.
Copy Link and share the item’s URL with another workspace member.
+Add inserts a new plan item directly below the one you have selected.
Project Templates create a project from a template and insert it in the next row (Portfolio and Package views only).
Duplicate inserts a copy of the item in the next row.
Manage Access to control who can view or edit an item. Only available on the ULTIMATE Plan.
Delete the item.
Related lessons: Bulk Edit & Move, Templates Collection, Duplicate Plan Items, Changes View
| 6 |
Bulk Edit & Move # |
Use the Bulk Editor to edit or move multiple items at once while in Portfolio, Package, and Project Views. Checking boxes to the left of the item name engages the Bulk Editor and reveals action buttons at the top of the view. The drop down menu also has options for selecting items.
Actions for Editing: Projects: Move, Edit, Delete, Copy Link, Clear Selection.
Actions for Editing Tasks: ASAP Scheduling, Task Status, Move, Edit, Add Assignment, Swap Assignments, Delete, Copy Link, Clear Selection.
Related lessons: Bulk Edit & Move, Changes View, ASAP Task Scheduling, Task Status, Tasks & Assignments
| 7 |
Quick Filter, Status Filter & Custom Status Filter # |
Use filtering to narrow views and focus on important information.
The Quick Filter at the top left of a Priority View can be used to filter by plan item name. These columns can also be filtered when they are displayed: Assigned To, ASAP Scheduling, Description, Task Status, Text and Picklist Data Fields.
The Quick Filter can be used in conjunction with the Status Filter at the upper right in Priority Views.
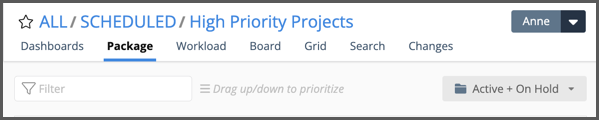
Status Filter

Use the Status Filter to view items by schedule state (active, on hold, done), by schedule risk or create a custom filter. The default setting in Portfolio and Package views is Active and On Hold projects. In Project View the default setting is All Tasks. The filter capsule turns dark blue when another filter is engaged.
Filtering to Schedule Risk displays all items expected to finish after a Target Finish Date.
Custom Filter
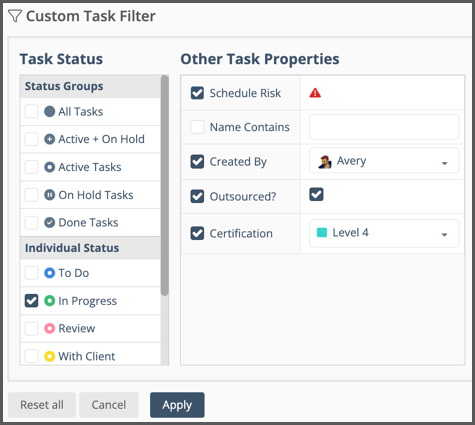
The Custom Filter is available for Projects and Tasks. Use it to combine status filters with other properties such as Schedule Risk, Name Contains, Created By and Custom Data Fields. Check the boxes to select filter components and then Apply to see filter results.
Custom Data Fields are available in PROFESSIONAL and ULTIMATE Plans.
| 8 |
Timeline Mode # |
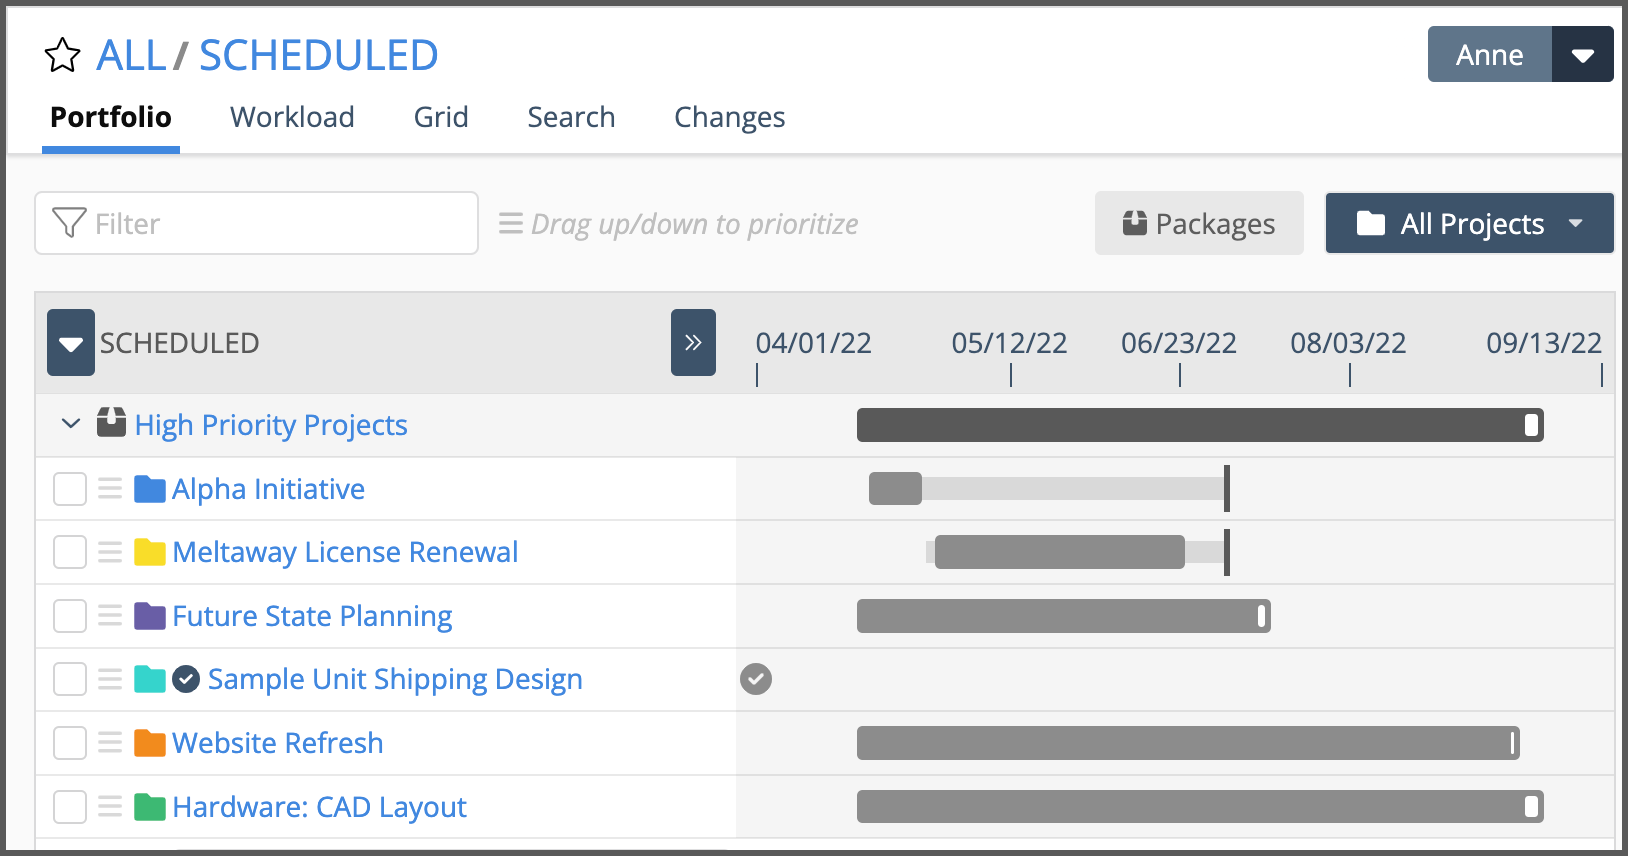
Timeline Mode reduces the view to plan items and schedule bars. Click on the chevron to expand or collapse the timeline while in Portfolio, Package and Project Views.
Hovering over a schedule bar displays the Finish Range (Expected Finish – Latest Finish). Finish Range captures the uncertainty in your schedule and shows how long it could take if worst case estimates come into play.
When the status filter is set to include All items or Done Items a checkmark represent items that are marked done. Hover over the check to see the done date.
You can drag and drop to prioritize while in Timeline Mode and use the checkboxes to engage the bulk editor.


