People in the left-side navigation has several important views for managing workspace Members, Resources and Placeholders. This is where Org Admins and Workspace Managers go to send workspace invitations, manage groups, monitor availability and time-off. Timesheet Reviewers come her to review and export Timesheets.
| 1 |
Member, Resource & Placeholder Profiles # |
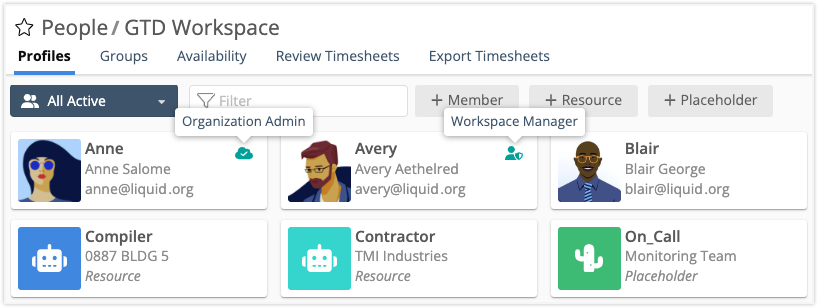
Profiles is the first view under People. This is where workspace Members, Resources and Placeholders are listed and where new ones are created. Everyone is represented by an informational tile with tags identifying Organization Administrators and Workspace Managers.
Members are Licensed Users who access the workspace to update and manage their tasks.
Resources do not access the workspace. They are used to schedule and track work for people outside your workspace, or to represent machine resources. With every User License purchased, two Resources are included for modeling (e.g., a workspace with 10 paid Members has 20 Resources alloted).
Placeholders don’t access the workspace either. Use them to set up tasks that will be assigned to other Members or Resources later. They are free, and you can add as many as you need. Work assigned to Placeholders can’t be scheduled or tracked.
Clicking on a Member or Resource opens a view where you can see assigned work, availability and profile information. Clicking on a Placeholder opens their Profile View. Learn more in the lessons about Members, Resources and Placeholders.
Read about filtering the Profiles View and seeing disconnected members . . .
Filter by Profile Type
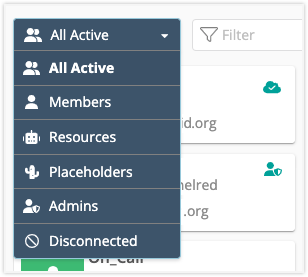
The drop down menu at the top filters the view by Profile type. The default is “All Active” Profiles. Use “Disconnected” to see disconnected Members along with deactivated Resources and Placeholders.
Quick Filter

Use the Quick Filter to find someone by username, first or last name. The Quick Filter activates jump buttons for accessing their Workload, Board, Timesheet, Availability, Access and Profile Views. These are the same views Members have when they go to My Work in the left-side navigation.
| 2 |
Invite Members, create Resources and Placeholders # |

When all your people, resources and work are in one place you can rely on LiquidPlanner to optimize the schedule based on your priorities and constraints. Profiles is where Organization Administrators and Workspace Managers create the Members, Resources and Placeholders responsible for getting everything done.
+Member opens the workspace invitation where you enter their email address.
+Resource opens the Add Resource page where you enter a name and choose the avatar color.
+Placeholder opens the Add Placeholder page where you enter a name and choose the avatar color.
Read about purchasing licenses for Members and Resources . . .
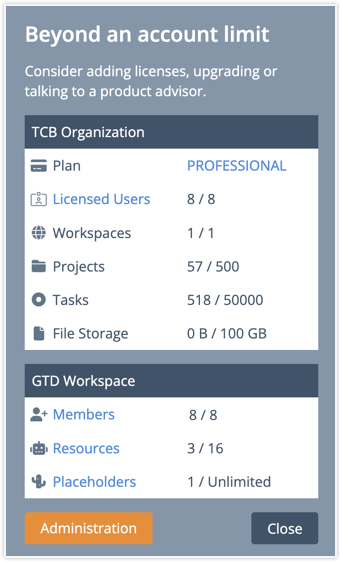
In Profiles View, a usage meter shows how you’re tracking against plan and license limits. A pop up appears when a limit is reached.
Org Admin access is needed in order to change billing terms, upgrade plans or add licenses.
The Billing Plan link navigates to Manage Account where you can purchase licenses and upgrade the billing plan.
Licensed Users link navigates to All Users. Current Org Users can be added to a workspace from this location and disconnected users can be re-connected.
Members, Resources and Placeholders links navigate to their lists on the Profiles view under People.
The Administration button at the bottom of the pop up jumps to Administration in the left-side navigation.
| 3 |
Workspace Availability Summary & Time Off # |
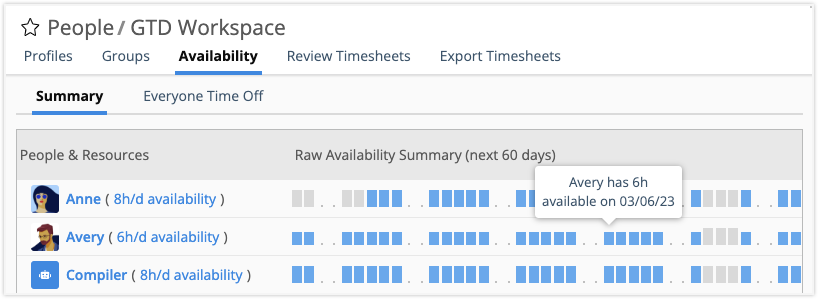
Availability is integral to Predictive Scheduling and maintaining a Balanced Workload. Working Times and Time Off rules ensure that work only schedules when people are available to do it.
Raw Availability Summary displays Member and Resource availability over the next 60 days for everyone in the Workspace. Working Times indicators are blue and Time Off indicators are gray. Hover over the indicators to see the date and hours available per day. Click on someone’s name to view their Workload. Jump to their Availability rules using the link next to their name.
Read about setting up Everyone Time Off . . .
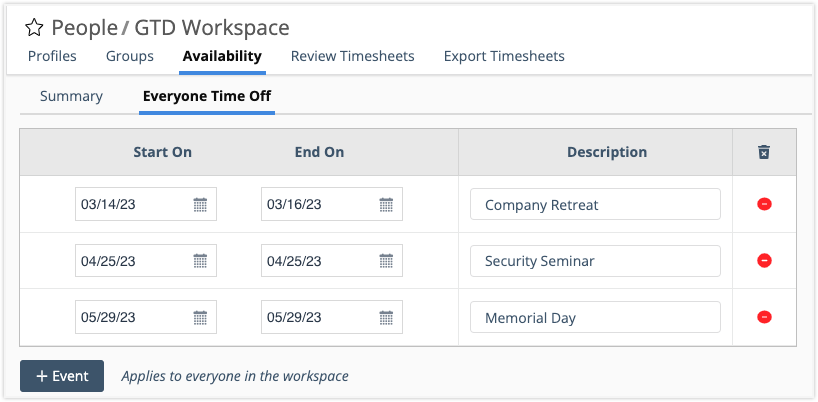
Org Admins and Workspace Managers can create Everyone Time Off rules to block scheduling for the whole workspace. Use them for holidays and other activities that take people away from project work for a full day or more.
+Event adds a new rule. Use the calendar to set start and end dates, then enter a description.
Delete events by clicking the red icon in the last column.
| 4 |
Premium Features: Groups, Timesheet Review & Export # |

People is the home for three Premium Features, Groups, Review Timesheets and Export Timesheets.
Groups are available on the ULTIMATE Plan. They’re used for Workspace Access Controls, Dashboards and other insights. Members can belong to multiple Groups.
Timesheet Review and Export are included on PROFESSIONAL and ULTIMATE Plans.


