Navigate to Administration in the left-side menu to create Custom Data settings that can be applied to plan items and user profiles. Org Admins and Workspace Managers can create, edit and archive Custom Data fields. Custom Data is a premium feature available on PROFESSIONAL and ULTIMATE plans.
| 1 |
Custom Data Table # |
Use Custom Data to set up fields that can be shared and accessed in a variety of views to help you monitor related work. On plan items, Custom Data fields are useful for tracking clients, programs, product lines, expenses, significant dates, and more. Create them for user profiles to identify skills, hire date, certifications and so on.
This lesson is for Org Admins and Workspace Managers and explains how to create, edit, and archive Custom Data. The final section details all data field types with descriptions and examples.
People who interact with these fields should review the lesson about Using Custom Data.
| 2 |
Custom Data Table # |
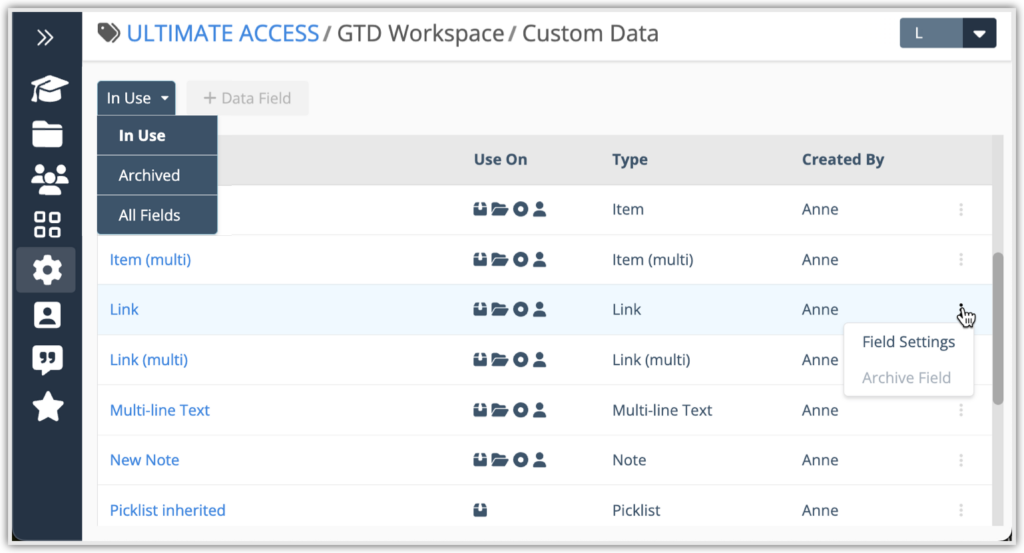
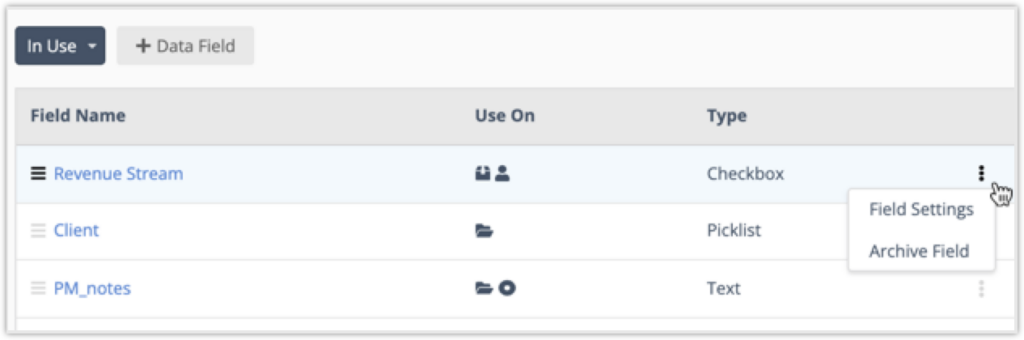
Any workspace member can view the Custom Data table, but only Org Admins and Workspace Managers can change the order, create new fields, or edit existing ones.
- Drop down menu: Filter to see Custom Data that is In Use, Archived or to view All Fields.
- +Data Field: Create a new field.
- Drag bars: Change the order by dragging a field up or down the table. Changing the order on this page changes the display order on Edit Panels and Profile pages where data fields are used.
- 3-dot menu: Open Field Settings or Archive Field.
- Field Name: Clicking on a field name also opens the Field Settings.
| 3 |
Create Data Fields # |
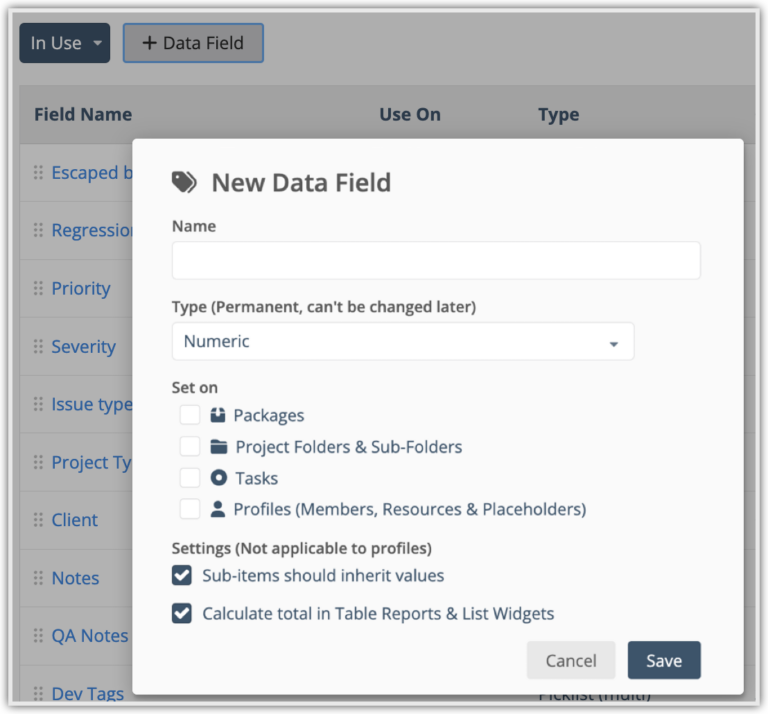
Select +Data Field to create a new field. The following customizations display:
Name: We recommend that you insert an underscore when the name contains more than one word (such as PM_notes or Client_request). Setting up a name this way makes it easier to search and filter by data field.
Type: Choose a data field type from the menu. The type cannot be changed after saving so if you need to make a change, archive the field and create a new one. Data field types are listed at the bottom of this lesson for reference.
Set on: Check all that apply.
- Fields used on Packages, Project Folders, and Tasks are located on the item’s Edit Panel Properties tab. Project Folders includes Sub-Folders.
- Members includes People, Resources and Placeholders. Data fields are located on their Profile pages. Visit People in the left-side navigation to view Profiles.
Settings (Not applicable to profiles)
- Sub-items should inherit values: Select the checkbox Sub-items should inherit values to have all sub-items of the Package, Project Folders, or Tasks inherit the values of your new custom data field. If you want, you could then override any inherited values by going to the Properties tab of each individual sub-item.
- Calculate total in Table Reports & List Widgets: Select this checkbox to choose whether or not the custom data fields are totaled in table reports and list widgets. This setting only appears for numeric and currency data fields. Note: Percentages are calculated, not totaled.
Setting up Picklist Type

When creating a Picklist data field type, an alert in the data table will prompt you to add values in a second step. Click on the field name to open Field Settings and add values. See Managing Picklist Values further down in this lesson for more information.
| 4 |
Field Settings # |
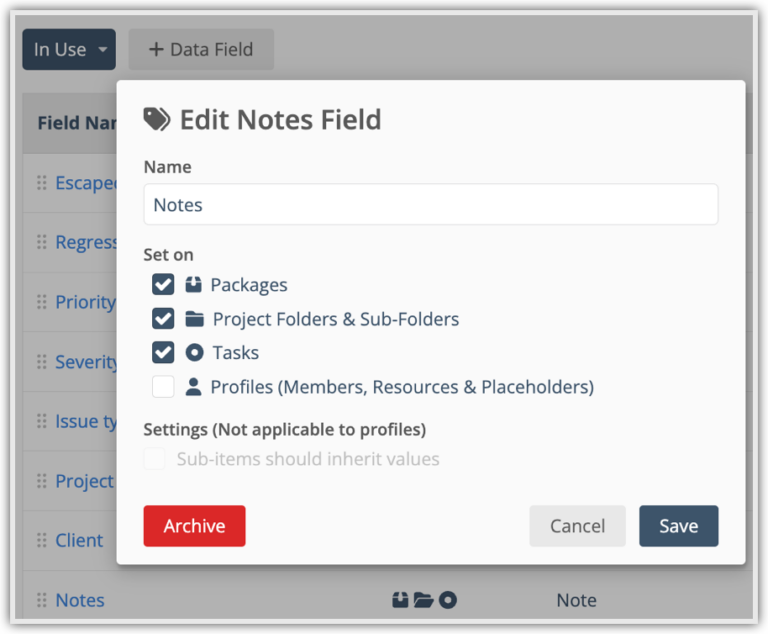
Click on the data field name or use the 3-dot menu on the Custom Data Table to open Field Settings.
- Name: Editing the name changes it in real time throughout the workspace.
- Checking a box adds the data field.
- Unchecking a box removes the data field from Edit Panels and Profiles where the field value isn’t set, but it remains active wherever the data field value is set. To avoid this, clear the value from Edit Panels and Profiles prior to unchecking the box.
- Settings (Not applicable to profiles): Select the checkbox Sub-items should inherit values to have all sub-items of the Package, Project Folders, or Tasks inherit the values of your new custom data field. If you are editing a numeric or currency data field, a checkbox for Calculate total in Table Reports & List Widgets also displays here.
- Save changes. Saving closes the window.
- Archive saves your changes, closes the modal and immediately moves the data field from In Use to Archived. Learn more about archiving in the next section.
| 5 |
Archive & Reactivate # |
Archive Custom Data when you no longer need it for tracking and analysis. Use the 3-dot menu on the Custom Data Table to Archive a field or open Field Settings and use the Archive button.
When you archive, the following occurs:
Custom Data Table: the field moves from In Use to Archived. Change the table filter to Archived or All Fields to see archived fields.
Existing Plan Items and Profiles: Archiving removes the field if the value isn’t set, but it remain active and can still be edited on Plan Items and Profiles where the data field value is set. To avoid this, choose another value or set it to None, and then archive the field.
New Plan Items: Data field no longer included on the Edit Panel Properties tab when new items are added.
New Profiles: Data field no longer included when new Members, Resources or Placeholders are created.
If you archive a field by mistake, reactivating it will restore fields and values to their previous state.
Reactivate Custom Data
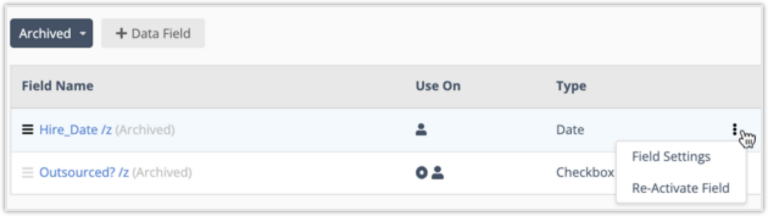
Filter the Custom Data Table to Archived or All Fields and use the 3-dot menu to Re-Activate Field or open Field Settings and use the Re-Activate button.
Reactivating the field makes it immediately In Use, restoring fields and values to their previous state.
Field Settings for Archived Data Fields
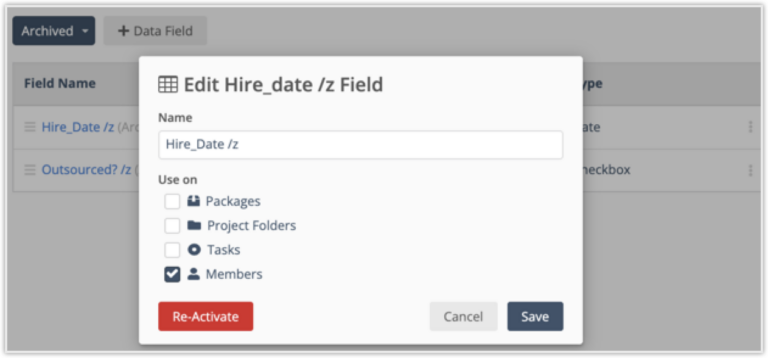
Archived fields can be edited. It’s helpful to append archived data field names as in the example above so that other team members know the field was archived intentionally, and not by accident. Also, since data field names need to be unique, the edit allows a name to be reused in the future.
| 6 |
Managing Picklist Values # |
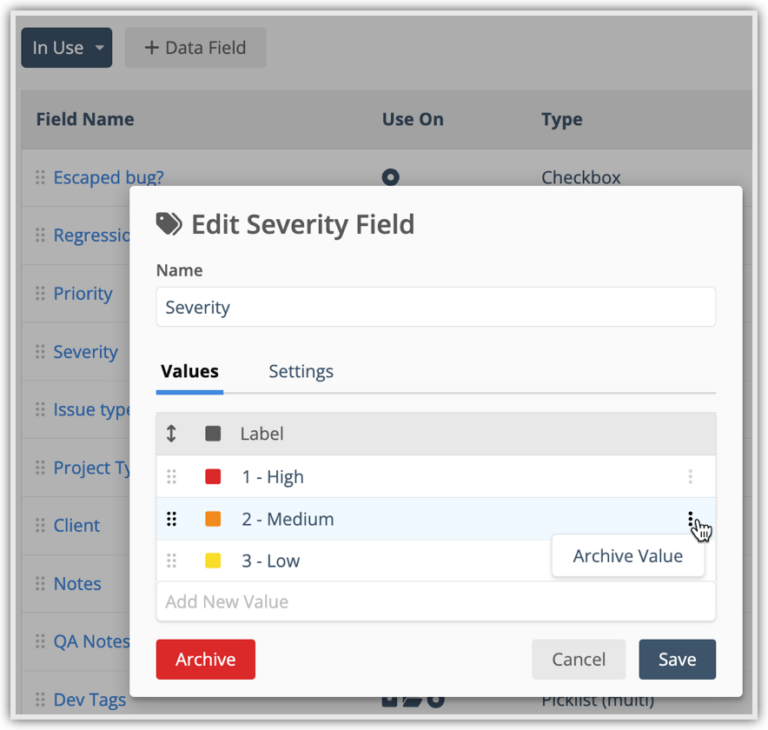
Field Settings for the Picklist type has two sections: Values and Settings.
Enter values into the table.
Associate the value with a color by clicking on the color icon and choosing one from the drop down menu.
Edit a value by clicking on it’s name. Editing a value changes it in real time on all the items where it is used.
Change the order by dragging values up or down the list.
Use the 3-dot menu to Archive a Picklist Value. Archiving a value sets the field to None.
Switch over to Settings in the modal to see where the data field is being used.
Archiving Picklist Values
The best way to archive a Picklist Value is to apply another value so the one that you want to archive isn’t associated with anything. Once it has been cleared everywhere you can archive it without any trouble. If you accidentally archive the value first and lose track of where it was applied, don’t worry! Reactivating the value will sync it back up again.
Reactivating a Value
Values can be reactivated. Reactivating the value syncs it back up on plan items and profiles where it had been set.
| 7 |
Data Field Types # |
The table below lists all the data field types available in your workspace with a few suggestions to help you get started.
| Data Field Type | Description | Examples & Suggestions |
|---|---|---|
| Checkbox | Check or uncheck a box. | Use just one for a simple Yes/No response, or set up a series to track steps in a process. |
| Currency | Accepts numbers in the currency format that was set in your personal Profile. | Associate monetary value with a Project. Export the field with other data in a Grid view for further analysis. |
| Date | Use the date format that was set in your personal Profile. | Request Date, Hire Date, Contract Date, Renewal Date. |
| Item | Create a link between two plan items in your workspace, or link a plan item to a Member, Resource or Placeholder Profile. | Use this data field type when you want to associate two related items in your workspace without creating a scheduling dependency.
When Item Data Fields are used on a Member, Resource or Placeholder you can jump to the linked plan item from their Profile. |
| Item Multi | Same as above, except you can add multiple plan item links. | |
| Link | Link to any URL with an optional description. | Link to a URL outside your workspace like a website or sign in page. You can also link to one of your workspace Dashboards. |
| Link Multi | Add multiple URL links. | Great for linking out to documents stored in other locations. |
| Multi-line Text | Add more than one line of text to a textbox. | Helpful for writing paragraphs. |
| Note | Rich text editor, no character limits. Every workspace starts out with one Note field on the Edit Panel for Tasks, Sub-Folders, Projects and Packages. Add more as needed. | Enter information, instructions, images, and links. |
| Numeric | Uses the number format that was set in your personal Profile. | Job numbers and product codes are common uses for this data field.
Use this field type for Agile Story Points. |
| Picklist | A category with multiple values that are pre-defined. Users select a single value from a list when updating this field. | Create a Client field with values representing each business you serve. Use the field on Projects and Tasks to track work by client. |
| Picklist Multi | Same as above, except users are allowed to select multiple values. | Create a Request field with values representing options to fulfill the request, like a service menu. Use the field on a Project or Task.
Set up fields for Members to identify people by skill set, location, certification, or vendor affiliation. |
| Text | Accepts a single line of plain text, no wrapping, no character limit. | Teams use these fields to enter a weekly Project update or to identify risk that’s not schedule related (vendor relationship issues, budget concerns, etc.). |
| Text Multi | Accepts multiple single-lines of plain text. | |
| User | Associate the plan item with a workspace member by selecting their name from a drop down menu. | Create a User field called Project Manager or Project Owner and use it on a Project. When you set up a new project, select the person who will manage or own it. |
| User Multi | Same as above except you can select more than one member. |


