Customizable Cost Codes | Premium Feature
Location: Administration in the left-side navigation
| 1 |
Understand where time goes # |
Define your own Cost Codes and associate them with assignments and tracking. Cost Codes capture categories of work so you can understand where time goes. They can be specific like, design, coding, testing, or more broad like, administration, meetings, task work and unplanned work.
Cost Codes are enabled for all billing plans, including FREE. Customizable Cost Codes are a premium feature in the PROFESSIONAL and ULTIMATE Plans. Customizing includes creating new Cost Codes, editing Cost Code names, making them billable or non-billable.
This lesson is for Org Admins and Workspace Managers responsible for managing Cost Codes in your workspace. It covers general management applicable to all Organizations (including FREE) and customization for Organizations with premium tracking features which includes Timesheet Review & Export and Rate Sheets.
Have team members review the lesson about Using Cost Codes to learn about applying them when logging progress.
| 2 |
Cost Code Settings Table # |
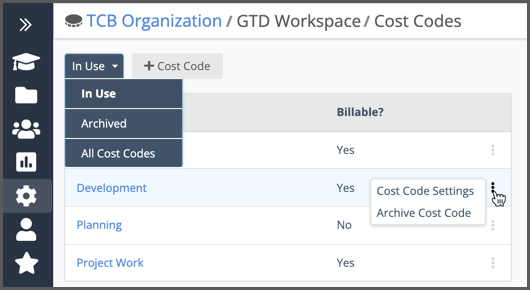
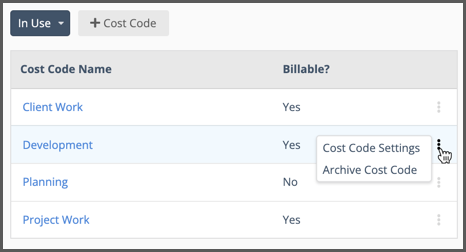
Cost Codes are under Administration in the left-side navigation. Anyone can view the table but only Org Admins and Workspace Managers on PROFESSIONAL and ULTIMATE Plans can create new codes, edit existing ones and designate them as billable or non-billable.
Here’s what you need to know about working in the table:
Drop down menu: Filter to see Cost Codes that are In Use, Archived or view All Cost Codes.
+Cost Code: Create a new code.
3-dot menu: Open Cost Code Settings or Archive Cost Code.
Cost Code Name: Clicking on a name also opens Cost Code Settings.
(Default): Identifies the Workspace Default Cost Code.
Cost Codes are listed in alphabetical order.
Creating Cost Codes, editing and designating them as billable or non-billable is disabled for Organizations on FREE and ESSENTIALS Plans.
| 3 |
Default Cost Codes & Requiring Cost Codes in Workspace Settings # |
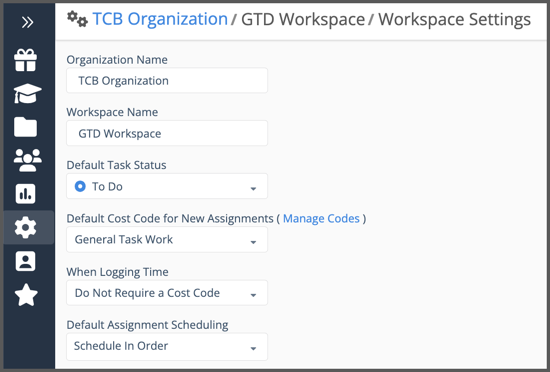
There are two settings that ensure Cost Codes are used when logging progress. Org Admins and Workspace Managers can edit them in Workspace Settings under Administration in the left-side navigation.
- Default Cost Code for New Assignments automatically adds the default Cost Code when new assignments are created. General Task Work is the default setting in a new workspace. It can be changed or set to None.
- Cost Codes can be required when tracking time by setting the field, When Logging Time to Require a Cost Code. When this is enabled members will not be able to log progress without a Cost Code.
| 4 |
Create Cost Codes # |
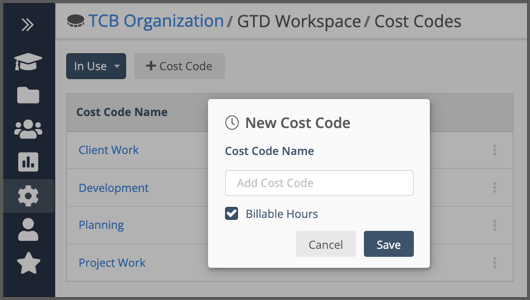
Use +Cost Code to create a new code and capture categories of work you’d like to measure. They can be specific like, design, coding, testing, or more broad like, project work, meetings, administration.
Cost Codes can be billable or non-billable. Uncheck the box to make it non-billable.
| 5 |
Cost Code Settings # |
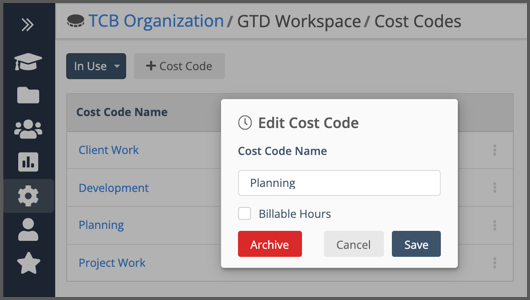
Click on a Cost Code or use the 3-dot menu on the table to open Cost Code Settings.
Cost Code Name: Editing the name changes it in real time throughout the workspace, including time tracking history.
Check or uncheck the box to change the setting for Billable Hours.
Archive saves changes and immediately moves the data field from In Use to Archived. Learn more about archiving in the next section.
| 6 |
Archive & Reactivate Cost Codes # |
Archive a Cost Code when you don’t need it anymore. Use the 3-dot menu to archive it or open Cost Code Settings and use the Archive button. Once a Cost Code is archived you can’t track time to it anymore.
Here’s what you can expect when Archiving:
Default Cost Code: Archiving is disabled. Set a new default under Workspace Settings and then archive.
Cost Code Table: The field moves from In Use to Archived. Change the table filter to Archived or All Cost Codes to see archived codes.
Hours Editor on the Task Edit Panel and Timesheet: The Cost Code field is cleared and the archived code can’t be selected anymore.
Time Tracking History: Tracking history is preserved and can be exported via Timesheet Export.
Reactivate a Cost Code
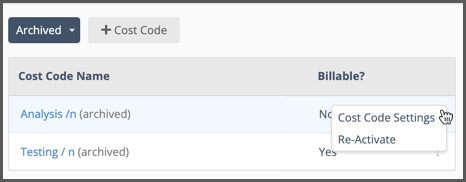
To reactivate an archived Cost Code, set the table filter to All Statuses or Archived, then use the 3-dot menu or click the cost code name to open Cost Code Settings and use the Re-Activate button (shown below).
Reactivating the code returns the status to In Use on the table and restores it in the Hours Editor so it can be selected again. If it was set as the default cost code for an assignment, it will become the default once again unless another one had been set to replace it.
Default cost code settings are covered in the lesson about Using Cost Codes.
Archived Cost Code Settings
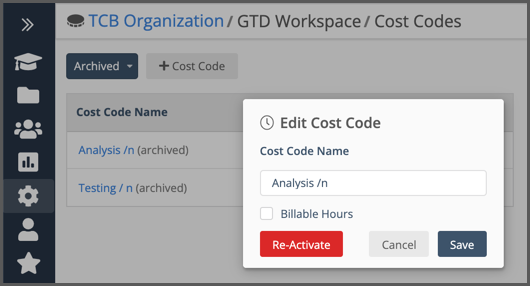
Archived codes can be edited in PROFESSIONAL and ULTIMATE workspaces. We recommend appending the name as in the example above. There are a few reasons for this.
- Cost code names need to be unique, and with this edit you can reuse the name later.
- It confirms that the field was archived intentionally and not by accident. You could have people add their initials so you know who archived it, or add something to indicate why it was archived (obsolete, created by mistake, old process, etc.).
- It’s easy to see which ones are archived when looking at time tracking history in the Hours Editor.
| 7 |
Hours Editor, Tracking History & Default Cost Codes for Assignments # |
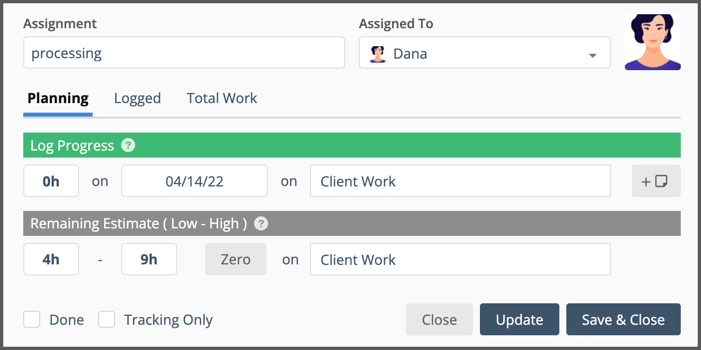
Cost Codes are associated with hours logged or remaining on Task Assignments. They can be updated in the Hours Editor under Planning (shown above). You can access the Hours Editor from the Task Edit Panel or the Timesheet.
The Default Cost Code is always displayed. If your workspace doesn’t require a default Cost Code, you may set one for the assignment by selecting a Cost Code for Remaining Estimate.
Override the default by selecting a different code when logging progress.
Change the default by selecting a different Cost Code for Remaining Estimate.
Time Tracking History
![]()
Switch over to Logged to see time tracking history by day, by Cost Code. In this example Analysis / n, which had been used in the past, is now archived.


