The Dashboards Library is the access point for viewing and creating Workspace Dashboards. To access the Dashboard Library go to Dashboards in the left-side navigation. Workspace Dashboards can include data from any Collection: SCHEDULED, PENDING, ARCHIVED and TEMPLATES.
| 1 |
Manage data for multiple projects and packages # |
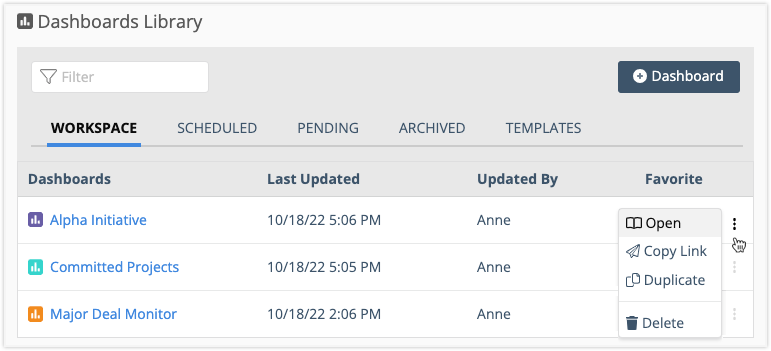
Members see Workspace Dashboards in the Library as long as they have Project Observer access or higher at the Workspace level. Workspace dashboards are listed in alphabetical order.
+Dashboard creates the Dashboard. Enter a name and select a color. Project Manager access in the Workspace is required in order to create a Workspace Dashboard.
Use the 3-Dot Menu to open a dashboard, copy the link, duplicate or delete it. Project Manager access in the Workspace is needed in order to duplicate or delete a Workspace Dashboard.
See the Dashboards lesson to learn about components that are common across all Dashboards: View Mode, Design Mode, Layout, Widgets, Widget Groups, Settings, Scope and Filtering. The Widgets & Groups lesson can help you decide how to display your data.
Other lessons in the Dashboards Course are: Dashboards Library, Package Dashboards, Project Dashboards.
| 2 |
Workspace Dashboard Scope & Filtering # |
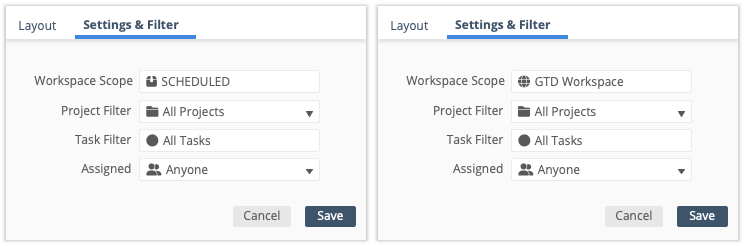
Scope sets the Dashboard’s boundaries. The default scope for a Workspace Dashboard is the SCHEDULED Collection (above, on the left). Scope can be changed to incorporate data from across the workspace. Changing scope to the Workspace would provide the greatest flexibility for designing a dashboard because Groups and Widgets could be scoped to different Collections, Packages, Projects and Sub-Folders.
![]() Scope needs attention displays when Groups or Widgets are accidentally scoped outside the Dashboard Scope. If you see this warning on a Workspace Dashboard, it may indicate that you should make a change. If you’re satisfied with the Dashboard Scope, then examine the Group and Widget Scope to correct the issue.
Scope needs attention displays when Groups or Widgets are accidentally scoped outside the Dashboard Scope. If you see this warning on a Workspace Dashboard, it may indicate that you should make a change. If you’re satisfied with the Dashboard Scope, then examine the Group and Widget Scope to correct the issue.
Filtering occurs within the Dashboard Scope. Setting Dashboard Filters is optional. Groups and Widgets inherit the Dashboard Scope and Filters. Filtering uses AND logic to identify items that meet all the Scope and Filter criteria. We recommend applying the broadest settings on the Dashboard and narrowing them down on the Group and Widget.
Scope and Filtering are located under Settings & Filter in Design Mode.
| 3 |
Sample Groups & Widgets on the Workspace Dashboard # |
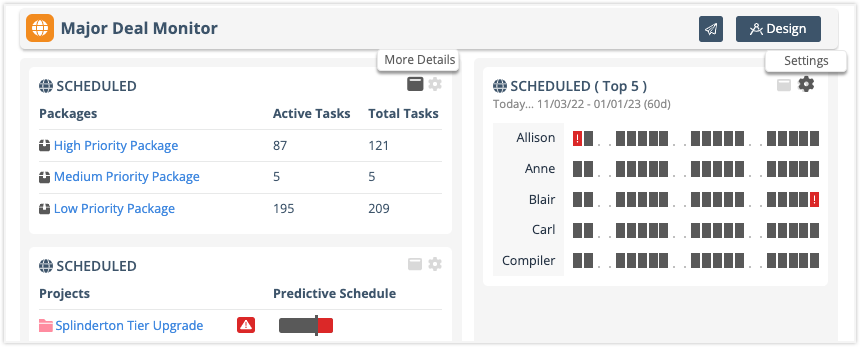
There are two sample Groups and three Widgets on a Workspace Dashboard. The widgets are Package List, Workload, and Project List.
Clicking More Details on the Widget performs the action defined in its Settings. It can expand into a View on the Dashboard, open a Plan Item Edit Panel or navigate to another View in the Workspace.
Project Managers can use Settings to edit widgets without leaving View Mode. For more extensive customization, go into Design Mode. Here are some things to try:
Add more Widgets and Groups or Duplicate existing ones and change the scope and filters.
Change what happens when More Details is clicked on Widgets that have On-Click Settings.
Adjust the Layout by dragging Widgets and Groups to new locations on the Dashboard.
Apply Filters to Groups, and to the Widgets that have Data Filter Settings.
Scope Groups or Widgets to Packages, Projects and Sub-Folders.
Read about the settings on sample Widgets and Groups in the Package Dashboard. . .
All the sample Widgets and Groups inherit the Dashboard Scope which is the SCHEDULED Collection. On the left side of the Dashboard, Group One has a Package List and a Project List widget. Group Two on the right has a Workload widget.
Each Groups has default filters: All Projects, All Tasks, Assigned to Anyone. The tables below show the widgets in each group, what they display on the Dashboard in View Mode, what happens when More Details is clicked and the Widget filters.
Clicking on the List Widgets in Group One opens Grid View in the Dashboard. Row Click for the Package List widget navigates to the Package Dashboard. Row Click in the Project List widget opens Project View.
| Group One Widgets | Column Display in View Mode | Sort By | Filters |
| Package List | Active Tasks, Total Tasks, Total Projects | Default (priority list order) | All Projects, All Tasks, Assigned to Anyone |
| Project List | Project Name, Predictive Schedule, Expected Finish, Target Finish | Default (priority list order) | All Projects, All Tasks, Assigned to Anyone |
| Group Two Widget | Display in View Mode | More Details | Filter |
| Workload | Top 5 Workspace Workload | Workload View expands on the Dashboard | Active Projects, Active Tasks, Assigned to Anyone |


