TEMPLATES is a Project Collection in LiquidPlanner. Access the TEMPLATES Collection by clicking Projects in the left-side navigation. Projects opens the Portfolio View for the SCHEDULED Collection. From there, click ALL in the location breadcrumb at the top of the page. Choose TEMPLATES when you reach the All Projects page.
| 1 |
Working in the TEMPLATES Collection # |
This lesson covers what you need to know about working in the TEMPLATES Collection:
 |
Hierarchy, Views and Packages Editing Sample Templates Creating Project Templates Adding Template Tasks Importing Tasks from Excel into a Project Template Customizing Project Template Dashboards Create a Project from a Template while in the TEMPLATES Collection |
There’s no scheduling or tracking in the TEMPLATES Collection. Scheduling begins when a project is created is from a Template and added to the SCHEDULED Collection.
The Academy Lesson about Project Templates, explains how to create projects from templates when you’re in SCHEDULED, PENDING or ARCHIVED Collections. It also covers updating projects to include schedule controls and member access features that are disabled in the Templates Collection.
Bulk Edit & and Move is a helpful lesson to review before working in the TEMPLATES Collection or creating Projects from Templates.
Read about navigating to the TEMPLATES Collection . . .
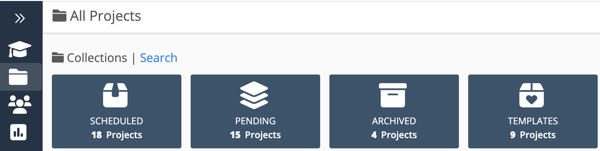
TEMPLATES are located on the All Projects page under Collections. Access this page by clicking Projects in the left-side navigation.
Projects opens the Portfolio View for the SCHEDULED Collection. From there, click ALL in the location breadcrumb at the top of the page. Choose TEMPLATES when you reach the All Projects page.
![]()
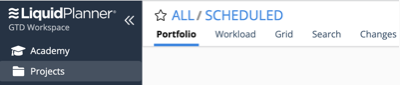
The location breadcrumb shows your current location. Click on items in the breadcrumb to navigate up the hierarchy. Use ALL to reach the All Projects page and change Collections.
| 2 |
TEMPLATES Collection Hierarchy, Views & Packages # |
The TEMPLATES Collection structure is similar to the SCHEDULED Collection. There are three levels of hierarchy, with a series of views at each level.
TEMPLATES Portfolio: Portfolio, Search and Changes
Package level: Package, Search and Changes
Project level: Project, Search, Changes and Dashboards
Portfolio and Package views are for adding custom Project Templates.
Project View is for adding tasks, estimating and assigning work. Project Templates have customizable Dashboards that carry over when the project is created in another Collection.
Search is location based, returning result for items within the Collection, Package or Project.
Changes retains history and deleted items up to 90 days for paid accounts and 30 days on the FREE Plan. Template changes aren’t carried over when the project is created in another collection.
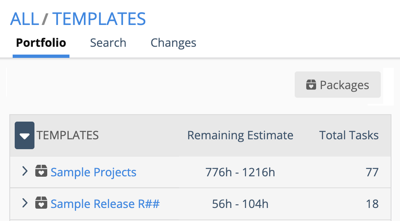
Every workspace starts out with two Packages in the TEMPLATES Collection, Sample Projects and Sample Release R##. The Packages and their Sample Project Templates can be edited or deleted. Click the toggle on the left of the Package to expand it and view the Projects inside.
Use the Packages button at the top of the TEMPLATES Portfolio to create new Packages, edit existing ones or change their order.
Read more to learn about editing and adding Packages in the TEMPLATES Collection. . .
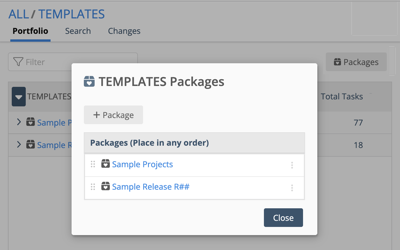
Clicking on the Packages button opens the Packages Modal. Use +Packages to add Packages. Change Package order by using the grab handles to drag them up or down the list. Packages can be placed in any order because priority based scheduling isn’t part of the TEMPLATES Collection. Use Packages to organize Templates in this view.
The 3-dot menu on the right side of each Package row has the following links:
Go to Package: jumps into the Package View
Package Settings: opens the Edit Panel to change the name, color or description, apply Custom Data fields and enter notes
Delete Package: sends it to the deleted items view in Changes
Member access: opens the Edit Panel Manage Access tab
| 3 |
Editing Sample Templates # |
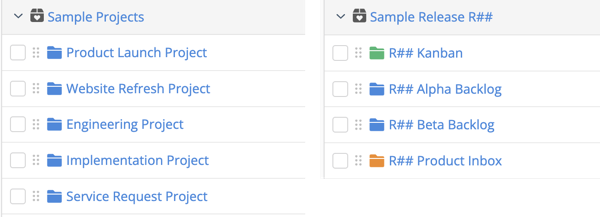
There are 9 sample templates that can be customized or deleted. Five are in the Sample Projects Package. The remaining projects are in the second package, Sample Release R## which is an example for agile teams based on LiquidPlanner’s release process. You can learn more about it at the end of the Package FAQ lesson in this track.
Bulk Edit Template Items
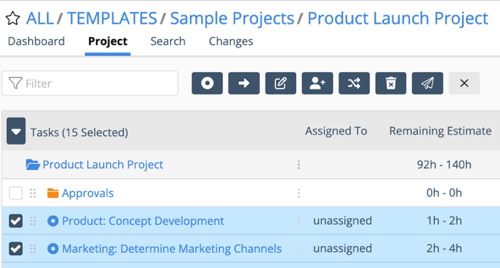
Edit plan items in the Sample Project by checking boxes to the left of the item name to engage the Bulk Editor and reveal the action buttons at the top of the view.
Use Swap Assignments to give “unassigned” work to your own members, resources or placeholders. See the Bulk Edit & and Move lesson for a deeper dive into plan item editing.
| 4 |
Creating Project Templates # |

The first step when creating a Template is adding a project folder to one of the Packages in the TEMPLATES Collection. Enter a name into the Add Project field and click the Add button. Use the drag bars to move the new Project Template folder up or down the list.
Once the folder is in place, right-click or use the 3-dot menu and select Edit Project to set Planning and Properties fields on the Project Edit Panel.
Read more to see what can be customized in the Project Edit Panel for the Template . . .
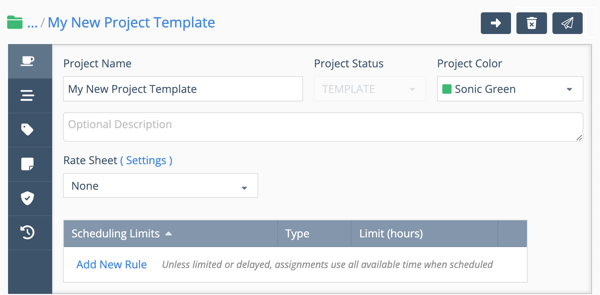
Settings on the Template’s Project Edit Panel carry over when the project is created in another Collection.
Planning: select a color for the project folder and enter the project description. Choose a Rate Sheet and set Scheduling Limits.
Properties: apply custom Data Fields. Custom Data Fields are available on the PROFESSIONAL and ULTIMATE PLANS.
Notes: enter project instructions or other information using rich text, images, and links.
Scheduling: Project Targets, Calculated Schedule, Insights and Dependencies are not available in the Templates Collection.
Member Access is not available on Templates. Keep in mind that access will be inherited from the Package you place your new project into.
Changes retains history and deleted items up to 90 days for paid accounts and 30 days on the FREE Plan. Template changes aren’t carried over when the project is created in another collection.
| 5 |
Add Tasks to your template # |
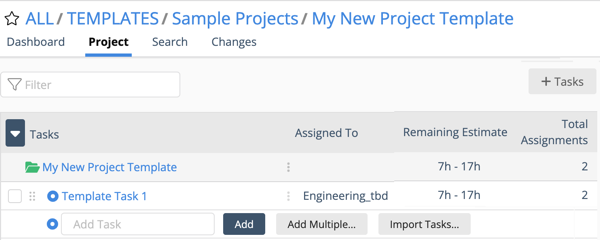
After the Template’s project folder is set up, it’s time to go into the Project View and add Tasks. When you’re in the TEMPLATES Portfolio or a Package View, simply click on the project name to enter the Project View. Enter your cursor into the Add Task field to reveal the Add button along with options to Add Multiple tasks and Import Tasks from Excel.
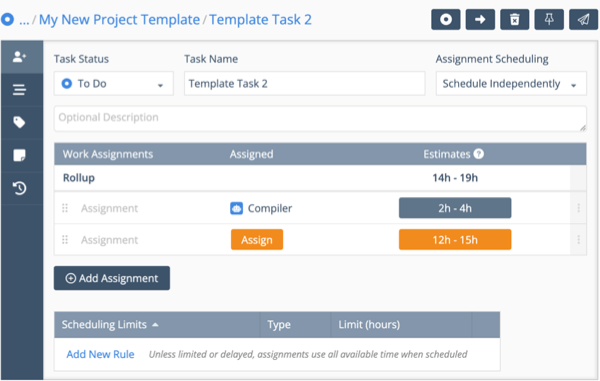
Enter a task name and use the Add button to create a single Task. Use Add Multiple, or the +Tasks button at the top of Project View and add up to 30 Tasks at a time under Bulk Add Tasks. Enter the task name, add the first assignment and estimate each task using a best case – worst case range. See the lesson about Tasks & Assignments to learn about adding Multiple Tasks.
Assigning work is optional
Assigning work in a Template is optional. These assignments won’t be a distraction for team members because template assignments don’t show up in Dashboards, My Work or Member views until after the project is added to the SCHEDULED Collection.
Using Placeholders or Resources to represent teams or skill types is another option for Template assignments. Use names like Engineering_tbd, Design_tbd to represent people who will be assigned later. Tasks can also remain unassigned by leaving the Assignments field blank. Later, when a project is created from a template, use Swap Assignments in the Bulk Editor to assign the right Member or Resource.
Read to learn more about the Edit Panel for Template Tasks . . .
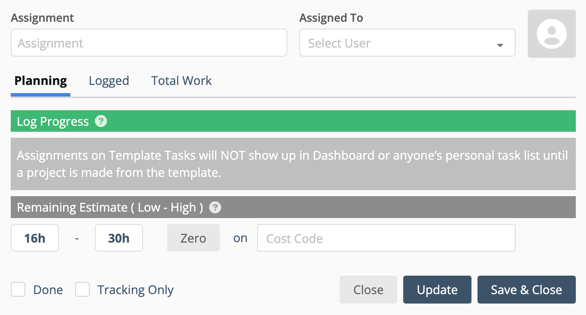
Click on a task name to open the Task Edit Panel. Settings Template Task carry over when the project is created in another collection.
Assignments: set the Task Status, Assignment Scheduling Order and Description. Add and estimate assignments. Assigning work in a template is optional. Apply Scheduling Limits if needed.
Scheduling: add dependencies to link items within the Project Template. Target dates and scheduling are disabled in the Templates Collection.
Properties: apply custom Data Fields. (Available on the PROFESSIONAL and ULTIMATE PLANS.)
Notes: enter task instructions or other information using rich text, images, and links.
Changes retains history and deleted items up to 90 days for paid accounts and 30 days on the FREE Plan. Template changes aren’t carried over when the project is created in another collection.
| 6 |
Import Tasks into your template # |
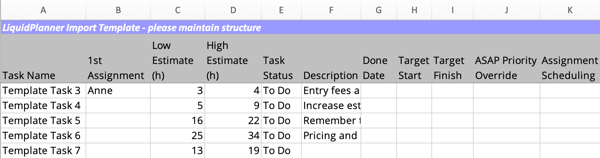
Importing tasks is a quick way to get up to 100 tasks into your Project Template. There are some differences to be aware of when Importing tasks into a Template. Several fields are ignored because tracking and scheduling aren’t supported in the TEMPLATES Collection.
These fields can be left blank: Done Date, Target Start, Target Finish, ASAP Priority Override, Assignment Scheduling.
When the 1st Assignment field is blank the task will be “unassigned” in the template after import.
Assignment Scheduling can be updated on the task edit panel after importing.
The lesson Import Tasks from Excel has everything you need to know about importing tasks.
| 7 |
Project Template Dashboards # |
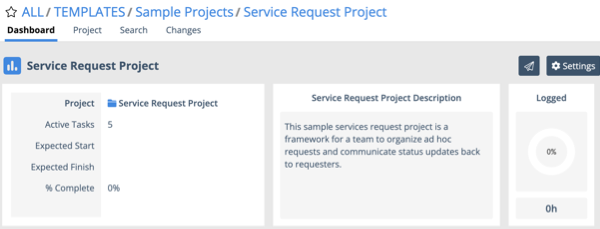
Template Projects have customizable dashboards that carry over when the project is created from the Template. Click on Settings to enter design mode and access the dashboard widget library.
Some widgets in the template dashboard are blank because scheduling, logging progress, and date settings are disabled within the Templates Collection. They’ll activate once the template is added to the SCHEDULED Collection and update in real time when the project is in motion.
| 8 |
Create a Project from a Template while in the TEMPLATES Collection # |
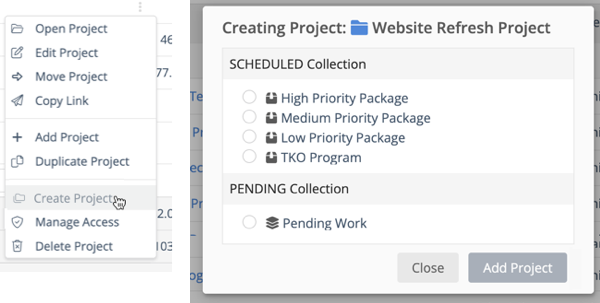
It’s possible to create a Project from a Template while you’re in the TEMPLATES Portfolio or one of the Packages. Use the right-click or 3-dot menu and choose Create Project. When the modal opens, select the Package and click Add Project. A new project is immediately added to the bottom of the project list in the selected Package.
Don’t forget to go into the new project to add Target Dates and update assignments. Organizations on the ULTIMATE Plan should also review Member Access.


