 Say hello to the new Tempo! LiquidPlanner is now Portfolio Manager.
 Administration in the left-side navigation is where Organization Administrators manage billing, upgrades and licensing. Workspace Managers come here to customize workspace settings and data, configure integrations and API access.
| 1 |
Administration Hub # |
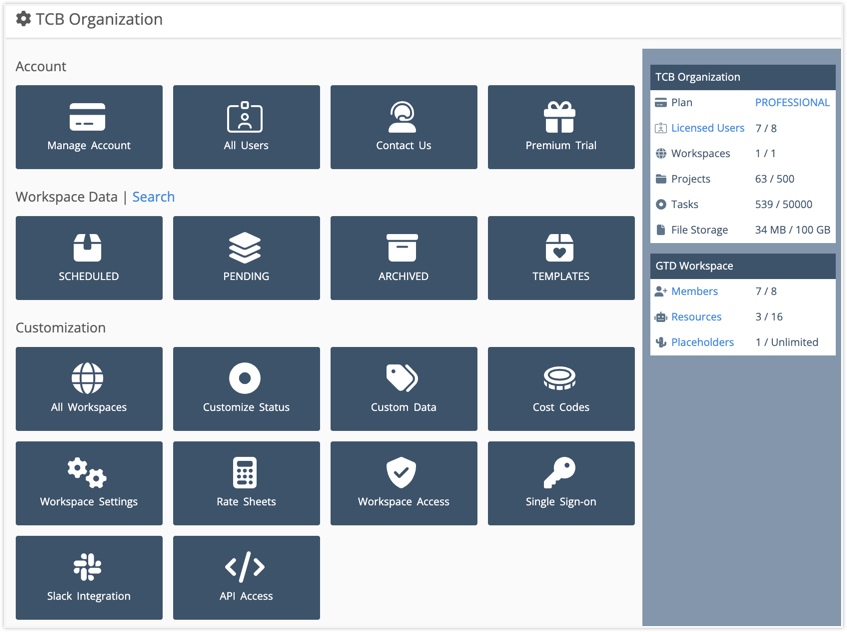
Administration is divided into three sections: Account, Workspace Data and Customization. Click on a tile to access it’s settings or data. Tiles are grayed out when you don’t have sufficient access privileges. The usage meter on the right shows how you’re tracking against plan limits.
Read more about the usage meter . . .
Organization Usage Meter
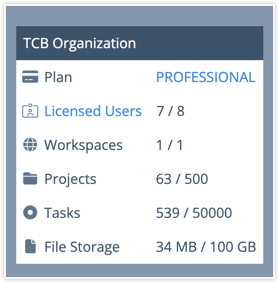
Your billing plan is listed first. Clicking the link opens the Manage Account page.
Licensed Users shows the number of licenses being used, compared to the number purchased for the Organization. Clicking Licensed Users navigates to All Users.
Organizations on the ULTIMATE Plan can have more than one workspace.
File Storage isn’t offered on the free plan.
Workspace metering
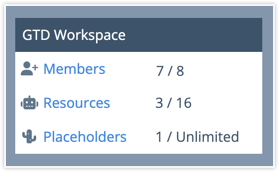
This section displays the number of Members, Resources and Placeholders in your Workspace. The links take you to their profiles under People in the left-side navigation.
On the ULTIMATE Plan, members can belong to more than one workspace without buying additional licenses. Each workspace has two Resources for every user license in the Organization. Placeholders are free.
| 2 |
Account: Manage Billing & Users # |
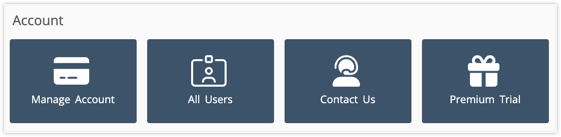
In the Account section, Manage Account and All Users can only be accessed by Organization Administrators.
Manage Account displays for paid plans. Upgrade Account displays for Organizations in an ULTIMATE TRIAL or on the FREE Plan. This is where you choose your billing plan and subscription terms, add or remove licenses and upgrade or downgrade your plan. Upgrading takes place immediately. Downgrading occurs at the next renewal date. To cancel, downgrade to a FREE Plan.
All Users lists everyone in the Organization. It has views for Licensed Users, Organization Administrators, Disconnected Users and Pending Invitations. We recommend having more than one Organization Administrator for your account.
Contact Us opens a calendar to schedule time with a Product Advisor.
Premium Trial displays for Organizations on the FREE, ESSENTIALS and PROFESSIONAL Plans. A Premium Trial gives you access to features not available on your current billing plan for 7 days.
| 3 |
Workspace Data & Search # |

Project Collections organize your work. Clicking a tile takes you to that Collection’s Portfolio View. Workspace Search is accessible from the link in the section heading. Learn more about this feature in the lesson about Search View.
The SCHEDULED Collection provides visibility for your organization’s top priorities. This is where your team spends their day – focused on their most important tasks.
Use the PENDING Collection for work you’re not ready to tackle yet or as a staging area to build out projects before moving them to SCHEDULED.
Your TEMPLATES Collection holds repeatable projects and tasks. If you are in SCHEDULED, PENDING or ARCHIVED Collections you can access templates from Portfolio and Package views. Templates can also be linked to Intake Forms.
Move projects to the ARCHIVED Collection when you no longer need them in SCHEDULED, PENDING or TEMPLATES. Archiving preserves tracking history and estimates.
| 4 |
Customization & Premium Features # |
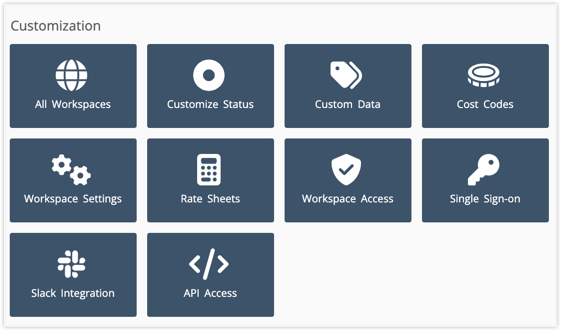
Workspace Managers and Organization Administrators have many customizable features to choose from in LiquidPlanner. Their availability is based on the Organization’s billing plan. If you’re curious about a feature, you can view the Academy lesson, start a Premium Trial or Contact Us and talk to a Product Advisor.
These customizations apply to all billing plans:
Customize Status incorporates your own terminology and workflows into task management, communicating the process Tasks go through from initiation to finish.
Workspace Settings include the Organization and Workspace Names, Default Task Status, Default Cost Code, along with rules for applying Cost Codes, Assignment Scheduling and File Upload. Workspace Settings are explained at the end of this lesson.
These are the lessons you should see to learn more: Customize Task Status, Custom Data Settings, Customizable Cost Codes, Customizing Rate Sheets, Single Sign-on, Slack Integration, API Access, Upload Files.
See a summary of Premium Features managed under Administration . . .
All Workspaces takes you to the page listing all the Workspaces associated with your Organization. Clicking on an workspace tile takes you into the Scheduled Portfolio view for that Workspace.
Custom Data defines your own data to attach to projects, tasks and users to categorize and track in any dimension you like. There are a wide variety of data field types to choose from such as dates, text, URL links, picklists, currency, and checklists.
Cost Codes are associated with assignments and tracked hours. They can be specific like, design, coding, testing, or more broad like, project work, meetings, administration. You can create Billable and Non-Billable Cost Codes.
Rate Sheets establish Project billing rules that calculate how time is billed, based on the Cost Codes applied when tracking time. Use them to track and forecast billing.
Workspace Access models are Basic and Advanced. With Basic, members in FREE, Essentials and Professional Plans get one access role for the whole workspace. Advanced access controls are part of the Ultimate Plan. With Advanced access control you can choose what members see and do by Package, Project and Group.
Slack Integration instantly notifies you about task updates and new assignments.
Single Sign-on can be configured by Organizations on the Ultimate Plan. LiquidPlanner supports SAML 2.0 (Security Assertion Markup Language), which allows the use of SSO through enterprise identity providers such as Active Directory and LDAP.
API Access enables you to retrieve data and build integrations with other teams your team uses. API is an Ultimate only feature.
| 5 |
Update Workspace Settings # |
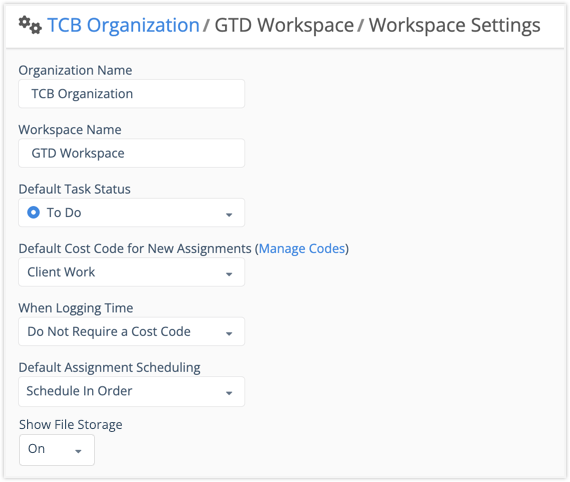
Organization is your account name. It’s picked up from the Company field on the LiquidPlanner account signup form. Organization Administrators can edit this field. Other settings on this page can be updated by either Org Admins or Workspace Managers.
Workspace Name is also picked up from the company field. Very often people change this to reflect their division, department, team or functional area.
Default Task Status is the status applied when a task is created. We start you out with a short status list that you can modify to suit your needs.
Default Cost Code for New Assignments sets the Cost Code to apply when new assignments are created. General Task Work is the default Cost Code in a new workspace. It can be changed or set to None.
When Logging Time stipulates whether or not a Cost Code is required when tracking time. When Require a Cost Code is set here members will not be able to log progress without a Cost Code.
Default Assignment Scheduling indicates whether multiple assignments on the same task should be scheduled independently or in order. In Order is the recommended default.
Show File Storage controls whether or not files can be uploaded on plan items.
“On” is the default setting.
“Off” hides the Edit Panel Files tab and any attached files. Files are not deleted and can be retrieved when the feature is turned on again.
File storage is not offered on the FREE Plan. The Files tab is displayed along with a link to start a Premium Feature Trial. Use the Off setting to hide the tab.


